
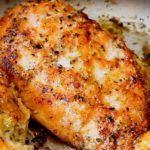
Easy Pan-Seared Chicken Breasts have a crunchy crust and lots of flavor from Italian seasoning! This easy chicken recipe turns out excellent every single time!
Easy pan-seared chicken breasts is one of my favorite ways to make chicken. You pan fry chicken right in the skillet. So that you can enjoy crunchy crust and lots of flavor! It’s an excellent way to cook boneless and skinless chicken breasts when you are short on time.
How to Make Easy Pan-Seared Chicken Breasts
To make this pan seared chicken, make sure to use thin boneless skinless chicken breasts. You can easily dredge them in the flour mixture. Another selling point is since they are flatter, they retain the coating better. By the way, I also used thin chicken breasts in this Parmesan Crusted Chicken recipe.
Besides, boneless chicken breasts are so easy to find! They are also low in fat and high in protein. So perfect!
To dredge chicken breasts, you will use all purpose unbleached flour. By the way, flour is one of the best coatings for frying or searing chicken. And it always produces nice and smooth coating.
How about whole wheat flour for dredging? Of course, you can use whole wheat flour, too. Whole wheat flour is very flavorful and will taste slightly different.
To Make Pan-Seared Chicken Gluten Free
- Use rice flour to get a beautiful golden crust on your chicken.
- Other mild-flavored flours that also work well include: specialty gluten-free flour mixes, corn flour and potato starch flour.
- Or, if you are able to tolerate nut flours, almond flour works great for coating and pan searing chicken. It also gives it a beautiful color.
I also have instructions on searing thick chicken breasts where I don’t use flour at all. In fact, you can compare and see how different the process is when chicken is thicker: How to sear thick chicken breasts.
How to Coat the Chicken Breasts
First, paper towel dry the chicken. Next, in a large bowl, combine flour, sea salt, black pepper, garlic powder, onion powder and Italian seasoning. Immediately stir well to blend.
Then, using a fork or tongs, coat the chicken breasts in the flour mixture and set aside. The reason why we want to dredge chicken in flour is simple! It’s because we want to make chicken’s surface attain a more attractive brown color. And we also want to get some crisp on the outside.
Additionally, you can also coat the chicken by tossing it with the flour. Use either a plastic bag, a paper bag or a plastic container with a lid.
Or, you can sprinkle the flour onto a plate. Then roll the chicken breasts around in it, while pressing it into the flour.
Searing Chicken Breasts
This easy pan seared chicken recipe produces a lovely crisp coating. It’s not the least bit heavy. What you really taste is the chicken, not the coating. And that’s how it should be. The coating is just barely there to complement the food.
- First things first, you will heat 2 tablespoons of olive oil in a large skillet over medium-high heat.
- Once the skillet is hot, you will place flour coated chicken breasts in the skillet.
- Next you will sear chicken breasts them for 4 to 5 minutes on each side. They should turn golden brown in color on both sides.
- Finally, I recommend to turn them only once between cooking. And the total cooking time should not exceed 8-10 minutes.
What Kind of Skillet to Use
I recommend using a good quality stainless steel pan, such as this 12 inch pan that comes with a lid. Or, you can also pan sear chicken in a large cast iron skillet, such as this 12 inch cast iron pan.
Both hold heat incredibly well and are easy to cook with. I cooked most of the recipes on this site with one of these two skillets.
Hungry for more chicken recipes?
- Skillet Chicken in Mushroom Sauce
- Herb Roasted Chicken in Creamy White Wine Sauce
- Chicken in Mustard and Wine Sauce
Easy Pan-Seared Chicken Breasts
Ingredients
- 4 chicken breasts, (thin, boneless and skinless)
- ½ cup flour
- 1 teaspoon sea salt
- ¼ teaspoon black pepper
- 1 teaspoon garlic powder
- 1 teaspoon onion powder
- 2 teaspoons Italian seasoning
- 2 tablespoons olive oil
Instructions
- Paper towel dry your thin chicken breasts (if you bought thick ones, make sure to butterfly each one). In a large bowl, combine flour, salt, black pepper, garlic powder, onion powder and Italian Seasoning. Stir well to blend.
- Using a fork or tongs, coat the chicken breasts in the flour mixture and set aside.
- Heat 2 tablespoons of olive oil in a large skillet over medium-high heat. Once the skillet is hot, place flour coated chicken breasts in the skillet and cook for 4 to 5 minutes on each side, until golden brown on both sides and cooked through, turning once between cooking, about 8-10 minutes.
- Remove chicken from pan and serve warm with pasta or vegetables.
Nutritional information is provided as a courtesy only. This information comes from online calculators. Although whatsinthepan.com attempts to provide accurate nutritional information, these figures are only estimates.
Our new favorite chicken recipes include this Cajun Chicken and Sausage Penne Pasta dish.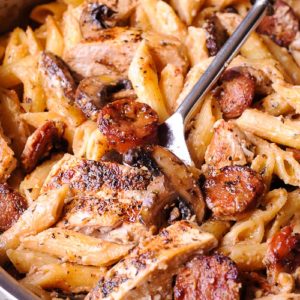
Additionally, we also like this amazing Chicken Spinach and Bacon Alfredo Pasta. In fact both recipes are perfect for midweek dinners!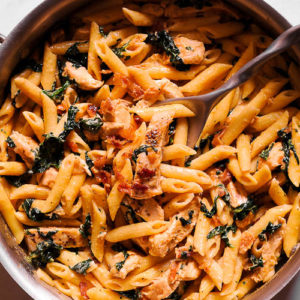
Followed as directed. I also added chicken gravy to the pan while chicken rested. Made mashed potatoes for the side.Came out perfect! Will be adding to my weekly meal plan.
Yeeees! So glad it will be part of your weekly meal plan!
Sounds delious can not wait to make it.
I used almond flour, butter instead of oil and pounded my chicken a bit before cooking. It came out delicious. Took about 10 min on one side, flipped and put the lid on and cooked for 10 more minutes.
Great idea on almond flour! I love it on chicken myself!
Family loved this–we used gf tapioca starch to coat and finished it up in the airfryer (as I didn’t think it would cook through in the pan).
I like thin sliced chicken breasts for the ease of cooking even tho I don’t cook a lot I’m getting there. The chicken was good and moist thanks to using an insta read thermometer. The recipe was easy to follow, next time I’m playing with the spices maybe add a little red pepper flakes. Thanks for sharing this simple and delicious recipe.
That’s so great to hear Tim!
What if I have more chicken then will fit in the pan? Can I use the same oil & pan multiple times? I like to prep a lot at once of the whole week!
Yes, of course – I do it all the time.
Drying and coating the cutlet made all the difference. Thank you so kindly, good author. This will become a regular staple. You have given me a treasure.
Thank you Ken! You are very kind!
Once you’ve cooked the chicken cover it with foil and let it rest. Any uncooked chicken will cook in this process. Make sure the heat is turned off.
Good tip! Thank you Kevin.
Loved this except my chicken wasnt throughly cooked thru 🙁
I seem to have that problem maybe I’m not flattening them enough!
I’m glad you liked it! I usually put a lid on and keep it on low heat for a bit if it’s not cooked through. Just a little bit, it won’t affect the crisp.
One of the Best tools I ever bought was a cooking thermometer! When it reads 165 I know it’s safe to eat- no more guessing! 🙂
We make this on weeknights now! our go to chicken recipe.