
No Bake Chocolate Dessert is easy to make using pre-made Oreo crust, Cool Whip, instant Jell-O chocolate pudding and half-n-half. This is an easy recipe that is ready in under 30-minutes. Kids love it and so do the adults. No oven time is required!
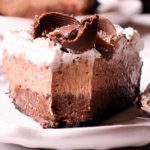
This double chocolate layer pie is topped with delicious chocolate shavings. I made out of Hershey’s milk chocolate and grated dark chocolate! Unlike my No Bake Oreo Dessert, where I crushed Oreos to make the crust, here I use premade Oreo crust. It is thin, not labor intensive at all, and cuts nicely. Perfect for hot summer months without turning your oven on!
I made both chocolate layers of this layered cake with chocolate pudding and half-n-half. But the look different. The bottom layer is darker, while the middle one is lighter. The lighter layer is made by combining cool Whip with the chocolate pudding layer.

TOOLS YOU WILL NEED TO MAKE NO BAKE DESSERT
You will need a whisk to make pudding, such as this stainless steel comfortable grip whisk.
Spatula will help you to spread the layers. While you will use Vegetable peeler for chocolate decoration on top, such as this serrated swivel peeler. I also used Medium bowl such as one of these non-slip stainless steel bowls that come with lids.


Ingredients to Make No Bake Chocolate Pudding Cream Pie
- Pre-made Oreo Pie crust
- Half and half (2 cups)
- Chocolate Instant Pudding (2 packages) – make sure it’s INSTANT, this no bake dessert won’t work with the pudding that you cook on the stove top. I used Jell-O chocolate pudding
- Cool Whip (1 package)
- Hershey’s milk chocolate bar for chocolate shavings to top the pie
- Dark chocolate for chocolate dust

Why Make No Bake Double Chocolate Layer Cream Pie
- It’s easy and quick to make. You can use it for potlucks, church gatherings and birthdays, especially during hot summer months.
- You can make it ahead ahead: freeze it or refrigerate it!
- No need to turn your oven on. It’s perfect for those warm months when you want to keep the house cool.
- Kids love Oreo crust and the chocolate layers!
How to make chocolate pudding mix for this no bake chocolate dessert
Please ignore the instructions on the label of the pudding mix. My Instant Chocolate Pudding Mix – Jell-O package called for 2 cups of milk per box of pudding mix. This would make it 4 cups for both boxes. But we are not going to be adding this much liquid at all. In this recipe, we add a total of 2 cups of half and half to two packages of Instant Chocolate Jell-O pudding mix. Each package is 3.4 oz.
Using half and half instead of milk will add more fat into the mixture. It will also make the pudding structure firmer and more stable. That’s exactly what we need for the layers to be nice and distinct. Using half and half will also help create a nice thick bottom layer and very soft smooth middle layer.

REFRIGERATE EASY NO BAKE CHOCOLATE PUDDING CREAM PIE
To make it easier to divide and cut, make sure to refrigerate the pie for at least 4 hours or overnight.
A quick method to make the layers firm is to put it in the freezer for 1 to 2 hours. At this point the pudding won’t freeze yet, but it will be solid enough for you to divide it easily.
Step by Step Photo Directions
Take pie crust out of package, but make sure to keep it inside the foil. Do not turn it upside down or attempt to take it out. Or, it will get crumbled and destroyed. The crust is very crumbly. Be careful.

Add half and half to the medium bowl. Then add both packages of instant chocolate pudding. Using a whisk, mix for 2 minutes until all mix is dissolved. Allow the pudding to sit in the fridge or freezer for 5 more minutes so that it thickens. Once the pudding is thick, take about ½ of the chocolate pudding mixture and spread it as a first layer. You will mix the remaining pudding will be mixed with Cool Whip to form the second layer.
 Work with the spatula to even out the first layer
 Add ½ of the Cool Whip package to the remaining ½ of the chocolate pudding in the bowl.
 Whisk it together or use a spatula to form a uniform mixture for the second layer.
 Add this Chocolate Pudding/Cool Whip mixture on top of the first layer. This layer is much smoother and lighter than the first chocolate layer.
 Spread Chocolate Pudding/Cool Whip layer with a spatula to even it out:
 Add remaining Cool Whip on top of the second layer. Work with a spatula to spread it. I used short circular motions with my spatula to create the spikes:
 Prepare vegetable peeler, Hershey’s milk chocolate bar and dark chocolate. You will now make chocolate shavings for the topping. I used vegetable peeler with the serrated stainless steel blade, to create textured chocolate shavings.
 Using a vegetable peeler, it’s easy to shave decorative chocolate shavings right over the Cool Whip to decorate this no bake dessert. The long strips are from Hershey’s milk chocolate while the finer dust is from grated dark chocolate. I used same peeler to make both.
Make sure to get a good amount of chocolate shavings as well as some chocolate dust.

This Easy No Bake Chocolate Cream Pie is done! Make sure to refrigerate it at least 4 hours (preferably over night). You can also freeze it for at least 1 hour before attempting to cut it!
No Bake Chocolate Pudding Cream Pie
Ingredients
- 1 Oreo pie crust
- 2 boxes instant chocolate pudding, 3.4 oz each (such as Jell-O)
- 2 cups half and half, (or half cream/half milk)
- 8 oz. Cool Whip, (1 package) thawed
- 1 milk chocolate bar, (such as Hershey's)
- dark chocolate, (for garnish)
Instructions
- Take pie crust out of package and keep it inside the foil. Do not turn it upside down or attempt to take it out - it will get crumbled and destroyed
Prepare Chocolate Pudding
- Combine dry pudding mixes and half & half in a mixing bowl. Using a whisk, mix for 2 minutes, until the instant pudding mix is dissolved. Allow the pudding to sit in the fridge or freezer for 5 more minutes so that it thickens.
First Layer
- Take about half of the chocolate pudding mixture and add it into the bottom of the pie crust. Using a spatula, spread it evenly.
Second Layer
- Add ½ of the Cool Whip package to the remaining half of the chocolate pudding in the bowl and mix together with a spatula to form a uniform mixture.Add this chocolate pudding/Cool Whip mixture on top of the first layer. Use a spatula to even it out.
Cool Whip Layer
- Add remaining Cool Whip on top. Spread the Cool Whip on top of the second layer with a spatula. I used circular motions with my spatulato create the spikes
- Using a vegetable peeler, shave decorative chocolate shavings out of Hershey's milk chocolate right over the Cool Whip. And then using same peeler, grate some dark chocolate over the top as well.
Refrigerate before slicing
- Refrigerate the cake for at least 4 hours or preferably overnight before attempting to slice it! You can also freeze it for at least 1 hour. This step is necessary for the layers to set and become firm.
Nutritional information is provided as a courtesy only. This information comes from online calculators. Although whatsinthepan.com attempts to provide accurate nutritional information, these figures are only estimates.
But wait, there are even more delicious no bake desserts waiting for you!
No Bake Oreo Dessert with Cream Cheese, Cool Whip and Chocolate Pudding

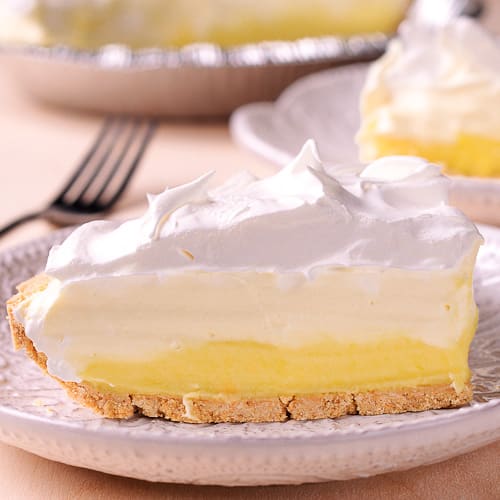
No Bake Lemon Pudding Cream Pie
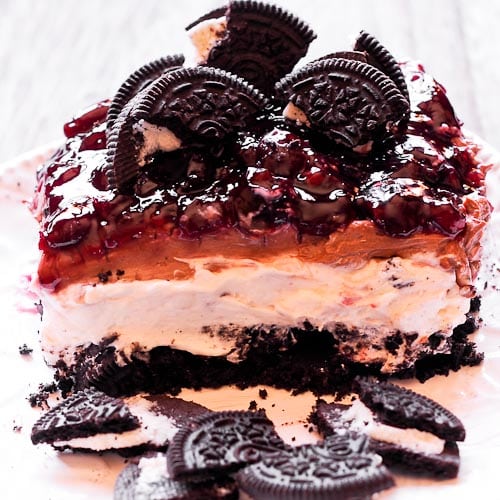
and delicious No Bake Black Forrest Cheesecake
I made this for my boyfriend and we love it!!! I used chocolate stuffed oreos for the crust. 24 Oreos mashed in a plastic bag then added 4 Tbsp melted butter to them. To get it down on the pan nicely i used the bottom of a glass wrapped in parchment paper to press it and put the pan in the freezer while completing the recipe. My pan was 9×13 so I used 3 boxes of pudding and 2 cups half n half, one cup whole milk…it was so thick I added another half cup whole milk. It was still very firm after refrigerating overnight and freezing one hour. I’ll make this for my family on Christmas! It’s wonderful! Thank you for the recipe!
Looks like you nailed Angela! Your boyfriend is very lucky!
The first layer was so thick it couldn’t be spread with a spatula and the crust was completely destroyed in the process of trying to spread it. I used 2 cups of half and half but should have used three. I woubd up mixing the whole thing together and calling it chocolate mousse pudding, but even with the whole container of Cool Whop added, it was so thick it was almost chewy. Big mess!
Maybe it’s the type of pudding used? Which brand was it?
This is literally the best chocolate cream pie I’ve ever made, and I’m a beginner, that’s how easy it is! I used a graham cracker crust. Everyone LOVED it! Definitely going down as my go-to chocolate pie recipe from now on out. Highly recommend!!
That’s fantastic! Thank you so much for such a great review!
This looks yummy! Can I use dairy free half and half? Thank you for posting😀
It won’t work the same way, especially if its soy – the pudding will be too runny and thin. Definitely do not use anything soy based. Rice or almond milk would work but you would use half or less that amount to thicken. And that won’t be enough to fill out the pie crust. You will have to increase the amount of jello packages by decreasing the amount of liquid.
Love your recipe for its visual, comprehensive, and detailed properties… I think even my 5 year-old grandnieces or grandnephew can successfully follow it…Thank you for such great recipe and instruction
Thank you Maria. That is such a great compliment!
This is soooo good!! I used heavy whipping cream that I had leftover from making coconut cream. It was as too thick & kept adding milk to smooth mix out! Next time I’ll use half & half just b’cuz it should be easier to mix.
Agreed about half and half!
Also good made with sugar free pudding mix. My family didn’t know I used sugar free
Don’t refrigerate the chocolate bar. It won’t curl. Husband loved how light and airy it was. I’m not a big fan of chocolate, and I liked it.
I’m so glad you liked it Tanya! We loved it too. And I like your tip about chocolate bar.
I made it for my kiddos and they keep asking to make more. Thank you for such a good recipe and easy instructions!
Thank you so much for coming back!
This was sooo delicious!! I will be making this again