
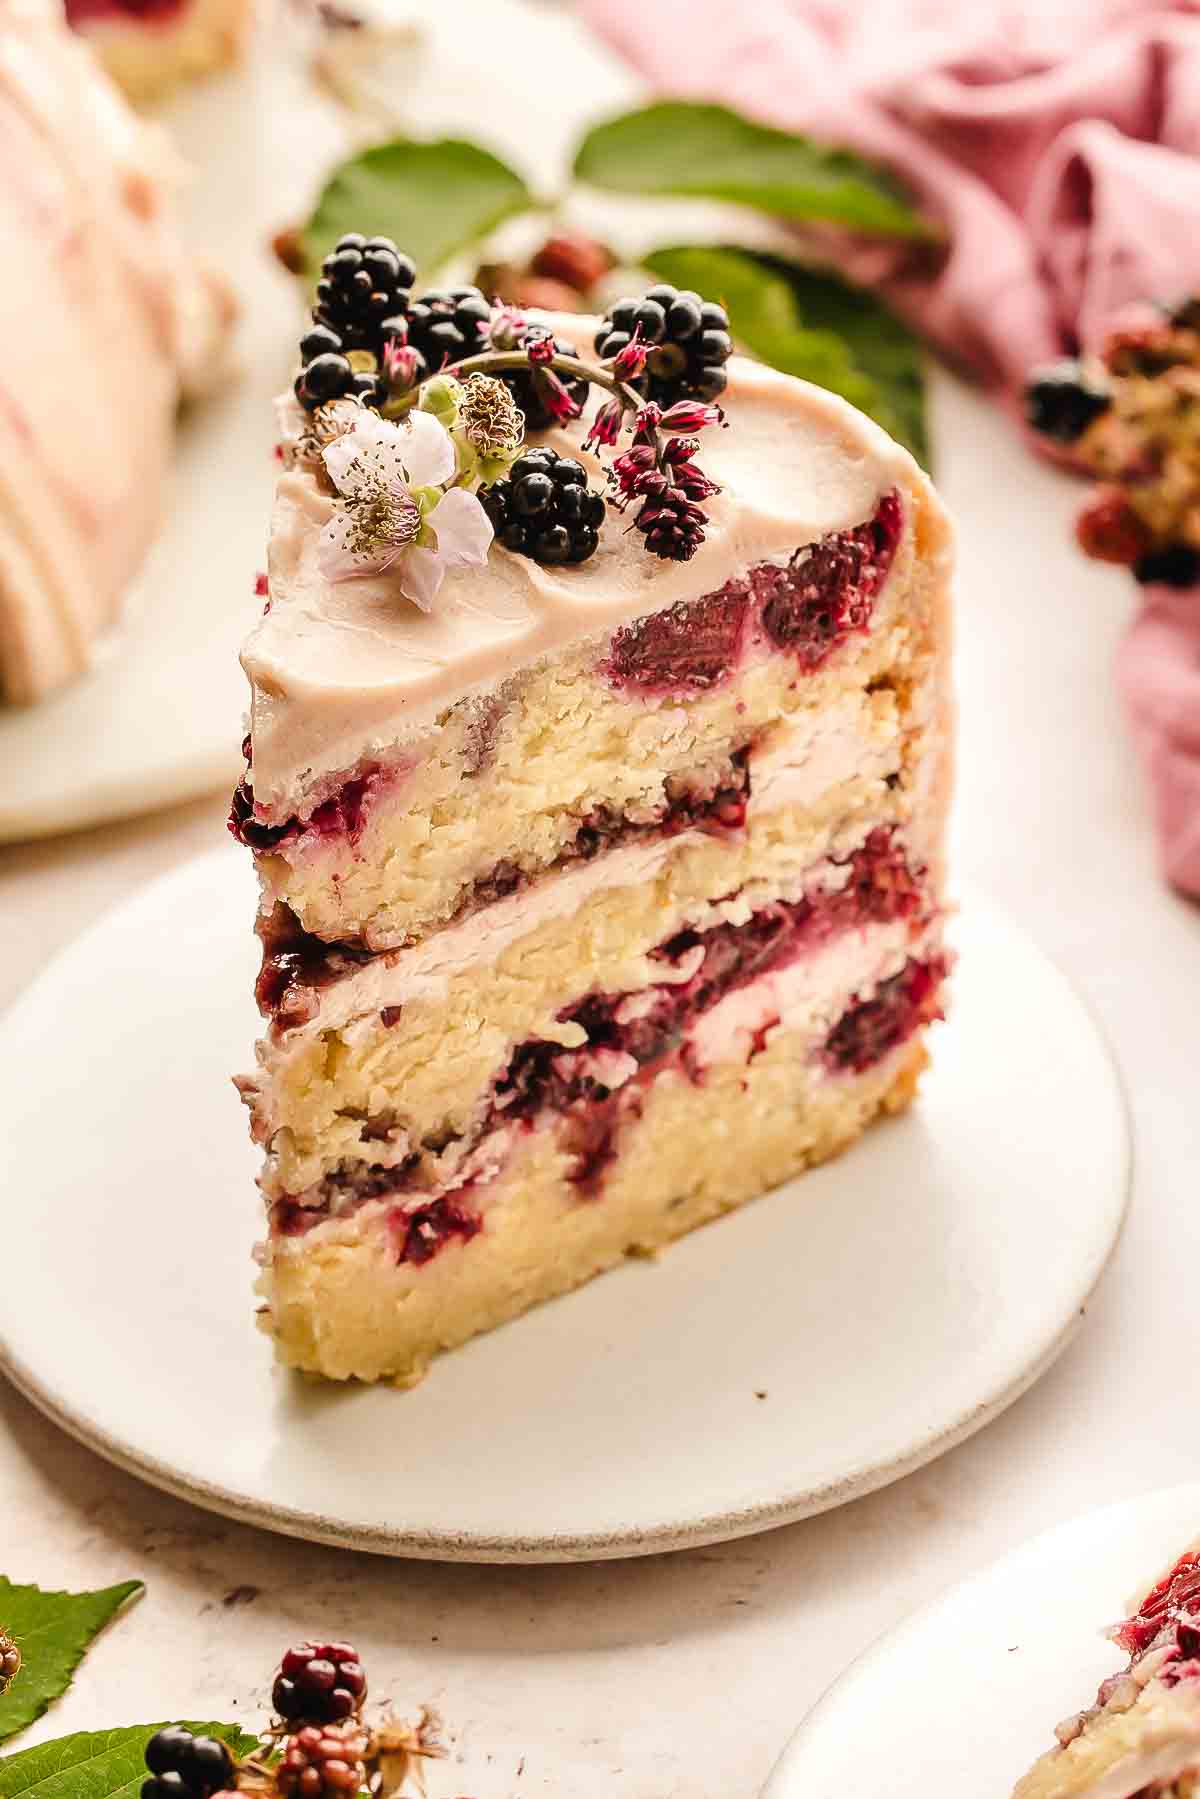
This blackberry layer cake gets its marbled look from blackberry jam streaked into the buttercream outside, and the same jam tucked inside each layer behind a piped buttercream ring. I bake three layers in 8-inch pans, fold flour-coated berries into the batter, and chill the cake before slicing for clean cuts. About 3 hours start to finish.

I fold fresh blackberries picked from my back yard straight into buttermilk vanilla cake batter for this one, tossed first in a spoonful of flour so they stay suspended through baking instead of sinking to the bottom of the pan. Each layer gets a thin ring of blackberry jam, held in place by a piped buttercream dam so it doesn't squeeze out once the cake is stacked and sliced. The outside gets the same treatment in reverse: blackberry buttercream first, then streaks of jam smoothed on top for a watercolor look.
Don't panic if the batter looks curdled the moment the buttermilk goes in - I see this every time I make it, and it always smooths back out once the last bit of flour is mixed through. The cake layers can be baked a full day ahead, wrapped, and left at room temperature, so the whole thing comes together in stages if you're making it for a birthday, bridal shower, or Mother's Day.
Blackberry Layer Cake Overview
- 🫐 Fold flour-coated fresh blackberries into buttermilk vanilla cake batter so they stay suspended, not sunk, through baking
- 🍰 Bake three 8-inch layers, then cool completely before filling and stacking
- 🧱 Pipe a buttercream dam around each layer to hold a thin ribbon of blackberry jam in place
- 🎨 Finish the outside in blackberry buttercream, then streak on jam and drag it into soft marbled swirls
- ❄️ Chill the assembled cake before slicing for clean, defined layers
- 🗓️ Make-ahead friendly: bake the layers a full day in advance and assemble when you're ready
- 🌸 Top with fresh blackberries and edible flowers for a finished, occasion-ready look
Why This Cake Works
Why the Blackberries Get Coated in Flour
Here's the thing: it's not the flour "catching" the berries like a net, even though that's how it sounds. The flour soaks up a little surface moisture from the blackberries and adds just enough grip against the batter around them. That tiny bit of friction is what slows them down as the batter sets in the oven, so they hang suspended through the layer instead of dropping to the bottom while it bakes.
Why the Batter Looks Curdled (And Why That's Fine)
I know it looks like something's gone wrong the second the buttermilk hits the batter. It hasn't. Butter, sugar, and eggs form a smooth emulsion on their own, and buttermilk is cold and acidic enough to knock that emulsion apart for a minute. You'll see little flecks and a broken, grainy look, and that's just physics doing its thing, not a sign to start over. Once the last of the flour goes in, the starch soaks up the extra liquid and pulls everything back into one smooth batter. I mix straight through it every time without stopping.
Why the Buttercream Dam Matters
Once you stack three heavy cake layers on top of each other, there's real weight pressing down on whatever's underneath, including the thin layer of jam in the middle. Without something holding that jam in, it gets pushed outward under the pressure and squeezes out the sides as you cut into the cake. The piped ring of buttercream around the edge of each layer acts like a wall, keeping the jam contained until you actually slice through it. Leave it out and you'll notice the difference the moment you cut the first piece. Dig deeper: What Is a Cake Dam and Why Every Layer Cake Needs One.

Ingredients for Blackberry Layer Cake
For the Cake
All-purpose flour - The base for the cake plus a little extra for coating the blackberries. Nothing specialty needed here, just make sure you're spooning it into your measuring cup and leveling it off rather than scooping straight from the bag, since scooping packs in extra flour and dries out the crumb.
Fine salt - Balances the sweetness in the batter. If you only have coarse kosher salt on hand, use a little less since the crystals are bigger and less concentrated by volume.
Baking powder and baking soda - Both are doing separate jobs here. The baking powder is the main leavener, while the baking soda reacts with the acid in the buttermilk to help the cake rise and stay tender. Skipping one or swapping the amounts will throw off the texture, so I wouldn't mess with the ratio.
Unsalted butter - Softened, not melted. You want it soft enough to give when you press it but still holding its shape, so the butter and sugar can trap air properly when you beat them together. Using salted butter works if that's what you've got, just cut back on the added salt slightly.
Granulated sugar - Standard white sugar creams with the butter to build the structure of the cake, not just sweetness. I haven't had luck substituting other sugars here without changing the texture.
Eggs and egg whites - Room temperature matters more than people think. Cold eggs can cause the batter to look separated and won't incorporate air as well, so I pull mine out at least 30 minutes before I start baking.
Vanilla extract - For flavor. Real vanilla extract over imitation if you have the choice, since it's a big enough part of this cake's flavor to notice the difference.
Buttermilk - Also room temperature, for the same reason as the eggs. If you don't have buttermilk, a rough substitute is a cup of milk with a tablespoon of lemon juice or white vinegar stirred in and left to sit for 5-10 minutes, though the flavor will be slightly different.
Fresh blackberries - Fresh over frozen for this one. Frozen berries release more moisture as they bake and thaw, which can make the batter around them soggy instead of holding its structure.
Extra flour for coating the berries - Just a tablespoon, tossed with the blackberries before folding them in. This is what keeps them suspended through the layer instead of sinking to the bottom while the cake bakes.
For the Blackberry Buttercream
Unsalted butter - Beaten on its own first until it lightens up in color, which takes a few minutes longer than you'd expect. This step alone makes a noticeable difference in how light the finished buttercream turns out.
Powdered sugar - Sifting isn't strictly required, but if yours is clumpy, it'll save you some mixing time and a grainier texture later.
Seedless blackberry jam - This is what gives the buttercream its color and flavor without needing fresh berries blended in, which would add too much extra liquid. If your jam has seeds, push it through a fine mesh sieve first for a smoother finish.
Vanilla extract - Rounds out the flavor so the buttercream doesn't taste one-note sweet.
Fine sea salt - Cuts the sweetness of all that powdered sugar. Don't skip it even though it's a small amount.
Heavy cream - Added a little at a time, only as needed. The jam already loosens the buttercream somewhat, so you may not need much, if any.

For Filling and Decorating
Seedless blackberry jam - Used again here, both as the thin filling layer between the cakes and streaked into the frosting on the outside. Buying a bit extra beyond what the buttercream recipe calls for is worth it so you're not stretching it thin in both places.
Fresh blackberries - For topping the finished cake. Pick ones that are firm and hold their shape rather than overly soft, since they'll be sitting on top rather than baked into anything.
Edible flowers - Purely for decoration. Leave them off if you can't find them or don't want to track them down, the cake doesn't need them to taste good, they just make it look a little more finished for a special occasion.
How to Make Blackberry Layer Cake
Step 1: Mix the Batter
Preheat the oven to 350°F and get your three 8-inch pans greased and lined with parchment before you start mixing anything, so you're not scrambling once the batter's ready. Whisk the flour, salt, baking powder, and baking soda together in a separate bowl first. This isn't just tidiness, it means the leaveners get distributed evenly through the flour instead of clumping in one spot once they hit the wet ingredients.
Toss the blackberries with a tablespoon of flour in a small bowl and set them aside.
Beat the butter and sugar together for a full 3 to 4 minutes, longer than feels necessary, until the mixture is noticeably paler than when you started. That color change is your sign the sugar has cut into the butter enough to trap air, which is what gives the cake its rise later.


Add the eggs one at a time, letting each one fully disappear into the batter before adding the next, then the egg whites and vanilla. Switch to low speed and alternate the dry ingredients with the buttermilk in three additions, starting and ending with flour. The batter will look curdled right after the buttermilk goes in. Keep mixing anyway.


Once the last of the flour is incorporated, gently fold in the floured blackberries by hand with a rubber spatula rather than the mixer, so you don't crush them or knock out the air you just beat in.


Step 2: Bake the Layers
Divide the batter evenly between the three pans and smooth the tops with a spatula so they bake level. Bake for 28 to 34 minutes. I start checking at 28, since oven temperatures vary more than people expect, and a few extra minutes can be the difference between a moist crumb and a dry one. The tops should spring back when you touch them lightly, and a toothpick in the center should come out clean, not wet with batter.
Let the layers cool in their pans for 15 minutes before turning them out onto wire racks. Pulling them out too early risks them breaking apart since they're still fragile, and leaving them in the pan too long can make the bottoms slightly soggy from trapped steam. Let them cool completely before you do anything else with them, including wrapping them for a make-ahead bake.


Step 3: Make the Blackberry Buttercream
Beat the butter on its own for 4 to 5 minutes before adding anything else. This step alone determines how light the finished buttercream turns out, so don't rush past it just because it looks done sooner. Reduce the speed to low and add the powdered sugar gradually rather than all at once, which keeps it from clouding your kitchen in sugar dust.


Once the sugar's incorporated, add the blackberry jam, vanilla, salt, and one tablespoon of the heavy cream. Increase the speed back up and beat for another 3 to 4 minutes until everything turns light and smooth. Add more cream only if the buttercream still feels stiff, a teaspoon at a time, since the jam is already adding moisture and it's easy to overshoot into something too soft to hold its shape. Finish by mixing on the lowest speed for a minute or two, just to knock out the larger air bubbles that build up from all that beating.


Step 4: Assemble and Decorate
Set your first cake layer on a plate or cake board and spread on a layer of buttercream, then pipe a ring of buttercream around the outer edge before adding the jam.

That ring is what holds the jam in place once the layers are stacked, so don't skip it even if it feels like an extra step. Spoon a thin layer of jam inside the ring and repeat with the second layer.


Place the final layer upside down on top. The bottom of a cake layer is naturally flatter than the domed top, so flipping this last one gives you a flatter surface to frost, which matters more than you'd think for how clean the finished cake looks. Apply a thin crumb coat over the whole cake and refrigerate for 20 to 30 minutes before the final coat, this locks in any loose crumbs so they don't end up streaked through your final layer of frosting.


Cover the cake with the rest of the buttercream and smooth the sides with an offset spatula or bench scraper. For the jam streaks, dot small spoonfuls around the sides and drag your bench scraper through them once or twice, no more. Overworking it blends the colors together instead of leaving the marbled effect you're going for. Finish with fresh blackberries and edible flowers on top, added close to serving time so the flowers don't wilt.


Dig deeper: My full guide to building a layer cake walk you through the structural basics like crumb coats and dams in more depth than fits into any single recipe post.

Blackberry Layer Cake with Blackberry Buttercream
Equipment
- Stand mixer with paddle attachment
- Three 8-inch round cake pans
- parchment paper
- medium mixing bowl
- Small mixing bowl
- Rubber spatula
- offset spatula
- Bench scraper
- Cake board or serving plate
- piping bag
- Fine mesh sieve (if your jam contains seeds)
- Serrated knife (for leveling layers, if needed)
Ingredients
For the Cake
- 3⅔ cups all-purpose flour
- 1 teaspoon fine salt
- 2 teaspoons baking powder
- ¾ teaspoon baking soda
- 1½ cups unsalted butter softened
- 2 cups granulated sugar
- 3 large eggs room temperature
- 2 large egg whites room temperature
- 1 tablespoon vanilla extract
- 1½ cups buttermilk room temperature
- 2 cups fresh blackberries
- 1 tablespoon all-purpose flour for coating the berries
For the Blackberry Buttercream
- 1½ cups unsalted butter softened
- 5 cups powdered sugar
- ¼ cup seedless blackberry jam
- 2 teaspoons vanilla extract
- ¼ teaspoon fine sea salt
- 1 to 2 tablespoons heavy cream as needed
For Filling and Decorating
- ¼ to ⅓ cup seedless blackberry jam
- Fresh blackberries
- Edible flowers
Instructions
Make Cake Layers
- Preheat the oven to 350°F. Grease and line three 8-inch round cake pans with parchment paper.
- In a medium bowl, whisk together the flour, salt, baking powder, and baking soda until evenly combined.
- Place the blackberries in a small bowl and toss them with the tablespoon of flour. This helps suspend the fruit throughout the batter while baking.
- In the bowl of a stand mixer fitted with the paddle attachment, beat the butter and sugar on medium-high speed for 3 to 4 minutes, until very pale, light, and fluffy.
- Add the eggs one at a time, beating well after each addition. Add the egg whites, followed by the vanilla extract, and mix until fully incorporated.
- Reduce the mixer to low speed. Add the dry ingredients in three additions, alternating with the buttermilk, beginning and ending with the flour mixture. Mix only until each addition is just incorporated. The batter may look slightly curdled after adding the buttermilk - this is normal and will come back together once the final addition of flour is mixed in.
- Using a rubber spatula, gently fold the floured blackberries into the batter until evenly distributed.
- Divide the batter evenly between the prepared cake pans and smooth the tops.
- Bake for 28 to 34 minutes, or until the tops spring back lightly when touched and a toothpick inserted into the center comes out clean.
- Leave the cakes to cool in the pans for 15 minutes before turning them out onto wire racks to cool completely.
Make the blackberry buttercream
- Beat the butter on medium-high speed for 4 to 5 minutes, until very pale and fluffy.
- Reduce the mixer to low speed and gradually add the powdered sugar. Once incorporated, add the blackberry jam, vanilla extract, salt, and 1 tablespoon of heavy cream.
- Increase the speed to medium-high and beat for another 3 to 4 minutes, until the buttercream is light, smooth, and fluffy.
- If needed, add the remaining heavy cream a teaspoon at a time until the buttercream reaches a smooth, spreadable consistency.
- Mix on the lowest speed for 1 to 2 minutes to remove any large air bubbles.
Assemble the cake
- Place one cake layer onto a serving plate or cake board. Spread a layer of buttercream on the cake, then pipe a buttercream ring around the outside edge to create a dam.
- Spoon a thin layer of seedless blackberry jam over the buttercream, keeping it inside the buttercream border.
- Repeat with the second cake layer.
- Place the final cake layer on top, upside down, for the flattest finish.
- Apply a thin crumb coat of buttercream over the entire cake and refrigerate for 20 to 30 minutes.
- Cover the cake with the remaining buttercream and smooth the sides with an offset spatula or bench scraper.
- Dot a few small spoonfuls of blackberry jam randomly around the sides of the cake and gently smooth with a bench scraper to create soft streaks. One or two passes is all you need - avoid overworking the jam.
- Decorate the top with fresh blackberries and edible flowers.
- Slice, serve, and enjoy.
Notes
Tips for the Best Blackberry Layer Cake
I always weigh my flour when I can. A kitchen scale takes the guesswork out of measuring completely, and it's the single biggest reason my cakes turn out the same way every time.
Don't skip greasing and lining the pans, even if they're nonstick. Cake this tender can stick in spots you wouldn't expect, and a torn layer is hard to fix after the fact.
I chill my finished cake for 20 to 30 minutes before slicing. Cold buttercream holds its shape under the knife instead of smearing, so the layers stay defined in each cut piece. Explore more here: How to Stack Cake Layers Like a Pro: 10 Tips for Tall, Straight Cakes.
Pipe the buttercream ring a little thicker than feels necessary. A thin ring is more likely to give way under the weight of the layers above it once the cake is fully stacked.
If your kitchen runs warm, work in shorter stretches while decorating and pop the cake back in the fridge between steps. Buttercream softens fast once it's out of the mixer, and it's much easier to smooth when it's cool.

Make-Ahead and Storage
Refrigerator Storage
Keep the assembled cake covered in the fridge for up to 3 days. I pull mine out 30 to 45 minutes before serving so the buttercream has time to soften back up. Cold buttercream straight from the fridge tastes noticeably duller and firmer than at room temperature.
Freezer Storage
The unfrosted layers freeze well for up to 2 months, wrapped tightly so they don't pick up freezer odors. I thaw them in the fridge overnight rather than on the counter, since a slower thaw keeps the crumb from getting damp. I wouldn't freeze the cake fully assembled and frosted, since the buttercream texture suffers more from thawing than the cake layers do.
Make-Ahead Instructions
Baking the layers a day ahead is my usual approach when I'm making this for something specific. Wrap them tightly in plastic once fully cooled and leave them at room temperature overnight, then assemble the next day. The buttercream can also be made a day ahead and kept in the fridge, just bring it back to room temperature and rewhip it briefly before using so it's smooth enough to spread.

Frequently Asked Questions
What If My Blackberry Jam Has Seeds?
Push it through a fine mesh sieve before using it, both in the buttercream and for the streaks on the outside. It only takes a minute and makes a real difference in how smooth the finished buttercream looks.
How Do I Get Clean Slices?
Chill the finished cake for 20 to 30 minutes before cutting, and wipe your knife clean between each slice. A warm knife drags through the buttercream and blurs the layers instead of giving you a clean cross-section.
More Occasion Cakes You'll Love
For something with berries, the raspberry lemon layer cake pairs tart raspberry filling with a bright lemon crumb, while the raspberry white chocolate layer cake is sweeter with a white chocolate buttercream instead of a fruit-based one.
For a bakery-style option, berry Chantilly cake swaps buttercream for a lighter mascarpone whipped cream between the layers. And if lemon and blueberry together sounds more like your speed, the moist lemon blueberry layer cake is worth a look too.

Comments
No Comments