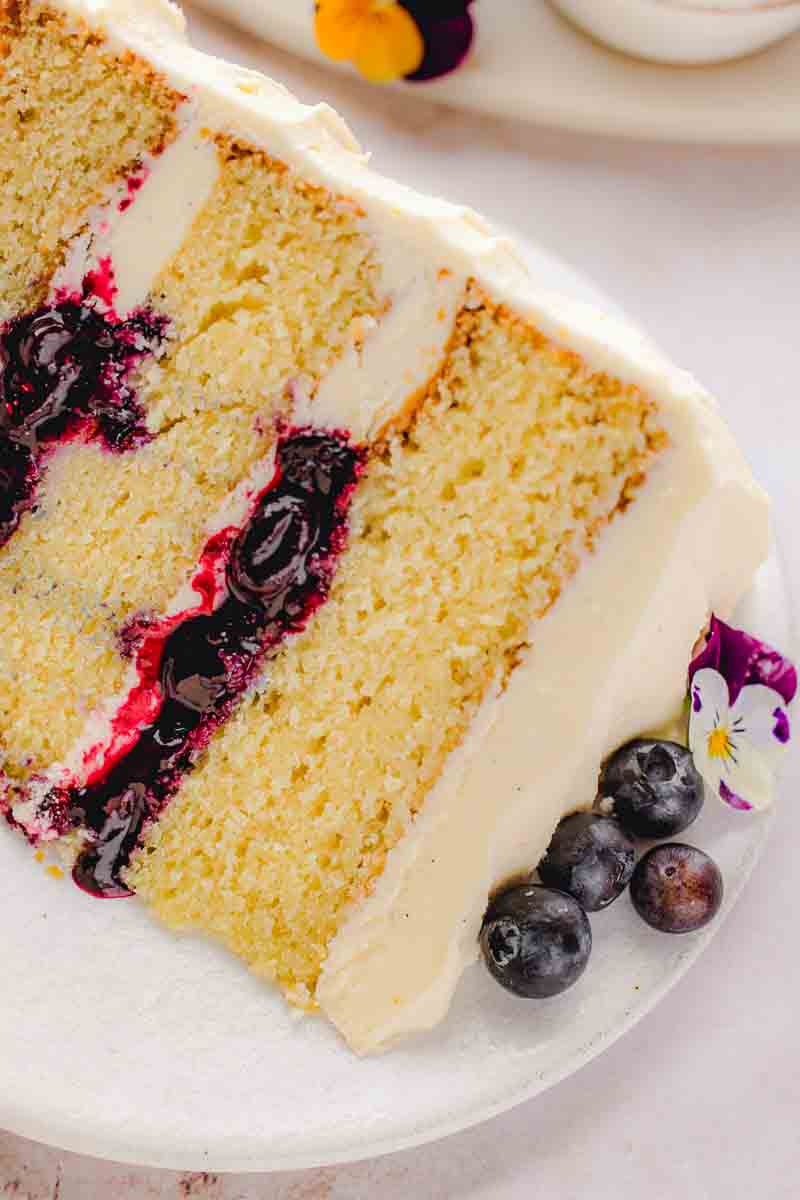
The filling here is made from frozen blueberries - not fresh - and after testing both, frozen blueberries win - deeper color, more concentrated flavor, and a filling that sets consistently every time. A cornstarch slurry and a piped buttercream dam keep everything exactly where it belongs. Vanilla bean paste in the frosting, not extract - one swap that makes the whole cake taste noticeably better.
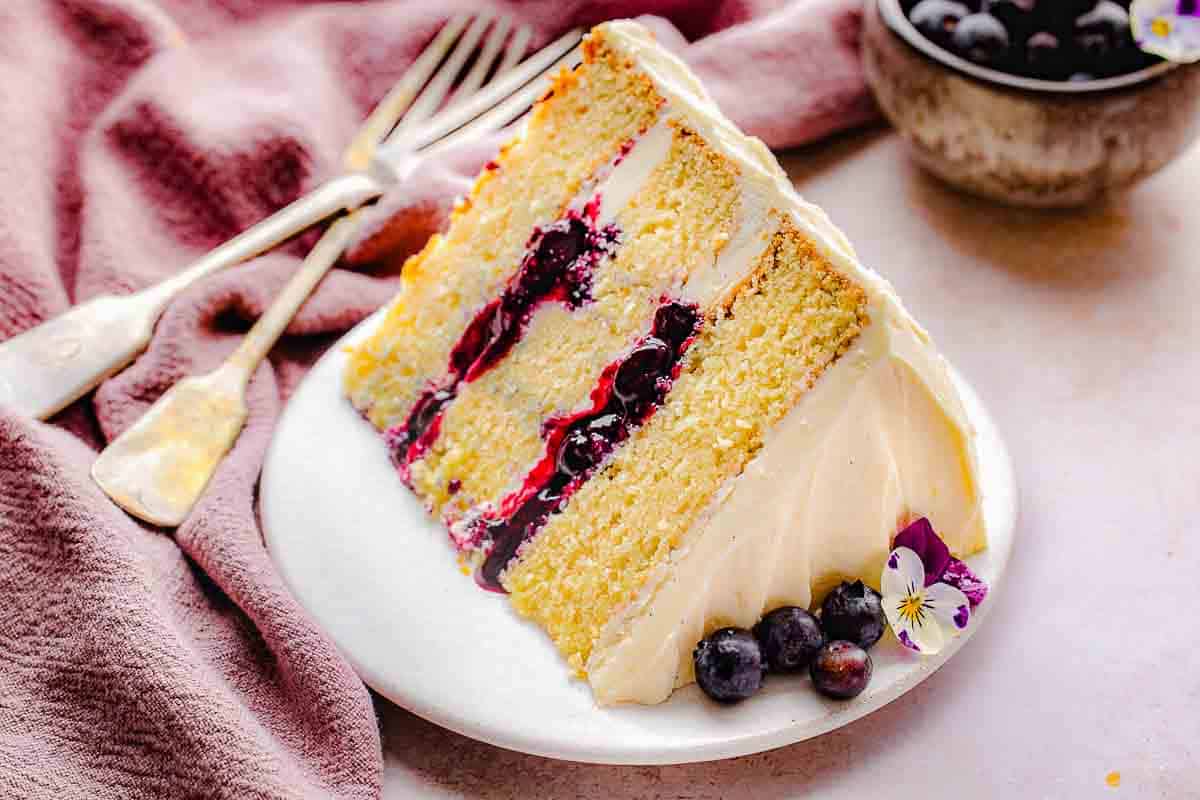
This vanilla blueberry layer cake has become my go-to celebration cake, and once you make it, you'll understand why. The filling is made from frozen blueberries cooked down with a cornstarch slurry until it reaches a thick, jam-like consistency that holds its shape completely between layers - no running, no sliding, just a clean ribbon of blueberry in every slice. The vanilla bean buttercream is silky, rich, and made with vanilla bean paste instead of extract, which gives you a noticeably deeper vanilla flavor and those beautiful little flecks throughout the frosting that tell you this is the real thing.
What I love most about this recipe is that it's built on a few simple techniques that make a big difference in how the finished cake looks and tastes. A buttercream dam piped around the edge of each layer keeps the filling exactly where you put it during assembly. A quick crumb coat before the final layer of frosting locks everything in and gives you a smooth, clean finish. The cake layers themselves are soft and buttery but sturdy enough to stack and frost without crumbling - the kind of reliable structure you want when you're making something for a birthday, baby shower, or any occasion that deserves a cake worth remembering. Follow the steps, trust the process, and this one will not let you down.
These aren't complicated techniques. They're just the ones nobody bothered to explain, and once you know them, every layer cake you make from here on out gets easier. If you're newer to layer cakes and want a full breakdown before you start, my layer cake guide walks through everything from pan prep to the final frost.
The Three Decisions That Made This Cake Worth Keeping
Frozen blueberries do something fresh ones can't
Fresh blueberries are unpredictable in a cooked filling - water content varies by season and ripeness, which means your consistency changes every single time you make it. Frozen blueberries are picked at peak ripeness, so the flavor is more concentrated, the color is a deeper, richer purple, and the filling sets the same way batch after batch. I tested both versions back to back, and the frozen filling held its shape cleanly on a spoon while the fresh version needed extra cooking time and still came out looser. For a filling that needs to sit between cake layers and stay put through assembly and slicing, frozen is the more reliable choice every time.
The spoon test that tells you the filling is actually done
Timing a cooked fruit filling by minutes alone is unreliable - stovetops vary and the filling can look done long before it actually is. The test I use is simple: drag a wooden spoon through the filling in the pan, and if the line holds without flooding back in, it's ready to come off the heat. If it flows back together, keep cooking and check again in a minute. Pull it too early and it seeps out the sides of the cake during assembly; get it to the right consistency and every slice comes out with a clean, defined layer of blueberry exactly where you put it.
Vanilla bean paste over extract - not a small difference
Vanilla extract works, but paste does two things extract simply can't. The flavor is noticeably deeper and more rounded - less sharp, more like vanilla actually tastes when it's the real thing - and you get the flecks, those small black specks distributed throughout the buttercream that signal genuine vanilla in a way that matters both visually and in terms of flavor. In a frosting this simple - butter, sugar, cream, and vanilla - the quality of the vanilla carries the whole flavor profile. Paste tells that story better than extract, and in a cake made for a celebration, that detail is worth it. This is the vanilla blueberry layer cake I make for birthdays and baby showers - but if you're looking for something lighter with a mascarpone frosting and fresh mixed berries, my Berry Chantilly Cake lives in the same family and is just as celebration-worthy.
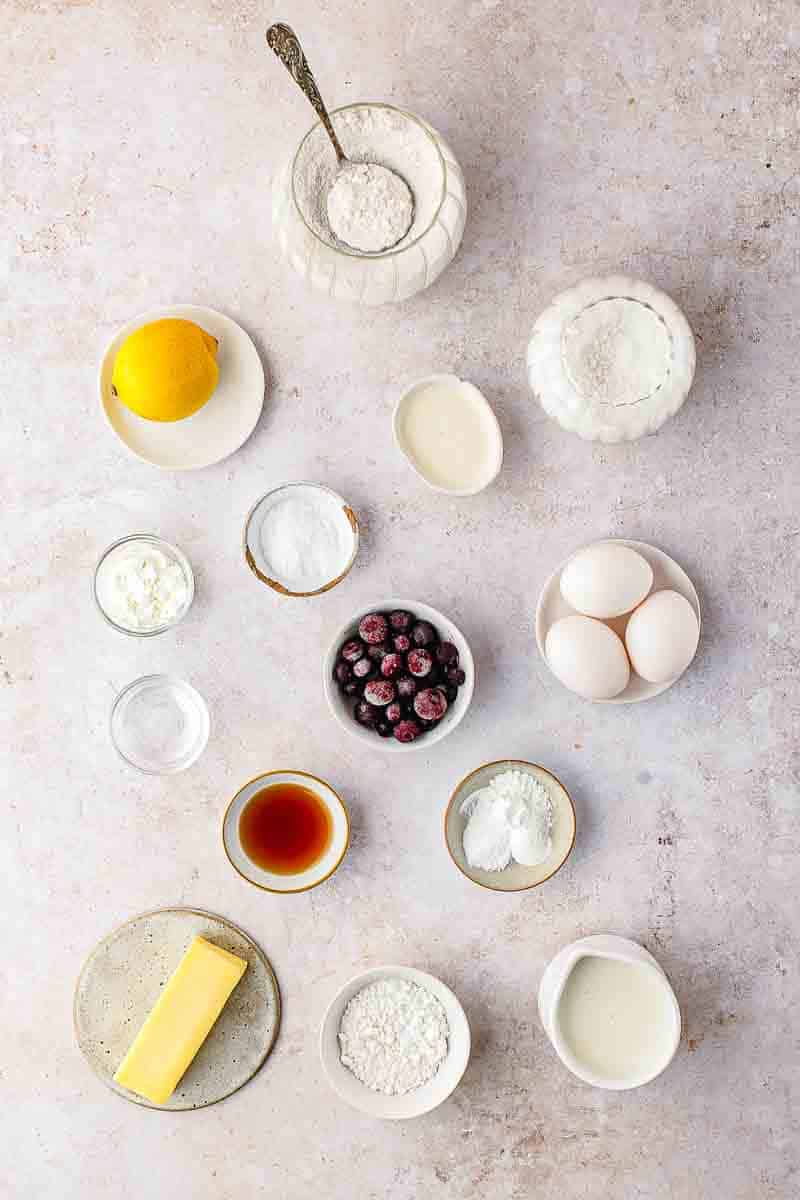
Ingredients and What Each One Does
The blueberry filling - just five ingredients
- Frozen blueberries - My go-to over fresh because the flavor is more concentrated and the filling sets more consistently every time I make it. Debating whether to use fresh? Here's everything on Fresh vs. Frozen Blueberries.
- Granulated sugar - Sweetens the filling and helps draw the juice out of the berries as they cook down.
- Lemon juice - Just a teaspoon, but it brightens the whole filling and keeps it from tasting flat or one-dimensional.
- Cornstarch - This is what turns a loose blueberry sauce into a filling that actually holds its shape between layers and slices cleanly.
- Water - Whisked with the cornstarch to make the slurry; don't skip this step or the cornstarch will clump straight into the hot filling.
What makes this vanilla cake soft and sturdy at the same time
- All-purpose flour - Gives the cake enough structure to hold three layers without collapsing under the weight of the filling and frosting.
- Fine sea salt - Balances the sweetness and sharpens every other flavor in the batter in a way you'd notice immediately if it were missing.
- Baking powder and baking soda - Used together here because the buttermilk needs the soda to react with, while the powder gives you the additional lift for a light, even crumb.
- Unsalted butter - I always use unsalted so I control the salt level myself; it also creams up better at room temperature and gives you that rich, buttery flavor that makes this taste like a real celebration cake.
- Granulated sugar - Beaten with the butter until genuinely light and fluffy - this step takes longer than you think and it matters more than almost anything else in the recipe.
- Eggs and egg whites - The whole eggs add richness and structure; the whites lighten the crumb so the cake stays tender rather than dense.
- Vanilla extract - Straight into the wet ingredients; this is the base vanilla note in the cake itself before the buttercream adds the more complex vanilla bean flavor on top. And it's one of the Best Flavor Pairings for Blueberries!
- Buttermilk - This is my secret weapon in any vanilla layer cake. The acidity tenderizes the crumb, the fat adds moisture, and it's why this cake stays soft for days rather than drying out by the next morning.
Vanilla bean buttercream - what to know before you start
- Unsalted butter - Needs to be genuinely softened - not melted, not cold - so it beats up light and smooth without leaving lumps in the finished frosting.
- Powdered sugar - Added gradually on low speed; dump it in all at once and you'll be wearing half of it. I add it in two or three additions and let each one incorporate before adding the next.
- Heavy cream - Two tablespoons loosens the buttercream just enough to make it spreadable and silky without making it too soft to hold its shape on the sides of the cake.
- Vanilla bean paste - This is the ingredient I refuse to substitute in this recipe. The flavor is deeper and more complex than extract, and the flecks throughout the finished frosting are the visual signature that makes this buttercream look and taste like it came from a bakery.
- Salt - Just a pinch, but it cuts through the sweetness and stops the frosting from tasting like straight powdered sugar.
How to Make Vanilla Blueberry Layer Cake
Before you start, pull your butter, eggs, and buttermilk out of the fridge. Room temperature ingredients aren't a suggestion here - they're what keeps the batter smooth and the crumb even.
1. Make and chill the blueberry filling
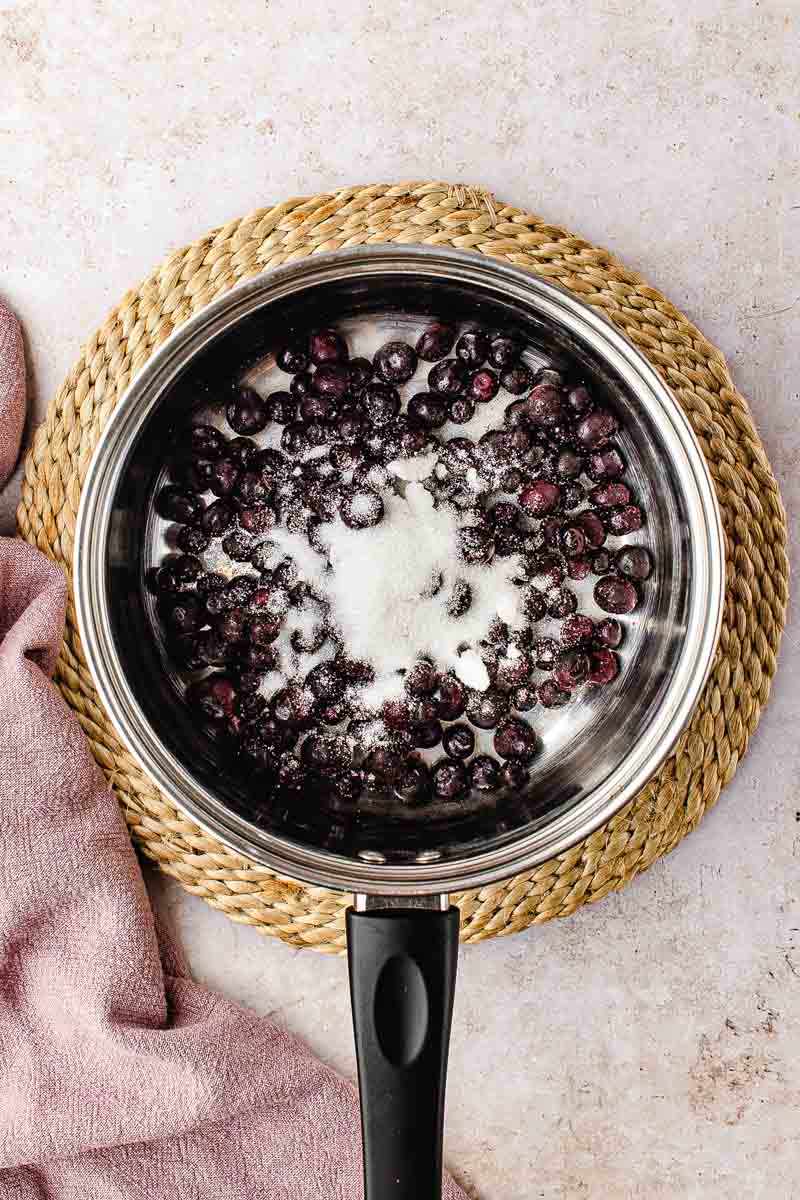
Add the frozen blueberries and sugar to a medium saucepan over medium heat and cook, stirring occasionally, until the berries soften and start releasing their juice. While that happens, whisk the cornstarch and water together in a small bowl until completely smooth - no lumps - then stir it into the berries along with the lemon juice. Keep cooking and stirring for another 2 to 4 minutes until the filling thickens into a jam-like consistency.
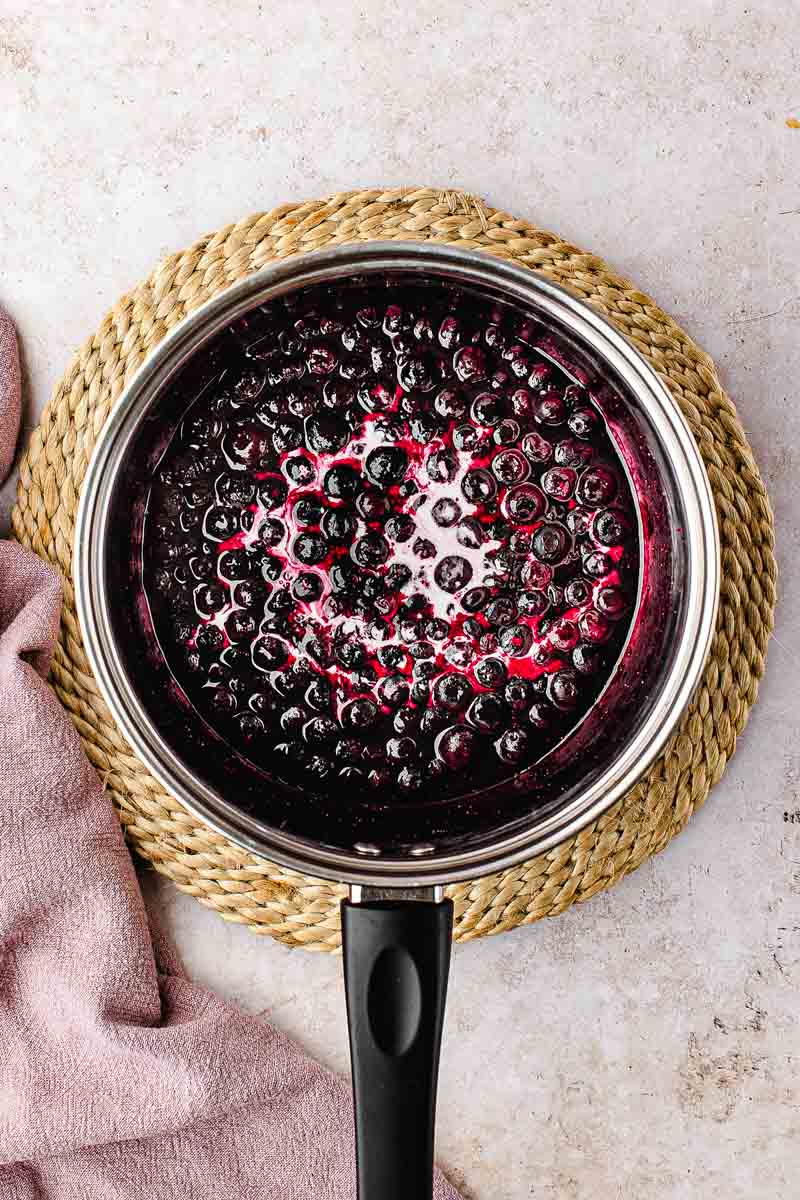
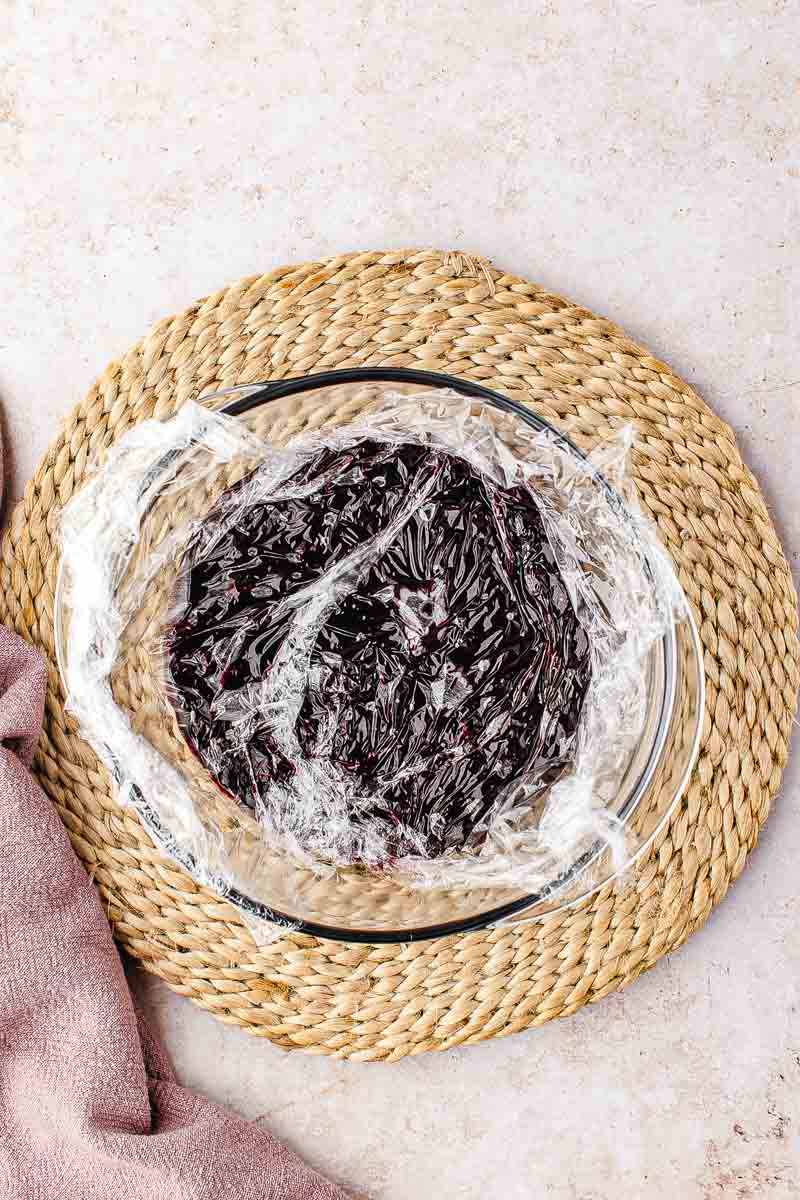
The test I use: drag a wooden spoon through the filling in the pan. If the line holds and doesn't flood back in, it's done. Transfer it to a bowl, press cling wrap directly onto the surface so a skin doesn't form, and refrigerate until completely cold before you use it. Don't rush this step - warm filling will soften the buttercream on contact and the layers will shift.
2. Bake the vanilla cake layers
Preheat the oven to 350°F and grease three 8-inch cake pans, lining the bottoms with parchment. Whisk the flour, salt, baking powder, and baking soda together in a medium bowl and set it aside.
In a large bowl, beat the softened butter and sugar together for a full 3 to 5 minutes - longer than feels necessary, but this is where you build the light, tender crumb, so don't cut it short.


Add the eggs one at a time, mixing well after each, then the egg whites, then the vanilla.


Add half the dry ingredients on low speed until just combined, then half the buttermilk, then the remaining dry ingredients, then the remaining buttermilk. Mix only until incorporated - overmixing at this stage makes the cake tough.


Divide the batter evenly between the three pans; if you want to be precise, weigh the total batter and divide by three. Bake for 28 to 32 minutes, until the tops spring back when lightly touched, the edges are just pulling away from the pans, and a toothpick comes out clean. Cool in the pans for 10 to 15 minutes before turning out onto wire racks to cool completely.
Even layers are worth the extra step; they make stacking and leveling significantly easier. If you want more detail on getting tall, straight layers, my guide on how to stack cake layers like a pro covers every step.


3. Make the vanilla bean buttercream
Beat the softened butter in a large bowl for about 3 minutes until it's smooth, creamy, and noticeably lighter in color - this step matters and it's worth the time. Add the powdered sugar gradually on low speed, a third at a time, letting each addition incorporate before adding the next.


Add the heavy cream, vanilla bean paste, and salt, then increase the speed to medium-high and beat for several minutes until the buttercream is light, fluffy, and completely smooth. Scrape down the bowl as you go. Once it's done, transfer a portion to a piping bag with the end snipped off - this is your dam buttercream for assembly.

4. Assemble with the buttercream dam technique
Place the first cake layer on your serving plate or cake board. Spread a thin, even layer of buttercream across the top, then pipe a thick ring of buttercream around the outer edge - this is the dam, and it's what keeps the filling from pushing out the sides when the next layer goes on. Spoon a heaping half cup of the chilled blueberry filling into the center and spread it evenly inside the buttercream border, all the way to the dam but not over it.
If you want the full breakdown on how dams work and when you need one, I wrote a dedicated post on what a cake dam is and why every layer cake needs one.


Place the second cake layer on top and press down gently to level it. Repeat with another layer of buttercream, another dam, and the remaining filling. Place the final cake layer on top, flat side up for the cleanest surface.
5. Crumb coat, frost, and decorate
Apply a thin layer of buttercream over the entire outside of the cake - top and sides - using an offset spatula. This is the crumb coat, and its only job is to seal in any loose crumbs so they don't drag through your final layer of frosting. Refrigerate for 20 to 30 minutes until the crumb coat feels firm to the touch.
It may feel like an unnecessary step the first time you do it - it isn't. I have a full post on how to crumb coat a cake if you want to go deeper on the technique before you start.


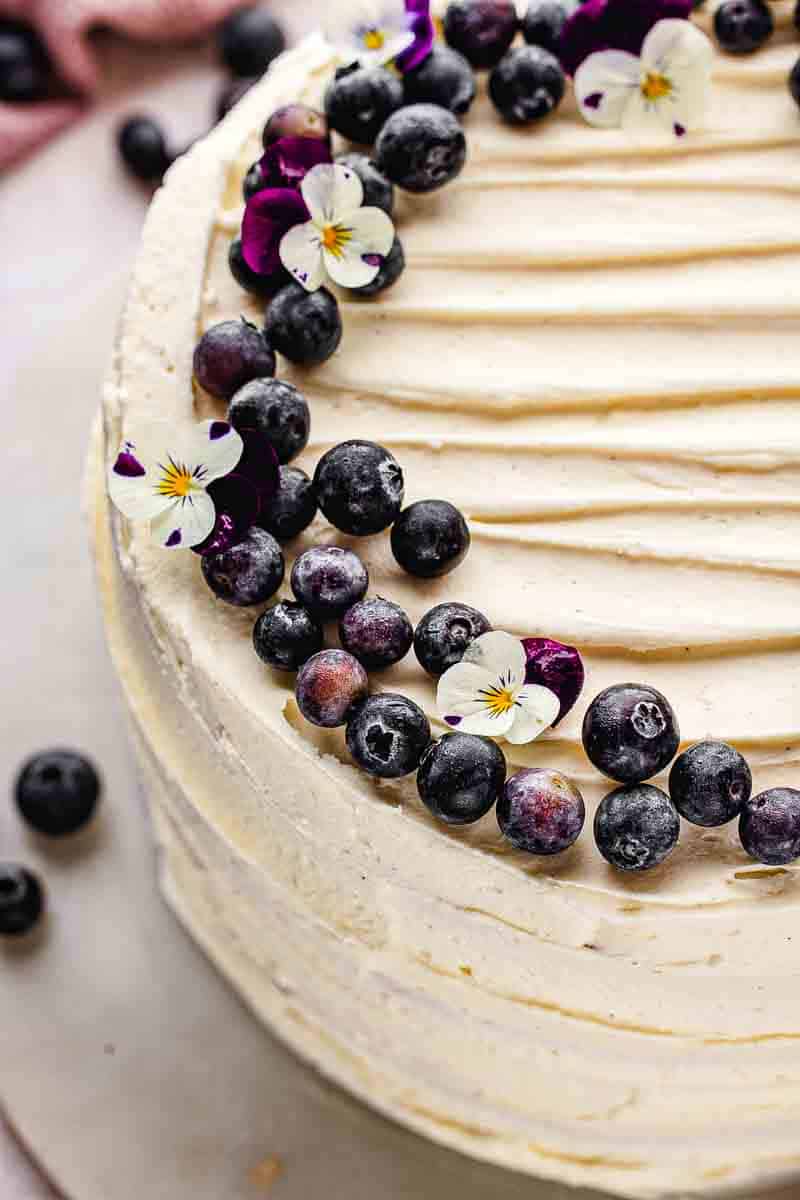
Once it's set, apply the remaining buttercream and smooth the sides and top to whatever finish you like. Decorate with fresh blueberries and edible flowers if you're using them. For the cleanest slices, refrigerate the finished cake for 30 minutes before serving and wipe the knife clean between each cut.

Vanilla Blueberry Layer Cake
CLICK on STARS to REVIEW the RECIPE, then CLICK OK
Equipment
- 3 (8-inch) cake pans
- parchment paper
- medium saucepan
- Small bowl
- Whisk
- Stand mixer or hand mixer
- Large mixing bowls
- Rubber spatula
- Wire racks
- offset spatula
- piping bag
- Cake board or serving plate
Ingredients
Blueberry Filling
- 2 cups frozen blueberries
- ¼ cup granulated sugar
- 1 teaspoon lemon juice
- 2 teaspoons water
- 2 teaspoons cornstarch
Vanilla Cake
- 3⅔ cups all-purpose flour
- 1 teaspoon fine sea salt
- 2 teaspoons baking powder
- ¾ teaspoon baking soda
- 1½ cups unsalted butter softened to room temperature
- 2 cups granulated sugar
- 3 large eggs room temperature
- 2 large egg whites room temperature
- 1 tablespoon vanilla extract
- 1½ cups buttermilk room temperature
Vanilla Bean Buttercream
- 1½ cups unsalted butter softened to room temperature
- 5 cups powdered sugar
- 2 tablespoons heavy cream
- 1½ tablespoons vanilla bean paste
- Pinch of salt
Decoration
- Fresh blueberries
- Edible flowers optional
Instructions
Blueberry Filling
- Add the frozen blueberries and granulated sugar to a medium saucepan set over medium heat.
- Cook, stirring occasionally, until the blueberries begin to soften and release their juices.
- In a small bowl, whisk together the water and cornstarch until smooth.
- Stir the slurry into the blueberries along with the lemon juice.
- Continue cooking for 2 to 4 minutes, stirring frequently, until the filling is thick and jam-like.
- Transfer the filling to a bowl, press cling wrap directly onto the surface, and refrigerate until completely chilled.
Vanilla Cake
- Preheat the oven to 350°F. Grease three 8-inch cake pans and line the bottoms with parchment paper.
- In a medium bowl, whisk together the flour, salt, baking powder, and baking soda. Set aside.
- In a large mixing bowl, beat the softened butter and granulated sugar together until very light and fluffy, about 3 to 5 minutes.
- Add the eggs one at a time, mixing well after each addition.
- Add the egg whites and mix until fully incorporated.
- Mix in the vanilla extract.
- Add half of the dry ingredients and mix on low speed until just combined.
- Pour in half of the buttermilk and mix gently.
- Add the remaining dry ingredients, followed by the remaining buttermilk, mixing only until incorporated.
- Scrape down the sides and bottom of the bowl as needed.
- Divide the batter evenly between the prepared pans.
- Bake for 28 to 32 minutes, or until the tops spring back lightly when touched, the edges begin to pull slightly away from the pans, and a toothpick inserted into the center comes out clean.
- Allow the cakes to cool in the pans for 10 to 15 minutes before turning them out onto wire racks to cool completely.
Vanilla Bean Buttercream
- In a large mixing bowl, beat the softened butter until smooth, creamy, and noticeably lighter in color, about 3 minutes.
- Gradually add the powdered sugar, mixing on low speed until incorporated.
- Add the heavy cream, vanilla bean paste, and salt.
- Increase the mixer speed to medium-high and beat for several minutes until the frosting is light, fluffy, and smooth.
- Scrape down the bowl as needed.
- Transfer a portion of the buttercream to a piping bag with the end snipped off.
Assemble the Cake
- Place the first cake layer onto a serving plate or cake board.
- Spread a thin layer of buttercream over the cake layer.
- Pipe a thick ring of buttercream around the outer edge to create a dam.
- Spoon a heaping ½ cup of the chilled blueberry filling into the center and spread it evenly inside the buttercream border.
- Top with the second cake layer and repeat with another layer of buttercream and the remaining blueberry filling.
- Place the final cake layer on top.
- Apply a thin crumb coat of buttercream over the entire cake. Refrigerate for 20 to 30 minutes to set.
- Frost the cake with the remaining buttercream and smooth the sides and top as desired.
- Decorate with fresh blueberries and edible flowers before serving.
- Slice and serve.
My Best Tips for Getting This Right Every Time
Room temperature ingredients - why it actually matters
This isn't a formality - it's the single most important prep step in the recipe. Cold butter won't cream properly, which means you lose the aeration that makes the cake light. Cold eggs added to creamed butter cause it to curdle and look broken, which affects the final texture of the crumb even after baking. Cold buttermilk tightens the batter and makes it harder to mix evenly. I pull everything out about an hour before I start baking. If you forget, sit the eggs in a bowl of warm water for 10 minutes and cut the butter into small cubes so it softens faster. It's worth the wait.
How to measure flour correctly for a tender crumb
Too much flour is the most common reason a vanilla cake comes out dry and dense, and it almost always comes from scooping the measuring cup directly into the bag. When you scoop, you compact the flour and can add up to 20% more than the recipe intends. The method I use every time: spoon the flour into the measuring cup from the bag or container, then sweep a straight edge across the top to level it off. It takes an extra 30 seconds and makes a real difference in the finished texture. If you have a kitchen scale, even better - weigh the flour and remove the guesswork entirely.
The buttercream dam - how to pipe it and why you need it
The dam is a thick ring of buttercream piped around the outer edge of each cake layer before the filling goes in. It acts as a wall that keeps the blueberry filling contained so it doesn't seep out the sides during assembly or bulge out under the weight of the next layer. To pipe it, fill a piping bag with buttercream and snip the end to about a half-inch opening - no tip needed. Pipe a ring just inside the outer edge of the cake layer, going around twice if you want extra insurance. The dam should be slightly thicker than the filling so the top layer rests on the buttercream, not the fruit. Don't skip this step - it's what separates a clean, stable cake from one that slides apart when you frost it.
How to get clean slices every time
Three things make the difference between a clean slice and a messy one. First, refrigerate the finished cake for at least 30 minutes before you cut it - the filling firms up and the buttercream sets so everything holds together under the knife. Second, use a sharp knife, not a serrated one - a long, thin blade gives you more control and cleaner cuts through the layers. Third, wipe the blade clean with a damp cloth between every single slice. Blueberry filling on the knife drags color through the buttercream and the vanilla cake on the next cut. It takes five extra seconds per slice and the difference on the plate is immediately obvious.

Make-Ahead, Storage, and Freezing
How far ahead you can make the filling
The blueberry filling can be made up to 3 days before you plan to assemble the cake - it's one of the most useful make-ahead components here. Once it's cooked and cooled, transfer it to an airtight container, press cling wrap directly onto the surface, and refrigerate. I almost always make it the day before to break the recipe into more manageable steps, especially when I'm baking this for a celebration. When you're ready to use it, give it a stir - it may have thickened slightly in the fridge but loosens up as you spread it.
Storing the finished cake
Store the frosted cake covered in the refrigerator for up to 4 days. The buttercream seals the layers and keeps them from drying out, so it holds up well. The key thing to remember: cold buttercream firms up significantly and the cake will taste flat straight from the fridge. Pull it out 30 to 45 minutes before serving - the buttercream softens, the crumb relaxes, and the flavor opens up in a way that makes a noticeable difference.
If you end up with leftover blueberry filling - which honestly happens - it's incredible spooned over my Blueberry Scones with Vanilla Glaze the next morning.
How to freeze unfrosted cake layers
Unfrosted cake layers freeze well for up to 2 months. Let them cool completely first - freezing warm cake creates condensation that turns into soggy spots when it thaws. Wrap each layer tightly in two layers of plastic wrap, then foil, and freeze flat. Thaw overnight in the refrigerator the day before you plan to assemble. A slightly cold cake is actually easier to crumb coat than one at room temperature, so don't wait for it to fully come back to room temp before you start frosting.

Variations and Substitutions
Can I use fresh blueberries instead of frozen?
You can, but expect to adjust. Fresh blueberries have a higher and less predictable water content than frozen, which means the filling can take longer to thicken and the final consistency varies depending on the season and how ripe the berries are. If you go the fresh route, use the spoon test rather than the timer - drag a wooden spoon through the filling and wait until the line holds before pulling it off the heat. The flavor will be slightly brighter and less concentrated than frozen, which isn't a bad thing, just different. In peak summer when blueberries are genuinely good, fresh works well. Any other time of year, frozen is the more reliable choice.
Swapping vanilla bean paste for vanilla extract
Vanilla extract works here and the cake will still be good - I just want to be honest that you'll notice the difference. The flavor is sharper and less complex than paste, and you lose the visual flecks throughout the buttercream that signal real vanilla. If paste isn't something you keep on hand, use the same quantity of a good-quality pure vanilla extract - not imitation. If you want to split the difference, use extract in the cake batter and splurge on the paste just for the buttercream, where it has the most impact on both flavor and appearance.
Can I add lemon?
Yes and it's a great variation. Add a tablespoon of lemon zest to the cake batter with the vanilla, and a teaspoon of lemon juice to the buttercream along with the heavy cream. The lemon brightens both components and pairs beautifully with the blueberry filling without overpowering the vanilla. If you love that combination, my Moist Lemon Blueberry Layer Cake takes it even further with a full lemon buttercream and blueberries baked right into the layers.
Making this gluten-free
Swap the all-purpose flour for a good 1:1 gluten-free baking blend and the rest of the recipe stays the same. The key word is 1:1 - blends formulated for direct substitution include xanthan gum or a similar binder that helps the cake hold together the way gluten would. In my experience the batter tends to look slightly thicker than the standard version, which is normal. Bake and test the same way - the toothpick test and the spring-back test are both still reliable indicators of doneness. Everything else, including the filling and buttercream, is already naturally gluten-free.

Frequently Asked Questions
Why did my filling turn out runny?
It wasn't cooked long enough. The filling needs to reach a true jam-like consistency before it comes off the heat - use the spoon test, not the timer. Drag a wooden spoon through the filling in the pan; if the line holds without flooding back in, it's ready. If it flows back together, keep cooking.
Why does my buttercream look greasy or curdled?
Almost always a temperature issue. If the butter was too warm when you started beating it, the buttercream can look greasy and separated. Refrigerate the bowl for 10 to 15 minutes, then beat again - it usually comes back together. If it looks curdled because the butter was too cold, let it sit at room temperature for a few minutes and beat again on medium-high.
Can I make this as a two-layer cake instead of three?
Yes. Use two 9-inch pans instead of three 8-inch pans and adjust the bake time slightly - start checking at 30 minutes. You'll have one layer of filling instead of two, and the cake will be a little shorter, but the flavor is identical.
My cake layers domed in the center - what do I do?
Level them with a serrated knife before assembling. A domed layer makes stacking unstable and the whole cake ends up leaning. Hold the knife parallel to the work surface and use a slow, steady sawing motion to take off just enough to flatten the top. The scraps are for tasting.
How do I know when the cake layers are done baking?
Three things happening at the same time: the top springs back lightly when you press it gently in the center, the edges are just beginning to pull away from the sides of the pan, and a toothpick inserted into the middle comes out clean or with just a few moist crumbs. If the toothpick has wet batter on it, give it another 3 minutes and check again.
More Layer Cakes You'll Love
- Raspberry White Chocolate Layer Cake - Soft cake layers filled with raspberry and finished with a creamy white chocolate frosting that makes this one a serious showstopper for any occasion.
- Moist Triple Layer Chocolate Cake - A rich, deeply chocolatey three-layer cake with a tender crumb and fudgy frosting - the one to make when only chocolate will do.
- Chocolate Strawberry Cake (3 Layers, From Scratch) - Three layers of rich chocolate cake filled with fresh strawberries and frosted from scratch - the kind of combination that never needs an explanation.
- Lemon Raspberry Cake with Freeze-Dried Raspberry Buttercream - Bright lemon cake paired with an intensely flavored freeze-dried raspberry buttercream that brings real fruit flavor without any of the moisture issues fresh berries cause in frosting.
- Berry Chantilly Cake - Soft vanilla layers made with the reverse creaming method, a lemon-kissed fresh berry filling, and a whipped mascarpone cream cheese frosting. Lighter in texture than this cake and built for spring and summer tables.
If you're deep in blueberry season and looking for more ways to use them, my Blueberry Recipe Collection has everything from no-bake options to baked showstoppers.

Comments
No Comments