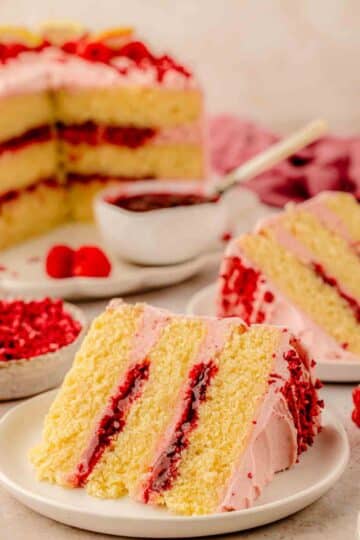
This Raspberry White Chocolate Cake starts with an easy vanilla batter, then layers in a sweet-tart raspberry filling and smooth white chocolate frosting. Everything is designed to work together, so the cake turns out soft, stable, and impressive without extra effort.

Why This Cake Works
This isn't just "vanilla cake + raspberries + frosting" - it's a three‑part system that keeps everything stable and sliceable. This raspberry white chocolate layer cake is built for clean layers, stable structure, and bakery-style results at home.
- The vanilla cake layers use a combination of whole eggs and extra whites plus buttermilk to create a texture that stays soft and buttery while remaining strong enough to stack and slice neatly. The texture in this cake comes down to the mixing method. Want to understand why it works - and what can go wrong? Start with Reverse Creaming Do's and Don'ts.
- The raspberry filling is cooked down to a thick, jam-like consistency, so it stays exactly where it belongs instead of shifting or leaking between layers. That's what keeps it from oozing out when you slice the cake.
- The white chocolate buttercream is made with real white chocolate (30-35% cocoa butter), which firms as it chills and gives the frosting structure instead of staying soft and sticky. Using cake dam makes the cake stable and smooth.
If you're newer to layer cakes, start with my step‑by‑step Layer Cake Guide. My how to stack cake layers guide walks through leveling, how to build cake dam, filling, and crumb‑coating step by step.

Ingredients You'll Need
For the Raspberry Filling
- Raspberries, fresh or frozen - The fruit that becomes the filling; frozen work just as well as fresh because they get cooked down completely. If you're debating which to use, I have a full breakdown in fresh vs frozen raspberries in baking.
- Granulated sugar - I bought a standard bag from Aldi; it sweetens the filling and helps it cook down to a thick, jammy consistency.
- Cornstarch - The thickening agent that turns cooked fruit into a filling that holds its shape between layers rather than running out the sides.
- Lemon juice - I bought a small bottle of fresh-squeezed; just a small amount brightens the raspberry flavor and stops the filling from tasting flat.
- Water - Mixed with the cornstarch before it hits the pan so the starch dissolves evenly and doesn't clump when it meets the hot fruit.
For the Vanilla Cake Layers
- All-purpose flour - I bought King Arthur all-purpose; it gives the layers enough structure to stack cleanly without crumbling under the weight of the filling.
- Unsalted butter, softened - The fat that makes this cake rich and tender; unsalted is specified so you control the salt level yourself.
- Granulated sugar - Creamed with the butter at the very start, which traps air in the fat and is what makes the crumb soft rather than dense.
- Large eggs, room temperature - I bought large eggs from the grocery store; these bind the batter and add richness - cold eggs can cause the mixture to look broken and curdled.
- Egg whites, room temperature - Just the whites, no yolks; they add structure and lift to the crumb without extra density, keeping the layers tender but firm enough to stack.
- Buttermilk, room temperature - I bought a small carton of full-fat buttermilk; the acidity reacts with the baking soda to produce a finer, softer crumb.
- Vanilla extract - Flavors the entire cake; use real vanilla extract rather than imitation - in a simple vanilla cake, the difference is noticeable.
- Baking powder - A leavening agent that activates when it hits liquid and again in oven heat, giving the layers their rise.
- Baking soda - Works with the baking powder but needs an acid to activate; the buttermilk provides that acid.
- Salt - I bought fine sea salt; a small amount sharpens all the other flavors and keeps the sweetness from tasting one-dimensional.

For the White Chocolate Buttercream
- White chocolate, chopped - I bought Lindt Classic White bars and chopped them myself; it must be real white chocolate with 30-35% cocoa butter on the label - chips and baking coating won't give the buttercream the right structure. If you want a quick refresher on technique, see my guide on how to melt white chocolate.
- Unsalted butter, softened - The base of the buttercream; it needs to be genuinely soft so it beats up light and creamy rather than lumpy.
- Powdered sugar - Sweetens and thickens the buttercream; add it gradually on low speed or it will coat your entire kitchen in a fine white cloud.
- Heavy cream - I bought a small carton of heavy whipping cream; added at the end, it loosens the buttercream to a smooth, spreadable consistency.
- Vanilla extract - Rounds out the sweetness of the white chocolate so the buttercream tastes balanced rather than purely sugary.
- Pinch of salt - Balances the sweetness of the white chocolate and powdered sugar so the frosting has flavor depth, not just sweetness.

For Decoration
- Spring flowers - I used whatever was in season at my local market (you can pick small flowers from the bouquets they sell in the front).
- Fresh raspberries - I bought them just before decorating. Peak season raspberries taste noticeably better here; add them at the very last minute because fresh berries release moisture and can bleed into the buttercream over time.
- White chocolate curls - Made by dragging a vegetable peeler along the flat side of a chilled white chocolate bar - no special equipment needed.

How to Make Raspberry White Chocolate Layer Cake
1. Make and Chill the Raspberry Filling
Stir the cornstarch and water together until completely smooth, then add it to a saucepan with raspberries, sugar, and lemon juice. Cook over medium heat, stirring and gently pressing the berries as they soften. Once it comes to a boil, let it bubble for 5 minutes - this fully activates the cornstarch so the filling actually sets instead of thinning out later.

When it looks thick, glossy, and jammy, take it off the heat. Transfer to a shallow dish, press plastic wrap directly onto the surface, and chill until completely cold. Shallow is important here - it cools much faster and more evenly than a deep bowl.

2. Mix and Bake the Cake Layers
- Preheat the oven to 350°F (175°C). Grease and line three 8‑inch round pans with parchment.
- Whisk together flour, baking powder, baking soda, and salt. In a separate bowl, beat the softened butter and sugar on high speed for about 3 minutes, until the mixture is noticeably lighter and fluffy. This creaming stage is what gives you a soft crumb, so don't cut it short.
- Beat in the eggs and egg whites one at a time, then the vanilla. The batter might look a bit curdled at this point - that's fine.
- On low speed, add the dry ingredients in a few additions, alternating with the buttermilk, starting and ending with the dry. Mix just until the batter comes together and looks smooth.


Divide the batter evenly between the pans (a scale helps) and smooth the tops. Bake 28-32 minutes, until the tops are lightly golden, the centers spring back when lightly pressed, and a toothpick comes out clean or with a few soft crumbs. Cool in the pans for 10-15 minutes, then turn out onto a rack and cool completely.


3. Make the White Chocolate Buttercream
Melt the chopped white chocolate in short bursts in the microwave or over a double boiler, stirring until smooth. If you'd like a quick visual refresher on technique, I walk through tips and troubleshooting in how to melt white chocolate.
Then let it cool to room temperature - it should feel neutral to the touch, not warm. This is important; warm chocolate will melt the butter and make the frosting greasy.

Beat the butter until smooth and creamy. Add powdered sugar gradually on low, then increase the speed and beat until light.

With the mixer on low, pour in the cooled white chocolate into the butter mixture and mix until fully combined.

Add cream, vanilla, and a pinch of salt, then beat again until the buttercream is smooth and spreadable.
- If it's too stiff, let it sit at room temperature and rewhip
- If it's too soft, chill briefly and whip again.

4. Assemble and Stack the Layers
If any cake layers domed, level the tops with a serrated knife so they stack flat.
- Place the first layer on your cake board or plate. Spread a thin layer of buttercream over the top, then pipe a ring of buttercream around the edge to make a border (a buttercream dam) - this is what keeps the filling from leaking out.
- Spoon about ½ cup of chilled raspberry filling inside the border and spread it gently to the edges without breaking the dam.


Add the second layer and repeat: thin layer of buttercream, buttercream border, ½ cup filling in the center. Place the third layer on top upside down so the flat bottom becomes the top of the cake.
If you'd like extra help with this part, my guide on how to stack cake layers walks through stacking, leveling, and filling with photos and troubleshooting.
5. Crumb Coat, Chill, and Final Coat
Spread a thin layer of buttercream over the entire cake (sides and top) to catch any loose crumbs. This is your crumb coat - a quick but essential step that keeps crumbs out of your final frosting layer.

It doesn't need to look perfect - it just needs to cover everything. Chill the cake for about 20 minutes until the frosting is firm to the touch.
Once the crumb coat is set, add a thicker, final layer of buttercream, smoothing the sides with a bench scraper and the top with an offset spatula.

Decorate with fresh raspberries, white chocolate curls, and small flowers just before serving.

White Chocolate Raspberry Cake
CLICK on STARS to REVIEW the RECIPE, then CLICK OK
Ingredients
Raspberry Filling
- 1½ tablespoon water
- 1¾ tablespoon cornstarch
- 3 cups raspberries fresh or frozen
- ⅓ cup granulated sugar
- 1 teaspoon lemon juice
Cake
- 3⅔ cups all-purpose flour
- 1 teaspoon salt
- 2 teaspoon baking powder
- ¾ teaspoon baking soda
- 1½ cups unsalted butter softened
- 2 cups granulated sugar
- 3 large eggs room temperature
- 2 egg whites room temperature
- 1 tablespoon vanilla extract
- 1½ cups buttermilk room temperature
White Chocolate Buttercream
- 1½ cups unsalted butter softened
- 9 oz white chocolate melted and cooled
- 5½ cups powdered sugar
- 6 tablespoon heavy cream
- 1½ teaspoon vanilla extract
- pinch salt
Decoration
- fresh raspberries
- white chocolate curls
- spring flowers
Instructions
Make Raspberry Sauce
- Start by making the raspberry filling so it has plenty of time to cool and thicken.
- In a small bowl, stir together the water and cornstarch until completely smooth with no lumps. Add this to a saucepan along with the raspberries, sugar, and lemon juice. Set the pan over medium heat and cook, stirring regularly. As the raspberries heat, gently press them with your spatula to help them break down.
- Once the mixture comes up to a boil, let it bubble for 5 minutes, stirring occasionally, until it becomes thick and glossy. It should look like a loose jam. I fit starts to look a little too thick or dry during the boiling time you can add a splash of water.
- Remove from the heat. Transfer the filling to a shallow dish, press plastic wrap directly onto the surface, and place it in the refrigerator to chill until completely cold and thickened.
Make Cake Batter
- Preheat your oven to 350°F. Grease and line three 8-inch round cake pans.
- In a medium bowl, whisk together the flour, salt, baking powder, and baking soda, then set aside.
- In a large mixing bowl, beat the butter and sugar together on high speed until light in color and fluffy, about 3 minutes. This step is important for creating a soft, tender cake, so don't rush it.
- Add the eggs, egg whites, and vanilla, and continue mixing on high speed until everything is fully incorporated. The mixture may look slightly curdled at this stage, which is completely normal.
- Reduce the mixer speed to low and add the dry ingredients, and mix until combined. With the mixer still on low, slowly pour in the buttermilk. Mix until the batter comes together, then scrape down the sides and give it a final gentle mix by hand to ensure everything is smooth and evenly combined.
Divide Cake Batter into 3 Pans and Bake
- Divide the batter evenly between your prepared pans and smooth the tops.
- Bake for 28 to 32 minutes, or until the cakes are lightly golden on top, spring back when pressed in the center, and a toothpick inserted comes out clean or with a few soft crumbs.
- Allow the cakes to cool in the pans for about 10 to 15 minutes, then turn them out onto a wire rack and leave them to cool completely.
- While the cakes are cooling, make the buttercream.
Make White Chocolate Buttercream
- Place the chopped white chocolate in a microwave-safe bowl and heat in short bursts, stirring well between each, until smooth. Set it aside to cool for 20 minutes until it is no longer warm but still fluid.
- In a large bowl, beat the butter until smooth and creamy. Add the powdered sugar gradually on low speed, then increase the speed and beat until the mixture is light and smooth.
- Pour in the cooled white chocolate into the butter mixture and mix until fully incorporated. Add the cream, vanilla, and salt, then beat again until the buttercream is smooth, creamy, and easy to spread.
- If the buttercream feels too firm, let it sit at room temperature for a short time and rewhip. If it becomes too soft, chill briefly and then beat again to bring it back to the right consistency.
Assemble the Cake
- To assemble the cake, level the cooled cake layers if needed so they stack evenly.
- Place the first layer on your cake board or serving plate. Spread a thin layer of buttercream over the surface, then pipe a border around the edge to create a barrier. Spoon ½ cup of raspberry filling into the center and spread it gently, keeping it inside the border.
- Add the second layer and repeat the process with another thin layer of buttercream and another ½ cup of raspberry filling.
- Place the final cake layer on top, positioning it upside down so the flat base becomes the top of the cake.
- Apply a thin crumb coat over the entire cake to seal in any loose crumbs, then refrigerate for about 20 minutes until firm.
- Finish with a final layer of buttercream, smoothing the sides and top to your desired finish.
- Decorate with fresh raspberries, white chocolate curls, and fresh spring flowers.
- Slice, serve and enjoy!
The Key to a Filling That Doesn't Leak
This filling is basically a cooked raspberry jam, and two things keep it from leaking: a full boil and a cold chill. Cornstarch only fully sets once the filling has bubbled for several minutes, so keep it at a true boil for the full 5 minutes (or a bit longer if it still looks thin) until it's thick, glossy, and jammy.
Let it cool completely in a shallow dish so it chills quickly and evenly. Warm filling will soften the buttercream border and push its way out. Cold, jam‑like filling stays put inside the buttercream dam, which should be a firm, continuous ring with no gaps.

White Chocolate Buttercream - What Makes It Different
White chocolate buttercream behaves a bit differently than regular buttercream because of the cocoa butter. It firms up more in the fridge, which is actually helpful - a firm crumb coat gives you a solid base for a smooth final coat. Let the cake sit out for about 5 minutes before you start frosting again so the surface softens slightly.
Use real white chocolate with cocoa butter (around 30-35%) for the best texture. "White baking chips" and coating made with vegetable fats tend to make the frosting feel greasy and don't firm as nicely. Also, make sure the melted chocolate is truly cool - not even slightly warm - before beating it into the butter, or you'll melt the butter and end up with a grainy, separated buttercream.
How to Get Clean Slices on a Layer Cake
For neat slices, you want a cold cake and a warm, sharp knife. Let the cake sit at room temperature for 20-30 minutes so the buttercream isn't rock hard, but slice while the cake is still slightly chilled so the layers hold their shape.
Run the knife under hot water, wipe it dry, then cut straight down instead of sawing. Wipe the blade clean between each slice so you're not dragging raspberry filling and buttercream through the next piece. A thin, sharp knife makes the biggest difference - a dull or thick blade squashes the crumb before it cuts.

Make‑Ahead and Storage Instructions
- Room Temperature - The assembled cake can sit out for 2-3 hours in a cool kitchen. After that, it belongs in the fridge. Before serving, let it sit at room temperature for 20-30 minutes so the buttercream softens and the flavors aren't muted from the cold.
- Refrigerator - Store the cake in an airtight container or under a cake dome for up to 3 days. Add fresh raspberries and flowers the day you serve it - raspberries can weep onto the frosting, and flowers always look best when they're fresh.
- Freezer - Unfrosted layers freeze very well. Wrap each one tightly in two layers of plastic wrap, pop them into a freezer bag, and freeze for up to 2 months. Thaw at room temperature while still wrapped so condensation forms on the wrapping instead of the cake. You can also freeze the fully frosted cake without decorations - freeze uncovered until the buttercream is firm, then wrap. Thaw overnight in the fridge and bring to room temperature before serving.
Frequently Asked Questions
Can I use frozen raspberries?
Yes. Frozen raspberries work just as well as fresh here because the filling is cooked down completely. They release a bit more liquid, so you may need an extra minute or two of boiling - go by look more than time. The filling should be thick and jammy, not saucy. Don't thaw the berries first; add them straight from the freezer.
Why did my buttercream turn grainy?
That usually means the white chocolate was too warm when you mixed it into the butter. Warm chocolate melts the butter fat and the frosting goes greasy or grainy. Next time, let the chocolate cool until it feels neutral on your wrist. If it's already grainy, try gently warming a few spoonfuls of the buttercream, then beating that back into the bowl, or let the whole bowl sit at room temperature for 10 minutes and rewhip.
Why did my layers slide?
Most of the time, layers slide because the filling was still warm or the buttercream border had a gap. Warm filling softens the border and pushes its way out. Make sure the filling is fully cold and thick before you assemble, and don't overfill - about ½ cup per layer is the sweet spot for this recipe.
Can I make this cake ahead?
Yes, and it actually benefits from it. The filling and cake layers can both be made ahead, and the fully assembled cake keeps in the fridge for up to 3 days. A night in the fridge helps the layers and filling settle, which makes slicing easier. Just wait to add fresh raspberries and flowers until the day you serve.
What's the difference between white chocolate ganache and white chocolate buttercream?
White chocolate ganache is just white chocolate and cream; it sets firm and has a fudgy texture when cooled. White chocolate buttercream is built on butter with white chocolate, powdered sugar, and cream beaten in, so it's lighter and more spreadable. For a tall, three‑layer cake with a soft filling and crumb coat + final coat, buttercream is easier to work with and more forgiving than ganache.
Can I make this as a two‑layer cake?
You can. Divide the batter between two 8‑inch pans instead of three - the layers will be taller and need a few extra minutes in the oven. Start checking around 35 minutes and use the same tests: golden top, springy center, and a mostly clean toothpick. Keep the ½ cup of filling per layer and the buttercream border. The cake will be shorter overall and a bit easier to frost, with a slightly different crumb‑to‑filling ratio.
More Layer Cake Recipes You'll Love
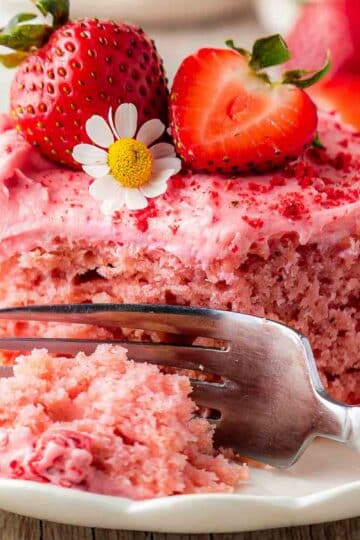
- Chocolate Strawberry Cake - Three layers of moist chocolate cake with a fresh strawberry filling and strawberry buttercream, finished with chocolate ganache. Same buttercream dam assembly method as this cake, different flavor direction entirely.
- Lemon Raspberry Cake with Raspberry Buttercream - Tender double-cream lemon layers with a raspberry jam filling and silky freeze-dried raspberry buttercream.
- Berry Chantilly Cake - Soft vanilla layers made with the reverse creaming method, a lemon-kissed fresh berry filling, and a whipped mascarpone cream cheese frosting. Lighter in texture than this cake and built for spring and summer tables.
- Moist Lemon Blueberry Layer Cake - Two layers of fluffy lemon cake with fresh blueberries and lemon buttercream. A smaller, simpler cake if you want a layer cake without the three-tier assembly process.
- Moist Triple Layer Chocolate Cake - Oil-based, sour cream chocolate layers that stay moist for five days, with a cream cheese chocolate frosting that is silkier and less sweet than a standard buttercream. A reliable go-to for chocolate cake occasions.
- The Vanilla Blueberry Layer Cake I'm Bringing to Every Summer Celebration - The only way I eat blueberries in the summer.


Tawni Price says
The cake was a real winner thank you for sharing
Olya Shepard says
Thank you! I'm glad you enjoyed it!