
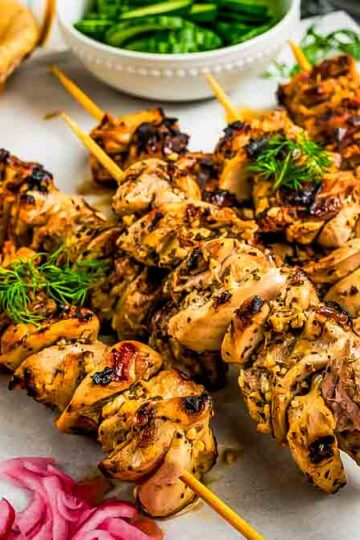
These chicken fajita skewers are built on a citrusy lime‑and‑orange marinade that I tested both on the grill and in the oven for the best char and juiciness. Lime zest, fresh orange juice, honey, and jalapeño boost flavor and browning, while a quick microwave step for the onions helps them cook through without drying out the chicken. The result is juicy, deeply flavored skewers you can serve straight from the sticks or tucked into tortillas, with dialed‑in temps and settings you can repeat every time.
Want more Chicken Kebabs? Try BBQ Chicken Kebabs and Chicken and Bacon Shish Kebabs next.

These chicken fajita skewers are a reader favorite, and they're featured alongside 14 other global skewer styles in the 15 best kebab and skewer recipes around the world - a great place to start if you're building a skewer night menu. Use either Wood or Metal Skewers.
They look simple, but the difference between juicy chicken with soft peppers and onions and a tray of dry meat and crunchy vegetables comes down to a few specific choices I've dialed in here. For this recipe I built a citrusy fajita marinade with lime juice and zest, orange juice, honey, garlic, jalapeño, and plenty of spices, then tested it on the grill at about 400°F and in a 425°F oven with a final broil to see which settings gave the best char without overcooking the chicken.
Along the way I figured out how thick to cut the chicken and veggies, how long to marinate, why I briefly microwave the onions before skewering them, and how to use the reserved marinade for basting and an air‑fryer reheat so these chicken fajita skewers stay soft, juicy, and full of flavor even on day two.
If you love cooking over open flame, don't miss these favorite grill and smoker recipes.
Why I love this recipe
- It fixes the raw‑onion vs dry‑chicken problem you see in a lot of fajita skewers by briefly microwaving the onions first, so they soften at the same time the chicken cooks through.
- The citrus marinade isn't just about flavor - the lime zest, orange juice, and honey all help the chicken brown and pick up that fajita "sizzle" whether you're cooking at about 400°F on the grill or 425°F in the oven with a quick broil.
- I love that I've actually tested both cooking methods and have exact times and temps: grill 9-11 minutes total at medium to medium‑high heat vs 15-20 minutes in the oven plus a broil, so you can choose what works with your setup and still get that char.
- Leftovers reheat shockingly well in the air fryer at 330°F for a few minutes, so this isn't just a one‑night meal - it's also a great make‑ahead option for tacos, bowls, and fajita salads.
Serve them with BBQ sauce or even Mint Yogurt Sauce.

What are the ingredients?
You will need 2 or 3 chicken breasts, cut into large pieces, bell peppers, yellow onion and red onion. Marinade ingredients include:
- Juice and zest of 2 limes
- Orange juice from freshly squeezed oranges or store bought.
- Canola oil
- Honey
- Jalapeno - diced
- Garlic - minced, salt & coarse ground pepper


How to Make Chicken Fajita Skewers
This is an overview with step-by-step photos. Full ingredients, measurements & instructions are in the recipe card below.
1. Prepare the Marinade
In a mixing bowl whisk together all the marinade ingredients together except the chicken until well combined. Add the chicken pieces and toss to coat evenly. Cover with plastic wrap and refrigerate for at least 1 hour or up to overnight.

2. Prepare Chicken And Assemble the Skewers
- Remove chicken from fridge 20-30 minutes before placing on the grill
- Heat your grill over medium to medium-high heat. You are aiming for about 400 F.
- Microwave the onions for 20-30 seconds before you put them on the skewers. Raw onions take longer to cook properly than chicken.
- While the grill heats up, assemble the skewers in a pattern of veggies and chicken pieces or randomly place them on if desired. Reserve the marinade.

Method 1: Grill
- Brush the grill grates with canola oil and place the chicken skewers on top. Brush the top of the skewers generously with the marinade, and close the lid and grill for 5-6 minutes.
- Flip the skewers and cook for an additional 4-5 minutes or until the chicken reaches an internal temperature of 165 F.
- Remove from the grill and let rest for 5 minutes before serving with your desired garnishes and sides.
Method 2: Bake
- Preheat the oven to 425°F. Line a baking tray with aluminum foil, place a wire rack on top of the baking tray, and set it aside.
- Thread marinated chicken onto metal skewers. Soak wooden skewers in water for 30 minutes if using those.
- Place skewers on a rack over a baking sheet and bake for 15-20 minutes, broiling for the last 3-5 minutes for char.


Chicken Fajita Skewers
Ingredients
Marinade
- juice and zest of 2 limes
- ¼ cup orange juice (freshly squeezed or store bought)
- 3 tablespoon canola oil
- 1 tablespoon honey
- 1 tablespoon cilantro chopped
- 1 jalapeno diced
- 3 cloves garlic minced
- 2 teaspoon chili powder
- 1 tablespoon garlic powder
- 1 tablespoon cumin
- ½ teaspoon salt
- ¼ teaspoon coarse ground pepper
- 1½ lbs chicken breasts cut into 1½ inch pieces
Instructions
Marinate the chicken
- In a mixing bowl whisk together all the marinade ingredients together except the chicken until well combined.
- Add the chicken pieces and toss to coat evenly. Cover with plastic wrap and refrigerate for at least 1 hour or up to overnight.
- Remove chicken from fridge 20-30 minutes before placing on the grill.
Grilling Method
- Heat your grill over medium to medium-high heat. You are aiming for about 400 F.
Microwave the onions for 20-30 seconds before you put them on the skewers. Raw onions take longer to cook properly than chicken.
- While the grill heats up, assemble the skewers in a pattern of veggies and chicken pieces or randomly place them on if desired. Reserve the marinade.
- Brush the grill grates with canola oil and place the chicken skewers on top. Brush the top of the skewers generously with the marinade, and close the lid and grill for 5-6 minutes.
- Flip the skewers and cook for an additional 4-5 minutes or until the chicken reaches an internal temperature of 165 F.
- Remove from the grill and let rest for 5 minutes before serving with your desired garnishes and sides.
Oven Method
- Preheat oven to 425 F.
- Line a baking tray with aluminum foil, place a wire rack on top of the baking tray, and set it aside.
- Place skewers on a rack over a baking sheet and bake for 15-20 minutes, broiling for the last 3-5 minutes for char.
- Once done, arrange the tandoori chicken skewers on a plate and sprinkle with fresh parsley, and serve with lemon wedges.
Helpful Tips on Making Chicken Fajita Kebabs
- Microwave the onions for 20-30 seconds before you put them on the skewers. Raw onions take longer to cook properly than chicken does so you're either left with tough, overcooked meat or undercooked onions.
- You can keep the seeds in for the marinade or remove them. I like keeping them because it adds more flavor to the chicken while marinating. If you don't want this at all spicy, remove the membranes and seeds.
- You can use chicken thighs instead of breasts.
- If using wooden skewers make sure to soak them in water at least 30 minutes before assembling.
Marinade time
The citrusy fajita marinade is strong enough that time becomes a big variable for both flavor and texture. I tested short, medium, and long marinating windows to see where the chicken tastes best without starting to "cook" in the acid.
A very quick 15-20 minute soak gave the chicken nice surface flavor but not as much depth; it works if you're rushing, but tastes more lightly seasoned. Around 1-2 hours in the lime, orange, honey, jalapeño, and spice mixture gave the best balance: the meat was noticeably more flavorful and still very tender.
When I pushed the marinade overnight, the lime started to work too hard-the outside of the chicken felt a touch pre‑cooked and could turn slightly firmer, especially on smaller pieces-so I recommend staying in roughly the 1-4 hour range for ideal flavor and texture.
Veggie prep and onion texture
Getting peppers and onions to soften in the same time that chicken cooks through is the main challenge with fajita skewers. When I threaded raw onion and peppers with the chicken and grilled everything at the same heat and time, the chicken hit 165°F just as the onions were still pretty sharp and crunchy.
Cutting the vegetables much smaller helped them cook faster, but very small pieces charred and broke apart easily on the skewers. The best compromise was to keep the peppers and onions in reasonable fajita‑style strips and chunks, but briefly pre‑soften the onions in the microwave before skewering. That quick head start on the onions let both vegetables land closer to that soft‑but‑still‑structured fajita texture in the same window the chicken needed on the grill or in the oven.
Grill versus oven temperature
I wanted the recipe to work reliably on both the grill and in the oven, so I tested specific temperature ranges instead of saying "medium heat." On the grill at a true medium to medium‑high (about 400°F), the chicken and vegetables picked up color and light char in roughly 9-11 minutes total with one good flip; the citrus and honey in the marinade helped the surface brown nicely.
At lower grill temps, the skewers cooked through but stayed paler and the vegetables tasted more steamed than grilled. In the oven at 425°F, the skewers roasted evenly but didn't develop the same level of char until I finished with a short broil.
That final broil produced a result much closer to the grilled version, which is why the oven method is written as 425°F roast plus a brief broil at the end instead of just baking.
Skewer layout and spacing
How tightly you pack the skewers changes how everything cooks. When I slid chicken and vegetables tightly together with almost no gaps, the center pieces tended to stay paler and took longer to cook; the crowded skewers trapped steam and made the vegetables softer but less charred.
Leaving a little space between pieces allowed hot air and heat to circulate so the chicken cooked more evenly and the peppers and onions picked up better browning on their edges. I also compared mixed skewers (alternating chicken and vegetables) with "all‑chicken" and "all‑veggie" skewers cooked side by side. Mixed skewers gave the best overall experience here-every bite had some chicken, pepper, and onion, and the shared marinade on a single skewer helped the flavors blend more like classic fajitas.
Troubleshooting dry chicken
If your chicken comes out dry, the most common culprit is a mismatch between heat and time. If the outside is very dark while the inside is just at 165°F, your grill or oven is probably running a bit hotter than intended; slightly lowering the heat or moving the skewers to a cooler zone for the last few minutes can help.
On the flip side, dropping the temperature too low and extending the cook time can also dry the chicken out as it sits on the heat waiting for color. It's better to keep the grill around 400°F or the oven at 425°F and start checking a couple of minutes before the suggested time-pull the skewers as soon as the chicken is opaque all the way through and juicy when cut.
Also make sure you're including the oil in the marinade; that bit of fat helps cushion the chicken against direct heat and promotes even browning instead of a tough, dry surface.

Troubleshooting crunchy peppers and onions
If your onions and peppers are still too crunchy when the chicken is done, there are a few easy adjustments. Giving the onions that quick microwave head start makes a surprisingly big difference; skipping it almost always leaves you with onions that are more raw‑crisp than fajita‑soft.
You can also adjust how you cut the vegetables: very thick pepper strips and large onion wedges simply need more time than 1-1¼‑inch chicken chunks, so trimming them slightly thinner or smaller helps everything finish together.
In the oven, if the vegetables are cooked through but lack that charred edge, a short broil at the end will give them color without needing to extend the total roast time and risk overcooking the chicken. On the grill, a brief move to a slightly hotter spot for the last minute or so has a similar effect-just enough direct heat to blister the edges without drying out the meat.
Serving Suggestions
Serve these chicken kebabs with salsa, sour cream, guacamole, and tortillas!
How to store fajita chicken skewers
- Storage: Save leftovers in an airtight container in the fridge for up to 4 days.
- Reheat: For best results, reheat in an air fryer at 330 for about 4 minutes.



Doll says
I followed instructions exactly. The kebabs turned out perfect! Thank you so much for such a beautifully made recipe and instructions are perfect!
Maira says
I was on vacation and we had a kitchen so while I didn’t make these on the grill. I sautéed the hack out of them and then baked them. I added so many veggies. I use the whole small onions. I sprinkled it with the sauce I bought from the store and my family just loved it.
Olya says
That's the way to do it! great job!!