

The difference between perfectly cooked pan seared shrimp and a rubbery disappointment is about 30 seconds - and it comes down to three things: dry shrimp, a hot pan, and knowing exactly when to pull them.
Cooking shrimp is so easy if you just know how
If your shrimp keeps coming out rubbery, pale, or swimming in liquid, the recipe isn't the problem - the technique is. Pan seared shrimp on the stove is a 5-minute cook, but those 5 minutes are unforgiving: wrong pan temperature, wet shrimp, or 30 extra seconds on the heat and the texture is gone.
Learn exactly how to cook shrimp on the stove so it comes out juicy and golden every time - with a proper sear, not a steam - whether you're serving it over pasta, in tacos, or as a fast weeknight protein straight from the skillet.
If you want to get really comfortable with shrimp beyond the stovetop-how to buy it, thaw it, and use it in all kinds of recipes-start with my full Shrimp Guide. From there, this pan‑seared method is your go‑to for quick, juicy shrimp on the stove
Best Shrimp for Pan Searing
Shrimp labels can be so confusing, don't you think? If you've ever stood in front of the seafood case wondering what "16/20" or "31/35" actually means, I break it all down in my guide on Which Shrimp to Buy, including frozen vs "fresh," size, and shell‑on vs peeled.
Why This Pan-Seared Shrimp Works Every Time
Pan searing uses high heat and a thin layer of fat to quickly brown the outside of the shrimp while keeping the inside juicy. Because shrimp cook in just a few minutes, this method is ideal for weeknights and for adding protein to pasta, rice, salads, tacos, and more.
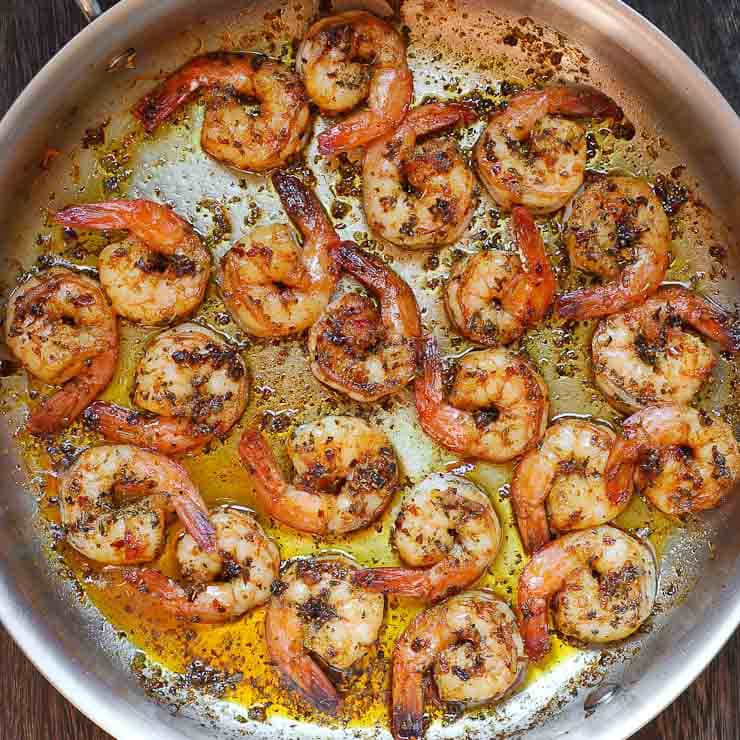
Well-executed pan seared shrimp develop a light golden crust, a firm but tender bite, and a clean, sweet shrimp flavor instead of rubbery or mushy texture. The technique is straightforward once you understand the common mistakes to avoid. But if you want to take a look at those mistakes for self-education and to prevent them from happening, I have a full troubleshooting breakdown in Why Your Shrimp Goes Wrong (and How to Fix It).
Oil vs. Butter: Which to Use
This is one of those questions that has a genuinely correct answer, not just a matter of preference - and it depends entirely on when you add each one.
The problem with butter alone: Butter burns. Add butter to a ripping hot pan and the milk solids scorch almost immediately, turning bitter and dark before your shrimp even hits the surface. This is true whether you're searing plain shrimp or building the base for something like Creamy Shrimp with Spinach - starting with scorched butter poisons the entire dish.
The problem with oil alone: A neutral oil like vegetable or canola handles the heat perfectly and gives you a clean, golden sear. But it contributes zero flavor. Shrimp cooked purely in neutral oil tastes flat, which means you're leaning entirely on your seasoning to carry the dish.
The correct answer is both - in sequence. Start with a high-smoke-point oil (avocado oil, refined olive oil, or a neutral vegetable oil) to build your sear. Get your shrimp golden on the first side, flip them, then add butter in the final 60 seconds of cooking. At that point, the pan temperature has dropped slightly and you're basting rather than searing - the butter melts fast, coats the shrimp in richness, and the milk solids brown just enough to add nuttiness without burning. This is the exact finish that makes Hawaiian Shrimp - with its garlicky butter sauce - taste so impossibly good for a 20-minute dinner.
The formula to remember: oil for the sear, butter for the finish. It's the same principle professional kitchens use on proteins from scallops to steak - and if you want to see it applied to another quick seafood prep, How to Cook Calamari Without Frying follows the exact same logic.
Ingredients You Need
- Shrimp (fresh or frozen, peeled and deveined): Shrimp are the star and need to be cleaned well for the best flavor and texture; peeling and deveining removes grit and the intestinal "vein" that can taste muddy if left in. Large or extra-large shrimp are easiest to sear without overcooking, while very small shrimp cook so fast they're easy to dry out. Always start with frozen shrimp if possible-they're often fresher than "fresh" counter shrimp and have the right texture
- Olive oil and/or butter: Oil (such as canola, avocado, or light olive oil) tolerates higher heat and helps shrimp sear instead of steam. Butter adds rich flavor and browning but can burn on its own at high heat, so I like to combine oil for searing with butter added toward the end for flavor.
- Salt: Lightly salting ahead of time also enhances their natural sweetness without making them taste "salty."
- Fresh garlic (or garlic powder): Garlic builds savory depth and makes a simple pan sauce taste restaurant-quality. Fresh garlic should be added near the end so it softens and turns fragrant without burning in the hot pan.
- Olive oil helps to cook the shrimp evenly so they don't stick to the pan or burn. It adds a mild, pleasant flavor and helps the shrimp develop a golden color as they sear. Butter can also be used for a richer taste, but it can smoke faster, so watch the heat. Pick oil or butter based on the flavor. you want-oil for light and fresh, butter for more savory results.
- Salt is needed for flavor-shrimp on its own can be bland. Salt seasons shrimp and helps draw a little surface moisture out so the exterior browns better. Salt also helps the shrimp retain a juicy, tender texture, so don't skip it. Use just enough to amplify the other seasonings without overpowering.
- Italian seasoning, black pepper and paprika: Add herb flavor and color for a simple but delicious result. Basic black pepper plus spices like paprika, garlic powder, onion powder, or chili powder add flavor without extra effort. Paprika and chili-based spices also deepen color, making shrimp look more golden and appetizing.
- Red pepper flakes: Optional; for a bit of heat and extra flavor.
Ingredient Swaps and Adjustments
- Oil and butter: For a fully dairy-free version, avocado oil is the best straight swap - its neutral flavor and high smoke point (~520°F) make it ideal for high-heat searing without any flavor compromise. Refined coconut oil works too but adds a subtle sweetness that only pairs well with certain seasoning profiles. If you're sensitive to dairy but still want that buttery richness, ghee is the cleanest solution.
- Garlic: Garlic powder (used in this recipe) gives even, consistent flavor across every shrimp. If you want a sharper, more pungent hit, swap in 2 cloves of freshly minced garlic - but add it to the pan after the shrimp come out, not before, or it will burn.
- Low sodium: Cut the added salt and lean on a squeeze of fresh lemon juice and a splash of white wine vinegar at the finish. Acid mimics the flavor-amplifying effect of salt without adding sodium - it brightens the entire dish and makes the seasoning taste more present, not less.
- Heat level: The red pepper flakes are easy to scale in either direction. Skip entirely for mild shrimp, double for a spicy version, or replace with Cajun seasoning for a smoky-spicy profile - the same blend that anchors the Creamy Cajun Shrimp and Sausage Pasta.

How to Cook Shrimp so They are Juicy, Not Rubbery
This is an overview with step-by-step photos. Full ingredients, measurements & instructions are in the recipe card below.
1. Season the Shrimp
Dry shrimp thoroughly with paper towels before they hit the pan. Surface moisture is the enemy of a sear. Wet shrimp steam instead of brown, and no amount of technique will fix that.
Place thawed, dried shrimp into a mixing bowl. Add salt and seasonings, tossing well to evenly coat all pieces. Shrimp's mild flavor makes it an ideal canvas for bold or subtle flavor profiles.
Pro Tip Worth Knowing: Add a pinch of sugar for deeper browning. A tiny pinch of granulated sugar mixed into your dry seasoning before searing accelerates browning on the shrimp's surface, giving you noticeably deeper caramelization and color without making the shrimp taste sweet. Use sparingly - a quarter teaspoon for a full pound of shrimp is enough.
2. Heat The Pan Properly
Add olive oil and butter to your skillet. Tilt gently to coat the bottom, heating over medium-high. A properly heated pan is crucial for quick cooking and optimal browning. Allow oil to shimmer but not smoke before proceeding.
3. Sear the Shrimp (Don't Touch It!)
Add shrimp in a single layer to the hot pan. If they don't sizzle on contact, the pan needs more preheat. Avoid overcrowding to ensure even cooking. Cook for 2-3 minutes on one side, flip, then cook for another 2-3 minutes. Turn only once.
Pro Tip: Add butter in the final 60 seconds of cooking!
4. Check for Doneness: The C vs. 0 Rule
- Perfect shrimp are pink, opaque, and curl into a "C" shape. Undercooked shrimp are loose "U" shapes and slightly translucent; overcooked will tighten into an "O" and turn rubbery.
- One minute they're a bit odd-looking and unappealing, and the next minute it's hard to keep from eating them directly from the pan. There's absolutely no guesswork involved.
- Remove immediately once pink and firm.
If you're ever unsure about timing, don't just trust the clock-use visual cues. I walk through the color, shape, and texture signs I look for in How to Tell When Shrimp Is Done.
5. Serve Immediately
Transfer cooked shrimp to a serving dish. Serve seared shrimp immediately with Garlic Butter Spaghetti or Creamy Garlic Potatoes for maximum freshness.

How to Cook Shrimp on the Stove (Pan Seared, Juicy Every Time)
CLICK on STARS to REVIEW the RECIPE, then CLICK OK
Ingredients
- 1 tablespoon olive oil (or butter)
- 1 tablespoon butter
- 1 lb. shrimp (defrosted and deveined)
Seasoning Mixture:
- 1 teaspoon Italian seasoning
- ½ teaspoon paprika
- 1 teaspoon garlic powder
- ½ teaspoon salt
- ½ teaspoon black pepper
- ½ teaspoon red pepper flakes
Instructions
Season Shrimp
- Put shrimp in a mixing bowl and rub in seasoning mixture. Mix well to make sure shrimp is coated well.
Pan Sear Shrimp in Oil
- Heat olive oil in a large skillet over medium heat.
- Add shrimp to the hot pan and cook for about 2-3 minutes on each side, turning once midway, until shrimp is pink and cooked through.
Add Butter at the End of Cooking Shrimp
- Add butter in the final 60 seconds of cooking!
- Remove shrimp from the skillet.
- Serve immediately.
Once you've nailed this stovetop method, it's easy to take shrimp in a healthier direction too. I put my favorite lighter dinners-low‑carb, high‑protein, and veggie‑heavy-into one place in this Healthy Shrimp Recipes roundup.
How Long Does It Take to Cook Shrimp?
Faster than you think, and that's exactly where most people go wrong.
- Large shrimp (31/35 count): 1½ to 2 minutes per side over medium-high heat - about 3 to 4 minutes total.
- Jumbo shrimp (16/20 count): 2 to 2½ minutes per side - about 4 to 5 minutes total.
- Extra-large shrimp (26/30 count): splits the difference at roughly 2 minutes per side.
Those times assume a properly preheated pan, shrimp that have been dried thoroughly, and shrimp that go in at room temperature - not straight from the fridge.
Cold shrimp added to a hot pan drops the surface temperature immediately and throws off every timing estimate.
The more important principle: cook by visual cues, not the clock. Shrimp size varies by brand, your burner output varies from mine, and your pan material changes heat retention entirely.
Frequently Asked Questions
Can you cook frozen shrimp without thawing? Technically you can, but you shouldn't for pan searing. Adding frozen shrimp straight to a hot pan floods the skillet with water, drops the temperature, and guarantees steamed, rubbery shrimp with no color. For best results, thaw under cold running water for 5-7 minutes, tossing occasionally, then dry very thoroughly with paper towels before seasoning and searing.
Do you need to peel and devein shrimp before cooking? For pan‑seared shrimp on the stove, yes. Shell‑on shrimp do have slightly better flavor, but you'll get a much better golden crust when the flesh is in direct contact with the hot pan. Peeling and deveining also removes grit and the vein that can taste muddy, and it only takes a few seconds per shrimp.
What is the best pan for cooking shrimp on the stove? A cast iron skillet or stainless steel pan gives you the best sear and deepest browning because they hold high heat well. A nonstick pan is more forgiving and works for beginners, but it usually won't deliver the same caramelized crust because the coating limits surface temperature. Whichever pan you use, preheat it for at least 2 minutes over medium‑high heat before adding oil and shrimp.
How long does it take to cook shrimp in a pan? On a properly preheated skillet, large shrimp (31/35) need about 1½-2 minutes per side, while jumbo shrimp (16/20) are closer to 2-2½ minutes per side. Use time as a guideline only; always confirm doneness with visual cues (pink and opaque, loose C‑shape) and texture (firm but not bouncy).
How can you tell when shrimp is done? Look for three cues at once: color, shape, and texture. Cooked shrimp are pink and opaque, curl into a loose C‑shape, and feel firm with a slight spring when pressed with tongs. If they tighten into an O‑shape and feel bouncy like a rubber eraser, they're overcooked.
Can you reheat cooked shrimp? Yes, but reheat very quickly to avoid turning them rubbery. The best method is a 30-60 second toss in a hot pan with a little oil or butter-just until warmed through. Avoid microwaving, which makes shrimp weep water and ruins both texture and sauce; for pasta dishes, add leftover shrimp off the heat and let the hot sauce warm them gently.
Can I use pre‑seasoned or marinated shrimp for pan searing? You can, but be careful with marinades that contain sugar, honey, citrus, or soy, because they burn fast in a hot pan. For a high‑heat sear, season shrimp with dry spices and salt first, then build a sauce in the pan after the shrimp come out and toss them back in at the end.
Variations to Try
- Garlic butter shrimp: Finish seared shrimp with plenty of butter, minced garlic, lemon, and parsley for a classic steakhouse-style preparation.
- Spicy Cajun shrimp: Toss shrimp with a bold Cajun or blackening seasoning blend and sear in oil, then finish with lemon and a little butter to tame the heat.
- Lemon herb shrimp: Season with paprika, garlic, and dried Italian herbs; after searing, deglaze with lemon juice and a splash of broth and finish with fresh basil or parsley.
- Chili-lime shrimp: Combine chili powder, cumin, garlic powder, and lime; sear quickly and serve in tacos, bowls, or over salad.
- Honey garlic shrimp: After searing, add a quick mixture of soy sauce, honey, and garlic to the pan and simmer briefly until thickened and glossy, coating the shrimp.
Other Ways to Cook Shrimp
The stove is just one option. If you're firing up the grill, I have a full step‑by‑step on timing, skewers, and marinades in my How to Grill Shrimp guide, and my Shrimp Guide pulls everything together in one place-from buying and thawing to every way to cook shrimp.
How to Make Shrimp into Dinner
While I could probably be perfectly happy with a bowl of shrimp and nothing else, most of the time shrimp needs some accompaniment, usually carbs, to make it a meal.
Shrimp pairs beautifully with pasta, rice, or salads for complete meals. Try tossing with pesto and fettuccine, serve atop orzo or risotto, pile into shrimp tacos, or toss with roasted carrots.
For a classic presentation, consider creamy Cajun shrimp pasta, garlic butter shrimp with French bread, or Mediterranean bowls with tomatoes and greens.
Storage and Leftovers
Shrimp are best eaten right after cooking, but careful storage keeps them usable for quick meals.
- Cooling: Let shrimp cool to room temperature briefly, but avoid leaving them out for extended periods for food safety.
- Refrigeration: Store cooked shrimp in an airtight container in the refrigerator and use within a couple of days for best texture and flavor.
- Reheating: Reheat very gently over low heat or briefly in a hot pan just until warmed through to avoid turning them rubbery; or serve chilled on salads or in shrimp cocktails instead of reheating.
- Freezing leftovers: Cooked shrimp can be frozen but may lose some ideal texture; raw shrimp generally freeze better and keep quality longer.


Vika says
How do I adjust this for shrimp still in its casing?