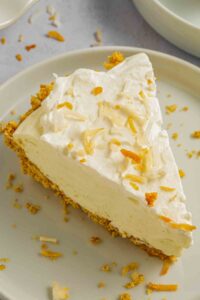
This No Bake Chocolate Pudding Pie has a crunchy Oreo crust, creamy double chocolate layers, and Cool Whip topping - ready in 20 minutes with no oven required!
Love No Bake Desserts made with pudding mix? Try Root Beer Float Pie and Eggnog Pie next.

No Bake Chocolate Pudding Pie with Oreo Crust is a masterpiece of convenience and taste. It eliminates oven time, making it ideal for warm weather or busy schedules. The Oreo crust provides a chocolaty crunch that perfectly balances the creamy pudding.
It wouldn't last a day in my house, but if it survives in yours, definitely take it to share to potlucks, church gatherings or birthdays, especially during hot summer months. And don't forget about No Bake Strawberry Cream Pie.
Five Star Reviews
Margaret commented: "This is literally the best chocolate cream pie I've ever made, and I'm a beginner, that's how easy it is! I used a graham cracker crust. Everyone LOVED it! Definitely going down as my go-to chocolate pie recipe from now on out. Highly recommend!★★★★★"
Why I Love This Recipe
- No Oven=No Fuss. This pie is perfect for those warm months when you want to keep the house cool. No bake desserts rule!
- Ready in 20 Minutes: It's super simple and quick to make with minimal number of ingredients.

Ingredients You'll Need
- Pre-made Oreo Pie crust: Unlike my No Bake Oreo Dessert, where I crushed Oreos to make the crust, here I use premade Oreo crust: it's thin, not labor intensive at all, and cuts nicely. Perfect for hot summer months without turning your oven on!
- Half and half: I used 2 cups.
- Chocolate Instant Pudding: This recipe calls for 3.4 ounce boxes, not 3.9 ounces. Also please make sure that it's instant pudding because this dessert work with the pudding that you cook on the stove top. I used Jell-O chocolate pudding.
- Cool Whip: 1 package of thawed Cool Whip.
- Hershey's milk chocolate bar: Using a vegetable peeler, shave decorative chocolate shavings out of Hershey's milk for the topping. I used the entire chocolate bar.
- Dark chocolate: Using the same peeler, grate some dark chocolate over the top for chocolate dust. This in my opinion, should not be skipped, even though it's not the most essential part, but it makes you say YUM with every bite!

Equipment
- You will need a whisk to make chocolate pudding, such as this stainless steel comfortable grip whisk.
- Spatula will help you to spread the layers.
- Vegetable peeler for chocolate decoration on top, such as this serrated swivel peeler.
- I also used medium bowl such as one of these non-slip stainless steel bowls that come with lids.

How to make no bake chocolate pudding pie
This is an overview of the process with photos in each step. The entire recipe with measurements is below in the recipe card.
1. Prepare Oreo pie crust: Take pie crust out of package, but make sure to keep it inside the foil. Do not turn it upside down or attempt to take it out, otherwise the crust will get crumbled and destroyed. The crust is very crumbly so be gentle and careful.

2. Make the chocolate pudding filling: Add half and half to the medium bowl. Then add both packages of instant chocolate pudding. Using a whisk, mix for 2 minutes until the mix is all dissolved and smooth in texture.
Refrigerate: Allow the pudding to sit in the fridge or freezer for 5 minutes so that it thickens.

3. Add 1st chocolate layer: Once the pudding is thick, take about ½ of the chocolate pudding mixture and add it onto the Oreo crust.

Using a spatula even it out flat.

4. Mix Cool Whip with Chocolate Pudding. Next, add ½ of the Cool Whip package to the remaining half of the chocolate pudding in the bowl. Make sure that your cool whip is thawed.
Whisk chocolate pudding and whip cream together (you can also use a spatula to do that). The mixture will be lighter in color than the first layer due to the Cool Whip.

5. Add chocolate-cool whip layer: Add it on top of the first layer.

Even it out: This layer is much smoother and lighter than the first chocolate layer. Spread chocolate/cool whip mixture with a spatula to even it out:

6. Create cool whip topping: Add remaining Cool Whip on top of the second layer, and work with a spatula to spread it out. I used short circular motions with my spatula to create the spikes in the cool whip.

7. Make chocolate shavings for topping: Using vegetable peeler, Hershey's milk chocolate bar and dark chocolate, make chocolate shavings for the topping.

The long strips are from Hershey's milk chocolate while the finer dust is from grated dark chocolate. I used same peeler to make both.


No Bake Chocolate Pudding Pie
CLICK on STARS to REVIEW the RECIPE, then CLICK OK
Ingredients
- 1 Oreo pie crust
- 2 boxes instant chocolate pudding 3.4 oz each (such as Jell-O)
- 2 cups half and half (or half cream/half milk)
- 8 oz. Cool Whip (1 package) thawed
- 1 milk chocolate bar (such as Hershey's)
- dark chocolate (for garnish)
Instructions
- Take pie crust out of package and keep it inside the foil. Do not turn it upside down or attempt to take it out - it will get crumbled and destroyed
Prepare Chocolate Pudding
- Combine dry pudding mixes and half & half in a mixing bowl. Using a whisk, mix for 2 minutes, until the instant pudding mix is dissolved. Allow the pudding to sit in the fridge or freezer for 5 more minutes so that it thickens.
First Layer
- Take about half of the chocolate pudding mixture and add it into the bottom of the pie crust. Using a spatula, spread it evenly.
Second Layer
- Add ½ of the thawed Cool Whip package to the remaining half of the chocolate pudding in the bowl and mix together with a spatula to form a uniform mixture.Add this chocolate pudding/Cool Whip mixture on top of the first layer. Use a spatula to even it out.
Cool Whip Layer
- Add remaining Cool Whip on top. Spread the Cool Whip on top of the second layer with a spatula. I used circular motions with my spatulato create the spikes
- Using a vegetable peeler, shave decorative chocolate shavings out of Hershey's milk chocolate right over the Cool Whip. And then using same peeler, grate some dark chocolate over the top as well.
Refrigerate before slicing
- Refrigerate the pie for at least 4 hours or preferably overnight before attempting to slice it! You can also freeze it for at least 1 hour. This step is necessary for the layers to set and become firm.
Make sure to get a good amount of chocolate shavings as well as some chocolate dust on top of the cool whip layer.

How to Get Clean Layers
- Start with the Right Pudding Consistency: Make your pudding thick before layering. Whisk the instant pudding mix with half and half or cold milk for a full 2 minutes until it's noticeably thick - not runny. If it's too loose, it will bleed into adjacent layers and blur the lines. Whole milk gives you the thickest, richest result.
- Chill Between Each Layer: This is the most important step for sharp definition. After spreading each layer, refrigerate for 20-30 minutes before adding the next one. This firms up the surface so the next layer floats on top instead of mixing in. For even faster results, use the freezer for 10-15 minutes per layer - the pudding won't freeze solid but will set enough to hold its shape.
- Use an offset spatula and work in gentle, even strokes - avoid pressing down hard into the layer below
- Dollop the next layer in the center first, then spread outward to the edges; this prevents disturbing the layer underneath.
Freezer Shortcut
Pudding is mostly water, sugar, and starch. The freezer rapidly drops the temperature, causing the starch molecules to set and firm up the layer's surface quickly - without actually freezing the filling solid. This gives you a stable, cuttable surface to build the next layer on top of without the layers bleeding together. Here's what to do:
- After spreading each layer, place the entire pie (uncovered) in the freezer for 10-15 minutes per layer
- For a fully assembled pie, freeze for 1-2 hours total - at this point the pudding is firm enough to slice cleanly but not frozen through
- Before serving, let it thaw in the fridge for a few minutes so the texture softens back to creamy rather than icy
Tips for Success
- Follow the Recipe Card, Not the Box!
The Jell-O instant pudding box can be tricky with its measurements. This recipe calls for less milk than the box suggests so your pie sets up perfectly without being runny. Trust the recipe, not the box directions. - Get That Pudding Thickness Right
When you whisk the pudding and milk together, it should be thick-almost mousse-like. If it feels thin, double-check your milk amount or pudding box size. Too much liquid can make the filling loose. - Layer With Love
Spoon half the pudding directly into your pie crust and smooth it out. Then mix the other half with half your Cool Whip until fluffy and spread that on top. Finish spreading the remaining Cool Whip on top-this layering creates that creamy, dreamy texture everyone loves. - Freezer shortcut: A quick method to make the layers firm is to put it in the freezer for 1 to 2 hours. At this point the pudding won't freeze yet, but it will be solid enough for you to cut it easily.
- Don't Skip the Chill Time
Refrigerate your pie for at least 2 hours before serving so it firms up enough to slice neatly. Impatience is the enemy here but waiting pays off with perfect slices and clean layers. - Keep the Crust Intact
If using a store-bought Oreo crust, keep it in the foil package until you're ready to fill it. Oreo crusts can be crumbly and delicate, so treat them gently to avoid breakage. - Decorate for WOW Factor
Top your pie with chocolate shavings, curls, or even crushed Oreos right before serving. A simple vegetable peeler works wonders.

Frequently Asked Questions
- What if I use 3.9 oz. pudding mix vs. recommended 3.4 oz mix? If you do so, make sure to add more half-and-half, otherwise your layer will be too thick.
- Please ignore the instructions on the label of the pudding mix. My 3.4 oz. Instant Chocolate Pudding Mix - Jell-O package called for 2 cups of milk per box of pudding mix, but we are not going to be adding this much liquid at all. In this recipe, we add a total of 2 cups of half and half to two packages.
- Can I use a different milk in this recipe? Half and half provides the best texture, richness, and thickness. You can also make the pie with the whole milk, but I would not suggest using low-fat milk, 2% or fat-free milk in this recipe. And definitely not heavy cream as it has too high of a fat content and will make pudding unspreadable.
- Is half-and-half superior to milk? Using half and half instead of milk will add more fat into the mixture. It will also make the pudding structure firmer and more stable. That's exactly what we need for the layers to be nice and distinct. Using half and half will also help create a nice thick bottom layer and very soft smooth middle layer.
- Can I use sugar-free instant pudding mixes? The sugar-free pudding boxes are a much smaller size which might not work with the 2 cups of milk called for in the recipe.
Troubleshooting
- The pudding mixture is so thick I can barely mix it. Add ¼ cup of milk to the mixture to make it easier to spread.
- I bought 3.9 oz box of chocolate pudding mix instead of 3.4 oz. What do I do? Add ½ cup more of half-and-half to the mixture to offset higher volume in the pudding box.

Storage and leftovers
- Ideally, let it chill for at least 2 hours before serving so all those layers stay nice and firm. The pie will keep well in the refrigerator for up to 2 days-if it lasts that long, it tends to disappear quickly!
- A little tip: if you like the whipped topping fresh and fluffy, consider adding the final Cool Whip layer right before serving leftover slices.
- Freezing isn't recommended because the texture of the pudding and whipped topping can separate once thawed, which can be a bit disappointing.
I originally published this recipe in 2018 and have since added new photos and more success tips. I now show you exactly how to turn this cream pie into a piece of cake.


John says
I was so excited to see this recipe, until I looked more closely at the ingredients and was shocked. Cool Whip contains High Fructose Corn Syrup (HFCS) which causes weight gain, obesity, and a heightened risk of developing type 2 diabetes. Moreover, HFCS consumption may contribute to elevated levels of triglycerides, which can increase the likelihood of heart disease. This recipe contains 50% (!!!) of one's daily saturated fat allotment. Sorry, but nobody should put these things into their body.
Cindy miller says
Hi, can I use real whipped cream to fold into the top layer instead of cool whip?
Olya says
Yes of course.
Ashley says
I am making this weekend and I only have a 3.9 instead of the 3.4 chocolate pudding, can I just add 1/4 cup 2% milk so it’s not so thick
Olya says
Based on the those who made this before - whole milk should definitely work, If you try it with 2% and larger volume pudding mix box (3.9 oz vs 3.4 oz.) - it might work.
Peggy says
This tastes absolutely delicious. My problem is that where I use half and half or half milk, half cream, the pudding is so thick I can barely mix it (and definitely can’t use a whisk). How do I fix this? I’m using regular half and half, and when I mixed the cream w/milk, it was whole milk (that’s all we have in our house). If I use cream and 2% or something, will that make it better? It’s so thick that when I spread it, the entire crust breaks. Either way, I will make making it because it’s so delicious, and I never have to go to Burger King to get a Hershey Pie again. LOL!
Olya says
No - please don't go back to Burger King - this recipe is more wholesome even if it is sweet and rich in calories:). I do think making this in winter and dryer temperatures is what makes it so thick. I make this in the spring and summer (so that I don't have to use the oven) - when temperatures are high and humid. Please try with whole milk/ half and half (50/50 each) and I think it should work.
Joanne Cuomo says
THE SAME THING JUST HAPPENED TO ME! So thick! I discovered some of the chocolate Jello instant pudding boxes contain 3.9 ounces. It calls for 3.4 ounce boxes. I WILL BE CHECKING MY PUDDING BOXES FROM NOW ON. THE RECIPE REQUIRED MORE LIQUID WITH 3.9 ounces OF INSTANT PUDDING MIX!
Olya says
Interesting discovery about instant pudding boxes sizes Joanne! Thank you
margaret says
could you use 2% milk instead?
Olya says
Unfortunately - it doesn't have same amount of fat content as half and half. It won't hold the layers.
Kelley says
Fabulous! I am thrilled with how this pie turned out, my family loved it.
I had a graham cracker crust on hand, but other than that, I followed the recipe & instructions to a T. The first layer was super thick going in, but I used a frosting spatula to it smooth out.
After cooling for 5 hours, the layers and whole pie set up perfect. We all liked how it was not overly sweet. This will be our go-to cream pie recipe from now on. Thank you!
JM says
"Instructions
1. Take pie crust out of package and keep it inside the foil. Do not turn it upside down or attempt to take it out - it will get crumbled and destroyed..."
This should also read : Do not put in pie filling or attempt to spread it - it will get crumbled and destroyed.
This may taste good, but the directions need to be be adjusted way too much for a brittle pie crust. Just blew through one of the two two crusts that I had and everything around me is closed today, so if another breaks then no pie tonight.
Julie Havens says
Filling was a bit thick but I’d rather it be thick then thin! All in all I’m happy how it came out! Have a very Hapoy Thanksgiving. Also I used half n half but also put in about 1/4 whole milk and it worked great. I used 3.9oz packages of pudding mix (great value)
Olya says
Thank you Julie! And Happy Thanksgiving to you as well! I am so glad it is working out on a thick side:). I made this in the spring and mine wasn't thick at all:). I believe dryness and cold is what contributes to thickness.