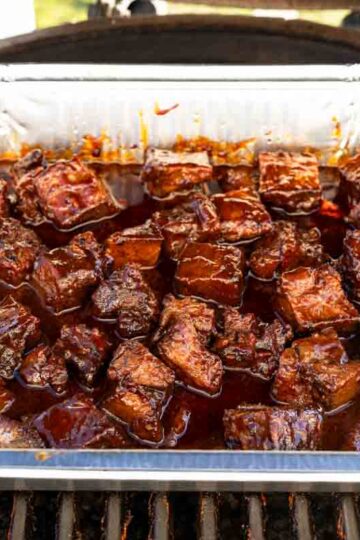
Brisket burnt ends are a BBQ bucket-list item - but chuck roast burnt ends are what I actually make every time. At roughly one-third the price, a 3-4 lb chuck roast delivers the same smoky, saucy, melt-in-your-mouth bite when you follow this specific low-and-slow method. Post oak, a mustard binder, and one key braising step are what separate these from every other version you'll find online.

Poor Man's Burnt Ends are one of the most satisfying things you can make on a smoker - and after making them more times than I can count, I'll tell you straight: chuck roast burnt ends are better than brisket burnt ends. That's not a budget concession. It's a flavor upgrade. Chuck roast has more fat marbled throughout the muscle, which means when you smoke it low and slow over post oak to an internal temperature of 170°F - then braise it in BBQ sauce until it hits 200°F - every single chunk becomes a caramelized, fork-tender bite that's hard to stop eating. This is my specific method, the one I've tested and refined on my smoker, and it uses a mustard binder to lock in a brown sugar crust that no other binding agent matches. Whether you're feeding a backyard crowd or just want a weeknight win on the smoker, this recipe is the one.
I smoke these chuck roast burnt ends over post oak (sometimes pecan), because it gives you that Central Texas-style beef flavour without overwhelming the meat.
Want help choosing wood? I wrote a full guide comparing post oak, pecan, hickory, mesquite, apple and cherry - including which combos I actually use for brisket, Smoked Chuck Roast and these burnt ends.
Don't want to babysit an offset all day? You can absolutely make these burnt ends on a pellet smoker and here's Why the Pellet Smoker Gives You the Most Hands-Off BBQ Experience.

I live in New York City. I don't have a 1,000-gallon offset smoker in a Texas backyard. I have a patio, a mid-range pellet smoker, and neighbors close enough to smell everything I'm cooking. And yet - these Poor Man's Burnt Ends are the single most-requested thing I've ever made.
Not the brisket. Not the ribs. This.
Let me tell you why, and let me be completely direct about it: chuck roast makes better burnt ends than brisket. I know that's a bold claim. I've made both. Back to back, same smoker, same wood, same sauce. The chuck won every single time - and once you understand why, you won't be surprised at all.
Why Chuck Roast Beats Brisket for Burnt Ends
Here's the thing about brisket burnt ends: they're traditionally made from the point - the fattier, more marbled end of the brisket. You smoke an entire 14-lb packer brisket, slice off the flat for your guests, then cube the point and braise it down into those sticky, caramelized bites everyone fights over. It's magnificent. It's also a 12-hour, $90+ commitment.
Chuck roast skips the preamble and goes straight to the payoff.
The Fat Marbling Difference
Chuck roast (cut from the shoulder) is densely marbled throughout the entire muscle - not just in one section like the brisket point. That means when you cube it after the first smoke, every single piece has fat running through its center. As those cubes braise in BBQ sauce at 200°F, that intramuscular fat renders completely, basting the meat from the inside out.
The result is something brisket burnt ends rarely achieve uniformly: every cube is equally tender, equally juicy, equally glazed. With brisket, you always get a few pieces that are drier than the rest. With chuck? That doesn't happen.
When I did my side-by-side test - same smoker temperature, same rub, same sauce, same braise time - the chuck roast cubes were more consistently tender across the entire pan. The brisket had maybe 70% great pieces. The chuck was 100%. That's not luck. That's the fat map of the muscle doing its job.

Cost Comparison: Chuck Roast vs. Brisket in 2026
A full packer brisket in 2026 will run you $70-$95 depending on where you shop. A 3-4 lb chuck roast? $18-$28 at most grocery stores, and you're feeding the same number of people. In this economy, that's not a compromise - that's the smarter choice. The "poor man's" name is outdated. These are the smart cook's burnt ends.
My Deliberate Flavor Decision: Post Oak + Apple Juice
This pairing is not accidental, and I want to explain exactly why I chose it - because most recipes just say "use your favorite wood" and move on. That's not useful.
Post oak is the traditional wood of Central Texas BBQ for a specific reason: it burns slowly and cleanly, producing a medium-density smoke that doesn't overpower beef. Unlike hickory (which can turn acrid over a 4-hour cook) or mesquite (which is beautiful but aggressive), post oak gives you a smoke flavor that builds gradually and tastes like wood, not campfire. It's the difference between a backdrop and a distraction. For a chuck roast that needs 3.5 to 4.5 hours on the smoker, you need a wood that stays consistent the whole time. Post oak does that.
Now, the apple juice spritz every 30 minutes - this isn't just about moisture. Apple juice is mildly acidic and slightly sweet. That acidity gently breaks down the surface proteins, keeping the bark from turning too hard too fast. The sugar in the juice caramelizes with the brown sugar crust already on the meat, building layers of color and flavor you can actually see developing. Swap in red wine if you want earthier depth, or pineapple juice for more aggressive tenderizing. But apple juice + post oak is my combination, and it's the one I come back to every time.
The Technique That Makes These Different: Braising In the Sauce
Most burnt ends recipes tell you to add BBQ sauce in the final stage. I braise the cubes directly in the sauce. That's not the same thing at all.
When you pour sauce over already-cooked cubes, you get a coating. When you braise cubed, smoke-kissed meat in BBQ sauce with beef broth and a layer of butter on top - covered in foil, trapped in steam - the sauce becomes part of the meat. The exterior caramelizes while the interior stays impossibly tender. The butter emulsifies into the sauce, making it glossy and rich in a way that thin, brushed-on sauce never achieves.
Here's what this looks like in practice:
- The smoke does its job first (0-170°F internal temp)
- Cubing exposes maximum surface area before the braise
- The covered foil pan creates a self-basting environment
- Butter on top melts down through the sauce and into every crevice
- That final push to 200°F is where the magic actually happens
I've tried finishing without the braise. The results are fine. With the braise? They're unforgettable.

The Mustard Binder: Why It's A Solid Idea (and What It's Actually Doing)
You'll see recipes that skip the mustard entirely, or suggest oil as a substitute. I'd push back on both.
Mustard is not there for flavor. You won't taste it in the finished product - I promise. Mustard is there because it's an emulsified, sticky, water-based coating that has two properties oil lacks: it adheres to cold, wet meat without sliding off, and it creates a slightly rough surface texture that the brown sugar rub can grab onto. Oil repels water; mustard doesn't. That means your crust stays on the meat through the first 30-minute spritz, through the temperature climb, and right up to the moment you cut it.
If you skip it, your rub washes off with the first spritz. Use it. Yellow mustard or Dijon both work - yellow is milder, Dijon adds a subtle sharpness that I actually prefer.
Making This in NYC (Without a Texas Setup)
Here's the honest reality of backyard BBQ in a city: I can't run a massive offset smoker. I use a mid-size pellet smoker on my outdoor patio, and these burnt ends are designed around that reality. You don't need a competition rig. You need:
- A smoker that holds 250°F consistently (pellet, kamado, or kettle all work)
- Post oak pellets or chunks
- An instant-read thermometer (cook to temperature, not time - always)
- A half-size aluminum pan for the braise
If you're using an oven or indirect grill heat, add ½ teaspoon of liquid smoke to the braise liquid and follow the same temperatures. You'll lose the bark complexity but keep the tenderness. It's still one of the best things you'll eat this summer.
These disappear faster than anything else I make. Every single time. Make a bigger batch than you think you need - you'll thank yourself later.
What You Need (And Why Each One Earns Its Place)
Every ingredient here has a specific job. Here's what's actually going on behind the scenes:
- Chuck roast (3-4 lbs) - The real hero of this recipe. Chuck is marbled throughout the entire muscle (unlike brisket, where the good fat is concentrated in just the point), which means every single cube comes out equally tender and juicy after the braise. Don't trim the fat - you need it.
- Yellow mustard or Dijon - Your binder, not your flavor. It cooks off completely, I promise. See the full breakdown below for why mustard beats oil every time.
- Brown sugar - Does two things: the molasses content helps it grab onto the mustard surface and form a bark earlier in the cook, and it caramelizes at smoking temperatures into that dark, lacquered crust you're after. Dark brown sugar gives you a deeper, more molasses-forward bark - my preference.
- Garlic powder + onion powder - Dehydrated on purpose. Fresh aromatics would burn over a 4-hour smoke. These integrate into the crust and stay there.
- Salt - Starts working immediately, drawing moisture to the surface and reabsorbing it deeper into the muscle. Let the rubbed roast sit 15 minutes before it hits the smoker if you can.
- Black pepper - Adds bite and helps build the bark. Don't go light on it.
- BBQ sauce - Use one you'd eat straight off a spoon, because in this recipe it's a braising liquid, not just a glaze. It reduces, concentrates, and melds with the broth and butter into something far richer than it started as. I use a Kansas City-style - sweet, thick, tomato-forward - because it holds up to the reduction without turning bitter.
- Beef broth - Your moisture insurance. It thins the sauce just enough to prevent scorching and adds savory depth as it reduces. Don't sub water here - you're building flavor, not just adding liquid.
- Salted butter (sliced, laid on top) - The step that surprises people and converts them. Cold butter slices melt slowly over the cubes under the foil, basting everything continuously and emulsifying into the sauce below. The result is a glossy, rich coating you can't fake. Real butter only - not margarine, not a spread.
- Apple juice (for the spritz) - See the full breakdown below. The short version: it slows bark hardening, layers more caramelization with each pass, and pairs deliberately with post oak smoke. You won't taste apple. You'll just notice the bark is better.

Why Mustard (Not Oil) Is the Right Binder
Oil repels water - so the first time your apple juice spritz hits the surface, your rub slides right off. Mustard is a water-based emulsion. It dries tacky, gives the dry rub something to physically grip, and stays put through moisture. By hour three at 250°F, the mustard flavor is completely gone. What's left is a bark that built up in intact layers instead of washing away. Yellow mustard works perfectly; Dijon adds a faint sharpness I actually prefer.
Why Post Oak Is My Wood of Choice for Chuck Roast
Most recipes say "use your favorite wood" and I find that genuinely unhelpful - because over a 4+ hour cook, wood choice is a real flavor variable.
Hickory and mesquite are great in short bursts, but sustained over this long they can turn bitter and compete with everything you've built into the crust. Post oak burns slowly and cleanly, producing thin, blue smoke - what pitmasters call clean smoke - that penetrates the meat and adds a warm, nutty, woody depth without dominating. The beef stays the main character. It's why Central Texas BBQ tastes like beef with smoke, not the other way around.
I pair it deliberately with the apple juice spritz because the mild sweetness of the juice balances post oak's earthiness - two quieter flavors that complement rather than compete. It's a pairing I've landed on after making this more times than I can count.
Can't find post oak? Cherry is your next best option. Apple wood also works beautifully and plays into the spritz. Skip mesquite entirely for a cook this long. If you're on a pellet smoker, look for 100% post oak pellets rather than blends - pure beats mixed every time.
How to make Poor Man's Burnt Ends
Step 1: Rub mustard over the chuck roast: Rub mustard all over the chuck roast. This step is necessary in order for our brown sugar mixture to properly adhere to the surface of meat. I used yellow mustard, but Dijon will work as well.
Step 2: Make brown sugar mixture: In a small mixing bowl, combine the brown sugar, garlic powder, salt, pepper, and onion powder and sprinkle this brown sugar mixture evenly over the roast (already covered with the mustard - the mustard will help our mixture to adhere to the meat's surface), pressing it into the mustard.


Step 3: Preheat the smoker: Preheat your smoker to 250°F. Oak, and particularly post oak, is what I like to use for chuck roast (or ribs). This type of wood has a slow burn, and will produce the best smoke flavor over a long period of time for traditional BBQ.
Step 4: Smoke the roast: Smoke the chuck roast until it reaches an internal temperature of 170°F, which will take about 3 ½ to 4 ½ hours. Every 30 minutes, spritz the roast with apple juice.


Step 5: Cut the chuck roast: Cut the chuck roast into 1-inch chunks and place them in a medium aluminum pan.
Step 6: Top it off: Stir in the barbecue sauce, beef broth, and brown sugar.


Top everything with slices of butter and cover the pan with aluminum foil.


Step 7: Return the roast to the smoker: Return the roast to the smoker for just a few more minutes until the internal temperature reaches 200°F, approximately 1 hour.
Allow the meat to rest, covered, for 10 minutes. Serve hot.


Poor Man's Burnt Ends (Smoked Chuck Roast Method)
CLICK on STARS to REVIEW the RECIPE, then CLICK OK
Ingredients
- 2.5 lb chuck roast
- ¼ cup yellow mustard
- ½ cup apple juice (for using while smoking the roast)
Brown Sugar Mixture
- 2 tablespoon brown sugar
- 1 tablespoon garlic powder
- 2 teaspoon onion powder
- 1 tablespoon smoked paprika
- 1 tablespoon kosher salt
- 1 tablespoon coarse black pepper
Sauce
- ½ cup BBQ sauce
- ¼ cup beef broth
- ¼ cup brown sugar
- 6 tablespoon salted butter sliced
Instructions
- Preheat your smoker to 250°F.
Rub mustard
- Rub mustard all over the chuck roast.
Make brown sugar mixture
- In a small mixing bowl, combine the brown sugar, garlic powder, salt, pepper, and onion powder.
- Sprinkle the brown sugar mixture evenly over the mustard covered roast, pressing it into the mustard.
Smoke the chuck roast
- Smoke the chuck roast until it reaches an internal temperature of 170°F, which will take about 3 ½ to 4 ½ hours.Every 30 minutes, spritz the roast with apple juice.
Cut the roast
- Cut the chuck roast into 1-inch chunks and place them in a medium aluminum pan.
Top it off with sauce, broth, sugar and butter
- Stir in the barbecue sauce, beef broth, and brown sugar.Top everything with slices of butter and cover the pan with aluminum foil.
Return to the smoker
- Return the roast to the smoker until the internal temperature reaches 200°F, approximately 1 hour.
- Allow the meat to rest, covered, for 10 minutes.
Common Mistakes (And How I Avoid Them)
I've made every single one of these errors myself. Some of them more than once. Here's what actually goes wrong and how to make sure it doesn't happen to you.
Skipping the Spritz
I get it - opening the smoker every 30 minutes feels fussy. The first time I made these, I told myself the roast would be fine without it. It wasn't.
Without the spritz, the surface of the chuck roast dries out and tightens before the internal fat has had a chance to start rendering properly. You end up with a bark that's hard and slightly bitter on the outside while the interior is still working to catch up. The spritz - apple juice every 30 minutes - does three things simultaneously: it keeps the surface moist enough to keep accepting smoke, it slows the bark from hardening too fast, and it layers more caramelization onto the brown sugar crust each time. By the end of the smoke, you've built up 5 or 6 passes of caramelized apple-sugar on that surface. That's the bark people compliment.
Set a timer on your phone. Thirty minutes goes fast when you're not thinking about it.
Cutting Too Early (Before 170°F)
This one trips up a lot of people because the roast looks done before it actually is. The outside is beautifully dark, the smell is incredible, and it's been on the smoker for three hours. Surely it's ready?
It's not. Not yet.
170°F is the specific threshold where the intramuscular fat in a chuck roast has begun rendering in earnest and the collagen in the muscle has started converting to gelatin. Cut it before that point and your cubes will be chewy, not tender - the fat is still solid, the collagen is still tight, and no amount of braising will fully rescue it. The braise finishes the job that the smoke started, but only if the smoke gets it to the right place first.
Use an instant-read thermometer and trust the number, not the clock. I can give you a time estimate (3.5 to 4.5 hours at 250°F), but your specific smoker, your roast's thickness, and the weather outside all affect that. Temperature is the only reliable signal. Cook to 170°F on the smoker, then 200°F in the braise - those two numbers are your checkpoints, not the timer.
Using Too Much BBQ Sauce in the Braise
More sauce feels like more flavor. I understand the logic. But this is actually the mistake that most often turns a great batch of burnt ends into a cloyingly sweet, one-dimensional result.
BBQ sauce concentrates as it reduces. A generous pour going into the pan becomes an intensely sweet, thick, almost jammy coating by the time the cubes hit 200°F - and at that point it overwhelms everything else you've built: the smoke, the brown sugar crust, the beef depth. You lose the layering.
The ratio I use: enough sauce to coat the cubes generously when stirred, with the beef broth thinning it to a loose, pourable consistency before it goes back on the smoker. It should look slightly thin going in. It will finish perfectly saucy. If you're second-guessing yourself and thinking "this needs more sauce," resist. Add more at the table if you want - but in the pan, less is more.
A good rule of thumb: if the cubes are swimming in sauce, you've gone too far. They should be coated, not submerged.
FAQ
How do I keep the meat from drying out while it cooks?
To keep the meat from drying out while it cooks, you will want to spritz it every 30 minutes until it is done. Another thing you can do is add some water and apple cider vinegar to your drip pan.
Do I need to trim the fat from the roast before smoking it?
No, you do not need to trim the fat unless it is covered with a lot of fat or the fat is super hard. Otherwise, you want that fat to be rendered into the meat as it cooks for both added flavor and juiciness.
Do I have to have a smoker to make this?
Though it is traditionally made in the smoker, and it allows for the best flavor, you can also make them in the oven or on the grill using indirect heat. If you are using the oven, still go with the low and slow method, following the instructions as they are.
If you are using the grill, you will have to constantly monitor the heat in the grill and be sure that the meat is staying off direct heat. To help with either of these options, you may add a little liquid smoke to try and replicate the flavor of smoking the meat.
Does this dish travel well?
Yes, it will travel well; just ensure that the pan is tightly covered, and if you want to keep it warm longer, you can wrap a thick towel around the pan.
Substitutions and Variations
- Chuck roast - could also use a round eye roast.
- Apple juice - red wine and pineapple juice or a Dr. Pepper and apple cider vinegar mix would also work.
- Barbecue sauce - You can use homemade or store-bought sauce and go with a flavor you like.
- Salted butter - It needs to be butter, not margarine. If you use unsalted butter, then just add a sprinkle of salt unless you're trying to reduce the sodium.
Leftovers and Storage
- Refrigerate: Poor Man's Burnt Ends should be stored in an airtight container in the refrigerator for up to 5 days.
- Freeze: You can freeze it in a freezer-safe bag for up to one month. Thaw in the refrigerator before reheating.
- To reheat, place in an oven-safe dish and heat, covered at 300°F for 20-25 minutes or until thoroughly heated. Add a little broth to the pan to keep it from drying out.


Maria says
Used this recipe several times this months. My husband can’t get enough!
Scottie says
I have been making “Poor Mans” Burnt ends last couple of years with Chuck, when I don’t want to do a whole brisket.
What I do is use your Stubbs BBQ Sauce recipe which is awesome.
Olya says
I really love this recipe - it's so easy to eat it all.