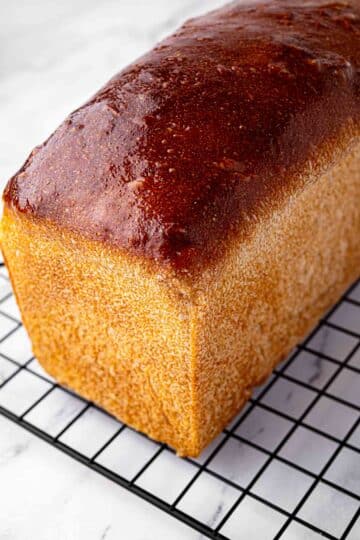
This easy dutch oven bread is crusty (think golden crust) on the outside and super soft and airy (almost croissant like) on the inside. Rich bakery-style flavor with minimal hands-on time, instant yeast and no kneading required.
Love Homemeade Bread as much as I do, then you might also like Fluffy Condensed Milk Bread and Garlic Bread Rolls.

Dutch Oven Bread has all the attributes you will ever want in a bread: beautiful crispy crust and airy artisan-style texture. Just like the finest bakery loaves! And it's perfect for bakers of all levels. This game changing homemade bread recipe will redefine your home baking experience.
It is ideal for beginners yet flexible enough for serious home bakers because who doesn't want reliable results, flavor variations, and make-ahead dough options?
Jump to:
- Dutch Oven Bread advantage
- Why Make Dutch Oven Bread
- Simple Ingredients
- Equipment You'll Need
- How to Make Bread in the Dutch Oven
- Dutch Oven Bread
- Pro Tips for the Best Crust and Crumb
- Should the yeast dough double in size?
- What if my dough not rising enough?
- Why Can't I Use Iodized Salt
- Dense or Flat Loaf
- Underdone Bread (Raw Inside)
- Too Thick or Hard Bottom Crust
- Dutch Oven Bread FAQ
- Altitude adjustments for proper dough rise
- Variations and Flavor Add-Ins
- Flour Options and Substitutions
- Serving Ideas for Dutch Oven Bread
- Storage, Make-Ahead, and Freezing
- Explore delicious savory bread recipes:
- Reviews
Dutch Oven Bread advantage
Dutch oven is the key to making an incredibly delicious and soft bread with a beautifully crisp crust and here's why.
- Dutch oven bread cooks evenly. The heavy cast iron conducts heat evenly to all areas of our bread. Because the bread is sort of sealed in the dutch oven, the inside of the bread turns out to be moist, but the outside develops a real golden crust!
- Cost Effective. Dutch ovens are very affordable and durable, making them perfect for cooking not only soups or meats, but breads!
- Fool Proof Recipe: You don't need any experience in bread making, nor do you need a food processor. There are no complicated measurements or ratios. Dutch oven bread is simply impossible to mess up and the result is always crispy crust and soft inside.
Why Make Dutch Oven Bread
Dutch oven bread uses a heavy lidded pot to create a steamy mini-oven, which is the key to that signature crackly crust and soft, moist interior. The high heat and trapped steam help the dough spring up quickly, set the crust, and keep the crumb from drying out as it bakes.
Unlike traditional artisan loaves that need kneading and multiple rises, this dough is stirred together in one bowl, left to rise, and then baked straight in the hot pot. You can bake it after a short rise of a few hours or refrigerate the dough for several days to develop deeper flavor and easier handling.

Simple Ingredients
- Flour: It's the number one reason why most bread recipes fail. If there's too much flour, this bread will turn dry. If possible, measure the flour with a food scale. Otherwise, to ensure the exact amount, gently spoon the flour into the measuring cup and level it off with a flat edge. If scooped directly into the flour container, the flour becomes packed down into the cup which could leave you with ¼ cup or more of added flour.
- Water: Warm water wakes up the yeast and hydrates the flour so gluten can form and starches can gelatinize during baking. The temperature should feel just warm, not hot, to keep the yeast alive and active.
- Instant Yeast: It creates gas bubbles and gives the loaf its open, airy texture. Using a relatively small amount spread over a long or short rise allows flexibility: you can do a quick room-temperature rise or an overnight refrigeration for more flavor.
- Sea Salt: One important tip is to not use iodized salt. Fine salt seasons the dough and subtly regulates yeast activity so the rise is steady rather than explosive and unstable. Different salt types have different grain sizes, so volume equivalents vary, but the goal is to enhance flavor without inhibiting yeast.
- Sugar: granulated.
Equipment You'll Need
You can make this dough in a single bowl with basic tools, but a few pieces of equipment dramatically improve ease and results.
- Dutch oven: A heavy cast iron or enameled cast iron pot with a tight-fitting lid, typically in the medium range, creates consistent heat and traps steam for a crisp, blistered crust.
- Parchment paper: Allows you to transfer sticky dough into the blazing hot pot without deflating it or burning your hands; it also reduces sticking.
- Silicone spatula or sturdy spoon: Makes mixing and shaping sticky no-knead dough easier without adding excess flour.
- Kitchen towel or loose lid: Covers the bowl during rising to protect the surface from drying out while still letting gas escape.
- Optional thermometer: A quick-read thermometer helps you hit the ideal water temperature for reliable yeast activity
How to Make Bread in the Dutch Oven
This method uses a simple stir-and-rise approach with minimal handling to preserve gas bubbles for a light, open crumb.
1. Mix the Dough
- Combine warm water, yeast, and salt in a large bowl and whisk until mostly dissolved.
- Add flour all at once and stir until no dry streaks remain; the dough should be loose, shaggy, and sticky.
- Resist adding lots of extra flour at this stage; stickiness is normal and critical for good oven spring and open crumb.
2. First Rise (Bulk Fermentation)
- Cover the bowl with a kitchen towel or set the lid on loosely so gases can escape.
- Place in a warm, draft-free spot and allow the dough to at least double in volume; the surface should look puffed and bubbly.
- In cooler kitchens, you can warm the oven briefly, turn it off, and set the bowl inside or place it near a warm appliance to help the rise along. Or place the dough near the heater.
3. Optional Cold Rest
- After the dough has risen, you can refrigerate it to develop more complex flavor and make the sticky dough easier to handle.
- The dough can stay chilled for several days, gradually taking on a more sourdough-like tang as it sits.
4. Preheat the Dutch Oven
- Place the empty dutch oven with its lid in the oven and preheat to a high baking temperature so the pot is thoroughly heated.
- Give the pot extra time at temperature to ensure the heavy cast iron is fully hot, which promotes strong oven spring.
5. Shape the Loaf
- Lay parchment on the counter and dust one edge lightly with flour.
- Use a silicone spatula to gently scrape the dough onto the floured area, trying not to deflate the bubbles.
- Using the spatula, fold the edges of the dough up and over onto itself to create a loose ball or oval; the goal is a rough loaf shape, not perfection.
- Flip the loaf so the floured side faces up and the dough sits in the center of the parchment for easy lifting.
- Optionally, score the top with a sharp knife or razor to encourage controlled expansion and attractive rustic ridges.
6. Bake
- Carefully remove the preheated pot from the oven, lift the dough by the parchment, and lower it into the hot dutch oven.
- Cover with the lid and bake until the loaf has risen and set; this covered stage traps steam and builds crust structure.
- Remove the lid and continue baking until the crust is deeply golden and crisp, adjusting time to your preferred color and crunch.
7. Cool Before Slicing
- Use the parchment to lift the bread out of the pot and place on a wire rack or cutting board.
- Let it cool at least until the interior sets; slicing too early can make the crumb appear gummy even when fully baked.


Dutch Oven Bread
CLICK on STARS to REVIEW the RECIPE, then CLICK OK
Ingredients
- 1 ½ cup water filtered and lukewarm
- 2 ½ teaspoon instant yeast 1 packet
- 2 teaspoons sugar granulated
- 1 ¼ teaspoon sea salt
- 3 cups all-purpose flour
Instructions
Proof the yeast
- Prepare a large bowl.
- Add water, yeast, sugar and sea salt. Whisk them together until you see bubbles. The yeast will proof for about 15 minutes.
Prepare dough
- Next add all 3 cups of all-purpose flour and mix it carefully using a wooden spoon. The dough should be wet. Don't worry if it looks like there is too much flour for the water - that's the correct amount.
- Mix everything together until a sticky dough forms. Don't worry too much about overmixing-just make sure all the ingredients are evenly moistened. The dough will be messy and sticky! Use a silicone spatula to scrape any leftovers off the spoon. (If your dough looks too wet, add 1-2 tablespoons of flour at a time until it matches the texture in the photo. If it seems too dry, add the same amount of water instead.)
Allow the dough to rise
- Cover the dough in the bowl with a cling wrap or a towel (or a plate).
- Let the dough rise in a warm spot for 2-3 hours, or until it has doubled in size, as shown in the previous photo. If it's a chilly day, you can place the bowl with dough near the heater or a radiator. You can also preheat your oven for a few minutes, turn it off, and place the bowl inside the oven to trap some warmth. If your home is already warm, simply leave it on the counter-or even outside if the weather is warm or hot.
- It should take 2 to 3 hours - the dough will double in size.
Shape the dough
- Pour the risen dough onto a sheet of floured parchment paper.
- Shape it into a round or oval ball. Don't worry about making it look perfect-the top doesn't need to be smooth.
Score the dough
- Using a sharp knife score the loaf on top (make an X) to allow it to expand while baking.
Preheat the oven
- Preheat oven to 450 F.
- Preheat oven with dutch oven inside! Basically, you will place the empty dutch oven into the oven and turn the oven on to 450 F.
Transfer the loaf to dutch oven
- Open dutch oven lid and using parchment paper as a sling - carefully transfer the loaf into the dutch oven.
Bake
- Cover with a lid and bake for about 25 minutes.
- Remove the lid: At 25 minutes, remove the lid. Continue baking for 15 more minutes until golden brown on top.
Cool the bread
- Remove the dutch oven from the oven.
- Remove bread out of the dutch oven and place it on wire rack to cool for 1 hour.
Slice
- Slice into the bread when completely cooled.
Notes
Pro Tips for the Best Crust and Crumb
- Let the loaf cool longer: Allowing the bread to rest helps moisture redistribute, reduces gumminess, and makes slicing cleaner.
- Embrace sticky dough: No-knead dough is intentionally wet and slack; this higher hydration produces a more open crumb and thin, shattering crust.
- Handle the dough gently: Every time the dough is pressed or stretched aggressively, gas bubbles collapse, leading to denser bread.
- Use parchment wisely: Crumpling the parchment first helps it conform to the pot and reduces awkward folds that can dent the loaf.
- Manage bottom crust intensity: If the bottom comes out too dark or tough, place a baking sheet on a lower rack to shield the dutch oven from direct heat.
- Warmth: For the bread to rise, you will be placing the dough in the warm spot. Usually finding a warm room is not a problem if you are making your bread during the summer.
- Use warmed oven in winter: However, if you are making this bread in the winter, I recommend placing the dough in a slightly warmed oven inside your dutch oven. Turn your oven on for a couple of minutes, then turn it off and place the dough in the turned off oven.
Should the yeast dough double in size?
While this is a key sign that the dough is properly risen, since we are using a dutch oven, the rise time is shorter and therefore the dough may not fully double.
However, it should noticeably expand and become puffy. A well risen dough is key to bakery-quality bread!

What if my dough not rising enough?
- Check yeast freshness - old yeast loses its potency. So check the expiration date!
- Water temperature - when the water is too hot it kills the yeast. When it's too cold - it stalls yeast activation. Make sure to use lukewarm water! Around 105 - 110 degrees F.
- Not enough warmth in the environment - this is why we want to place the dough in a slightly warmed oven.
- Not enough time - be patient and allow extra time, if needed.
- Incorrect salt amount - salt strengthens dough, but too much can inhibit yeast activity. The type of salt used matters as well - Do NOT use iodized salt!
- Dough is too dry - dough that is too dry won't expand well. We need well-hydrated dough for gluten development.
Why Can't I Use Iodized Salt
Iodized salt can hinder bread rising because the added iodine and anti-caking agentscan inhibit or even kill yeast activity, slowing fermentation, while the salt itself draws water from yeast cells (osmosis), causing dehydration and stress, preventing them from producing enough carbon dioxide to make the dough rise effectively.
While salt is crucial to control yeast, iodized salt's additives make it harsher, potentially leading to a dense, slow-rising loaf, so non-iodized salts (like kosher or sea salt) are definitely preferred.
Dense or Flat Loaf
- Using bread flour instead of all-purpose flour: Bread flour absorbs more water, so dough made with it may feel a lot tighter.
- Underdeveloped gluten: While no-knead bread relies on time instead of kneading, giving the dough a bit more mixing initially can help structure.
- Over-handling: Aggressive shaping destroys gas pockets; handle dough as little as possible when transferring and shaping.
- Flour type and brand: Lower-protein flours or certain brands may yield softer, weaker dough; switching to a higher-gluten flour can improve height.
- Rise timing: Underproofed dough has not built enough gas, while overproofed dough can collapse; aim for at least doubled volume with a still-bouncy surface.
Underdone Bread (Raw Inside)
- Cooling time: Cutting into the loaf while it is still very hot allows steam to condense and makes the crumb seem wet; longer cooling gives a better texture.
- Bake time: If the crust darkens too quickly but the inside seems underdone, leave the lid off only long enough to brown the crust while checking for interior doneness with extra minutes as needed.
Too Thick or Hard Bottom Crust
- Heat deflection: Place a baking sheet on a lower rack beneath the dutch oven to diffuse direct heat from the oven floor.
- Rack position: Baking on a slightly higher rack can help protect the bottom from intense heat without sacrificing crust color on top.

Dutch Oven Bread FAQ
Should I preheat Dutch oven? Yes. Preheating the oven with dutch oven inside creates trapped steam from the dough's initial moisture and heat, which leads to a greater rise, a more even bake, and a crispier crust.
Should I close the lid on my dutch oven bread? The lid is the secret! The lid on a dutch oven bread is essential for creating artisan-style bread. Here's why.
- Lid ensures humid environment - humidity prevents the crust form setting too quickly. This in turn allows the dough to expand more in the crucial first 20 minutes of baking.
- Even heat distribution - the heavy lid radiates heat evenly, thus ensuring a perfect golden loaf! Without it, the crust will form prematurely, leading to a dense bread texture inside.
- Lid traps steam - as the bread bakes, moisture from the dough turns into steam, which gets trapped inside the dutch oven! This mimics professional oven environment, keeping the crust soft enough for the bread to rise fully before it becomes crisp.
Should I use bread flour? No, not in this recipe. Bread flour has higher protein, will absorb more water and will result in a more chewy texture and the dough may feel a lot tighter.
What kind of flour should I use then? All-purpose flour, on the other hand, produces a tender bread with a good crust. Perfect for this recipe!
Can I use wholewheat flour? If you prefer whole wheat flour, I recommend Wholewheat Sourdough Bread.
Can I make this bread without dutch oven? Yes! Bake on a baking sheet or in a cast iron skillet and add steam with a preheated pan of water on a lower rack to mimic the humid environment. You will still get a flavorful loaf without the pot, though the crust may be less dramatically crisp and the rise slightly lower.
Do you need sugar in the dough?
This dough relies on flour as the yeast's food source, so added sugar is optional for flavor, not necessary for the rise.
How long can the dough stay in the fridge?
The dough can be refrigerated for several days; over time the flavor intensifies and becomes more tangy and complex, similar to sourdough.
Why is my dough so sticky?
The sticky, loose consistency is a hallmark of no-knead dough and is essential for an open crumb; adjust with very small additions of flour or water only if it seems drastically wetter or drier than a soft, tacky mass.
Altitude adjustments for proper dough rise
At higher elevations, air pressure and humidity shift how dough behaves, so a few tweaks can stabilize your loaf.
- Slightly more water: Dough may dry out more quickly, so adding a touch more water can maintain the proper sticky consistency.
- Moist rising environment: Use a damp towel or plastic wrap to keep the surface from drying out during fermentation.
- Rise monitoring: Dough may rise faster, so rely on visual cues (doubling in size) instead of strict timing; reduce yeast or shorten rise if needed.
For baking at 3,000+ feet above sea level (think Colorado), I recommend the following adjustments:
- Increase liquid - add 1 to 2 tablespoons of extra water per cup of flour to combat dryness.
- Reduce yeast - cut yeast amount slightly to prevent over-rising
- Shorten rise time - the bread may double in size much faster than at a regular altitude Lower baking temperature slightly - reduce oven temperature by 15 F to prevent over-browning.

Variations and Flavor Add-Ins
Dutch oven bread is a perfect blank canvas for mix-ins, toppings, and flour twists.
- Cheese and jalapeño: Fold in well-drained pickled jalapeños and either grated or cubed cheese for pockets of melted flavor or a more uniform cheesy crumb.
- Herb and parmesan: Add chopped fresh or dried herbs and grated hard cheese to the dough, then brush the shaped loaf with oil and sprinkle more on top before baking.
- Rosemary and sea salt: Mix chopped rosemary into the dough and finish the top with oil, extra rosemary, and coarse salt for a fragrant, crackly crust.
- Olive: Incorporate well-drained olives (whole or chopped) for a briny, savory loaf that pairs well with Italian-inspired meals.
- Cinnamon raisin: Hydrate raisins briefly in warm water, drain thoroughly, then mix them with cinnamon into the dough, adjusting water slightly to account for their moisture.
Flour Options and Substitutions
Flour choice affects texture, flavor, and handling, so some substitutions work better than others.
- All-purpose flour: Produces a soft crumb and is accessible for most home bakers; this is the baseline for the recipe.
- Bread flour: Do not use in this recipe.
- Partial whole wheat: Replacing a portion of the white flour with whole wheat adds nuttiness and color without compromising rise too much.
- Non-wheat alternatives: Nut flours and legume flours do not behave like wheat-based flours in this formula and will not produce a proper loaf without a completely different recipe design.
Gluten-free flour blends behave differently, so they require recipes specifically developed for them rather than simple substitution in this dough.

Serving Ideas for Dutch Oven Bread
Fresh dutch oven bread is versatile enough to star in simple snacks or anchor full meals.
- Simple serving: Enjoy warm slices with salted butter, honey, or quality olive oil to highlight the crust and crumb.
- With soups and stews: Serve thick slices alongside Chicken Pesto Soup, Marry Me Chicken Soup, Guinness Beef Stew or Zucchini Soup.
- With meats and chicken: Perfect with Beer Braised Lamb Shanks, Tri-Tip Santa Maria Style, or Herb Roasted Chicken where the sturdy crumb can soak up broth and sauces.
- Sandwiches and toast: Use cooled slices for grilled cheese, toast, breakfast tartines, or rustic sandwiches with fresh mozzarella, tomatoes, and herbs.
- Bread for dipping: Pair with olive oil and balsamic, garlic-infused oil, or creamy dips for an easy starter or side. Perfect with Scalloped Sweet Potatoes.
Storage, Make-Ahead, and Freezing
Dutch oven bread stores well both before and after baking as long as you manage moisture and airflow.
- Room temperature: Keep baked bread in an airtight container or bag for a short window; it will gradually become more stale and chewy over a couple of days.
- Keep baked bread in paper bags or an airtight container - there is no need to toast this bread for 2 days, since it will stay fresh and delicious for this long. But then after that, it is definitely better warmed or toasted.
- Freeze whole: Cool the loaf completely, wrap tightly, and freeze for longer storage; thaw at room temperature before slicing.
- Freeze sliced: Slice the cooled loaf, then freeze in an airtight bag so you can pull out individual pieces for toast or sandwiches.
- Refrigerate the dough: After the initial rise, refrigerate the dough in a loosely covered container (or ziplock bag) so gases can escape; later you can seal it more tightly for longer storage. Refrigerate raw dough up to 3 days. Take it out of the fridge for 1 hour to take the chill out of the dough, then bake per recipe. Keep in mind that cold dough won't rise as well as fresh dough.


Jennie says
I did it — I baked my first-ever loaf of bread, and it was absolutely perfect! This recipe was so beginner-friendly, and the step by step walkthrough and tips made it practically too easy. My loaf looked exactly like the picture and tasted amazing. Loaf number two is already in the works!
Olya Shepard says
So glad you made the cake and reported back! Love this!
Kate says
Can I use spring water for this or does it have to be distilled?
Olya Shepard says
Spring water, RO, distilled, but NOT tap water.
Jo says
Can I use 1 teaspoon of salt or even a bit less?
Olya Shepard says
You can go down on salt, but don't completely skip it.
Stella says
I used 3 cups plus 1/2 cup of flour. I wonder if using 3 cups of flour makes bread lighter? Haven't made it the second time yet but am curious.
Olya Shepard says
It doesn't. Using less flour will make the bread more damp. Also make sure that your yeast is fresh and not out of the date. Very important!
Kip says
What a simple recipe. Came out perfect. My kids ate it all and then asked me to make another one. It’s a keeper
Olya says
Thank you Kip! I have no doubt that you nailed it!
Aga says
Love freshly baked bread!
Olya says
So delicious and easy!