
No-Bake Berry Cream Cheese Pie is my answer to summer days when I want something special but refuse to touch the oven. 🥧 A buttery graham cracker crust, a light whipped cream cheese filling, and a triple berry topping come together into a pie that looks like it came from a bakery case - and it slices clean every single time. 🍓🫐

📝 No-Bake Berry Cream Cheese Pie Snapshot
✅ Prep Time: 30 minutes
❄️ Chill Time: 4 hours (overnight is even better)
🍽️ Serves: 8
💰 Cost: ~$16 total (about $2 per slice)
👨🍳 Skill Level: Easy, no oven required
🫐 Berries Used: Raspberries, blackberries, strawberries
📦 Equipment: 9.5-inch pie dish, food processor, immersion blender (optional)

The trick that makes this pie work when so many no-bake berry pies turn watery? I split the berries in half - cook half into a glossy compote, then fold the rest in fresh. 🍯 Clean layers, no bleeding, no soggy crust.
💬 Why You'll Love This Berry Cream Cheese Pie
- Tastes like a cozy cheesecake but lighter, fluffier, and completely no-bake 🍰
- The split-berry method keeps the topping thick and glossy instead of runny 🫙
- Make-ahead friendly - it actually improves after a night in the fridge ⏰
- Looks like it came from a bakery counter, but comes together with basic pantry tools 🎂
- Colorful, chilled, and perfect for anyone craving something fresh in summer ☀️
I tested this recipe 5 times - an all-fresh-berry version that turned into a soupy mess, and an all-cooked version that lost that bright, juicy snap I wanted in every bite. 😅 The split-berry method is the in-between method and it's my favorite way to cook the topping.
If you're the kind of person who ends up with way too many berries in your fridge every summer, this is where they go. 🧺 It's in the same family as my Mixed Berry Icebox Cake, and if you want the full breakdown on why berries and cream cheese behave the way they do together, I put all of it into The Ultimate Guide to Berry Cream Cheese Pies. 📖
Here's the science on berries, pies and cream cheese, all conveniently organized in The Ultimate Guide to Berry Cream Cheese Pies (No-Bake, Baked & Everything In Between).


Ingredients You'll Need
- Fresh raspberries - I use these for both the cooked base and the fresh mix-in because they break down easily and add that deep berry flavor I want in every bite.
- Fresh blackberries - These give the topping a little structure and texture; I like how they hold up slightly even after being folded into the compote.
- Fresh strawberries - I dice these small so they distribute evenly-this is what makes each slice feel balanced instead of overly tart.
- Granulated sugar - I use just enough to bring out the natural sweetness of the berries without making the topping taste heavy or jam-like.
- Cornstarch - This is what keeps the berry layer from turning watery later; I don't skip it because it's what makes the slices clean.
- Lemon juice - I always add this because it sharpens the berry flavor and keeps the berries from tasting flat after chilling.
- Graham crackers - This is my go-to crust base because it's simple and reliable, and it gives just enough sweetness without competing with the filling.
- Unsalted butter - I use melted butter to bind the crust; once it chills, it firms up and holds everything together when sliced.
- Heavy whipping cream - My go to for a filling that feels light but still holds its shape, and this is what makes that happen.
- Cream cheese - This is the base of the filling, and I always let it soften to room temp so it mixes smooth without lumps.
- Sour cream - I add this for extra creaminess and as a bonus it keeps the filling from tasting overly sweet.
- Vanilla extract - Always, always use vanilla, the more the better.

How to Make No-Bake Berry Cream Cheese Pie
1. 🫐 My Split Berry Method: Cook Half, Fold Half Fresh
The whole trick is right there in the name - cook half the berries, fold the other half in fresh. 🍓 That's it, that's the method.
I always start with the compote first, since it needs real time to cool completely before it ever touches the pie. ⏳ Patience pays off here, I promise. Whisk the sugar and cornstarch together in a medium saucepan before a single berry goes in. This step matters more than it looks - mixing the cornstarch into the dry sugar first keeps it from clumping the second it hits all that juice the berries release. 🥄
Add half your berries - 3 ounces raspberries, 3 ounces blackberries, and 4 ounces diced strawberries 🍇🍓 - then pour the lemon juice right over the top. Set the saucepan over medium heat and stir occasionally as the berries soften and release their juices. Once it hits a boil, turn the heat down and let it simmer about 10 minutes, stirring here and there so nothing scorches on the bottom. 🔥 You'll know it's ready when the compote turns thick and glossy, and the raspberries and blackberries have mostly broken down.
At this point, I like to run an immersion blender through it - just 30 seconds, and it gives you a perfectly smooth compote that spreads like a dream over the pie. Totally optional if you're a fan of chunkier texture, but for those clean bakery-style slices? I highly recommend it. Pour the compote into a heat-proof bowl and let it cool all the way to room temperature before moving on. 🧊


2. ❄️ Why Chilling the Crust Is the Bakery-Level Secret
Here's something worth knowing about this graham cracker crust - it's not just there to hold everything up. 🏗️ It's actually doing real structural work in every single slice you cut.
Pressing the crumbs firmly into the bottom and up the sides of the pan, then sliding the whole thing into the freezer for just 15 to 20 minutes ⏱️, is what takes this pie from "pretty good" to "wait, did you buy this?" 🎂 That short freeze gives the butter time to firm all the way back up and lock every crumb into place. Skip it - and trust me, I've been tempted to skip it too 👀 - and the edges go soft, and your slices lose that clean, bakery-case look.
It's a tiny step, but it's the kind of thing you'd notice at an actual bakery counter, not something pulled straight from a home fridge. 🥧✨ And that 20 minutes of waiting? Completely worth it.


3. Make the Cream Cheese Filling
Don't you hate it when a no-bake cheesecake filling either collapses the second you cut into it, or turns dense and heavy from overmixing? 😩 The fix here comes down to building the filling in two separate stages instead of dumping everything into one bowl at once.
I whip the cream on its own first, all the way to stiff peaks. 🍦 Then I fold it into a fully smooth cream cheese base. That order keeps the air locked into the cream while still giving the filling enough backbone to hold up that berry layer on top.


4. Assemble and Chill
Here's where it all comes together, and I promise it's the most satisfying part. First, fold the remaining fresh berries - the reserved 3 ounces each of raspberries and blackberries, plus the remaining 4 ounces of diced strawberries - into your cooled compote. Set that aside.
Spoon the cream cheese filling into your chilled graham cracker crust and spread it out into an even layer. An offset spatula makes this so much easier, but the back of a spoon works just fine too. Then spoon the berry compote evenly over the top.
Cover the pie loosely with plastic wrap and refrigerate for at least 4 hours, or overnight if you can wait that long. The pie needs that full chill time to set up properly - slicing it too early means a filling that won't hold its shape, and we've worked too hard for that! Serve it cold and enjoy every single bite.

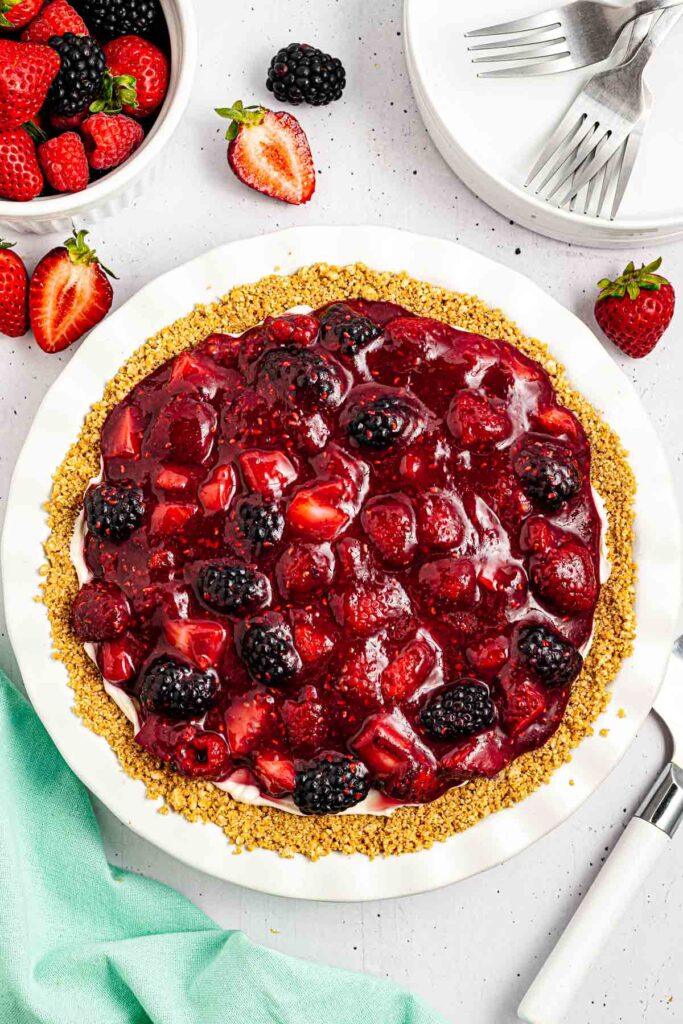

No-Bake Berry Cream Cheese Pie
Ingredients
Berry Topping
- ¼ cup granulated sugar
- 2 teaspoon cornstarch
- 6 oz fresh raspberries divided
- 6 oz fresh blackberries divided
- 8 oz fresh strawberries diced and divided
- 1 tablespoon lemon juice
Crust
- 12 graham crackers
- ½ cup unsalted butter melted
Cream Cheese Filling
- 1 cup heavy whipping cream cold
- 8 oz cream cheese room temperature
- ½ cup granulated sugar
- 2 tablespoon sour cream
- 1 teaspoon vanilla extract
Instructions
Berry Topping
- Whisk together the sugar and cornstarch in a medium saucepan. Stir 3 ounces of raspberries, 3 ounces of blackberries, and 4 ounces of diced strawberries, and pour the lemon juice over the berries.
- Place the saucepan over medium heat, stirring occasionally while the berries start to release their juice and break apart. Bring to a boil, then reduce the heat to a simmer. Cook the berries for 10 minutes, stirring occasionally to keep them from scorching on the bottom of the saucepan.
- Once the compote is thick and the raspberries and blackberries have broken down, remove from the heat, and use an immersion blender (or carefully pour the compote into a blender) to smooth out the compote. This step is optional, but it works best if you want a smoother compote.
- Pour the compote into a heat-proof bowl and let it rest at room temperature until cool.
Crust
- Grease a 9 ½ inch baking dish with shortening or butter. Set aside.
- Crush the graham crackers in a food processor, then pour in the melted butter while the processor is at low speed until the crumbs start to clump together.
- Firmly press the crumbs into the bottom and up the sides of the greased pie dish. Place the crust in the freezer for 15-20 minutes or until it has hardened.
Cream Cheese Filling
- While the crust is in the freezer, pour the heavy whipping cream into a medium bowl and use an electric mixer to whip the cream until stiff. Set aside.
- In a separate large bowl, add the cream cheese, sugar, sour cream, and vanilla, and use the electric mixer to mix until the cream cheese is smooth. Add the whipped cream, and mix at low speed until everything is combined and the mixture is fluffy and smooth.
Assembly
- Fold in the remaining 3 ounces of raspberries, blackberries, and 4 ounces of diced strawberries into the cooled compote and place it to the side.
- Spoon the cream cheese mixture into the crust, and spread it out evenly. Then spoon the berry compote on top of the pie, cover it with plastic wrap, and chill in the fridge for at least 4 hours.
- Serve chilled.
Tips for the Best No-Bake Berry Cream Cheese Pie
- Cool the compote all the way before assembling. A warm compote will melt the cream cheese filling and turn the whole pie soupy. An ice water bath speeds this up if you're short on time.
- Bring the cream cheese fully to room temperature. Cold cream cheese leaves lumps no matter how long you beat it. Give it 30 to 45 minutes on the counter before starting.
- Keep the heavy cream cold until you whip it. Cold cream whips faster and holds its peaks better. Chilling the mixing bowl for 10 minutes beforehand helps too.
- Get the cream cheese base completely smooth before folding in the whipped cream. Once the whipped cream goes in, you can't beat out lumps without deflating the filling, so take your time on this step first.
- Press the crust firmly and don't rush the chill. A loosely packed crust crumbles the moment you slice into it. Go around the edges twice to make sure every part is solid before freezing.

Substitutions and Variations
- Swap in different berries depending on what's in season. Blueberries or a mixed berry blend work well, though softer berries tend to break down more easily when cooked.
- Use a store-bought graham cracker crust if you want to save time. The filling may sit slightly higher, but the structure will still hold.
- Replace sour cream with plain yogurt for a similar tang, though the flavor will be slightly lighter.
- Use a whipped topping instead of homemade whipped cream for convenience, but expect a sweeter and slightly less stable filling.
How to Store Berry Cream Cheese Pie
Refrigerator: Leftovers keep best tightly covered in the refrigerator for up to 3 days. I like to press a piece of plastic wrap directly over the surface of the pie, then cover the whole dish to help keep the filling from absorbing any fridge odors. The crust will stay nicely crisp for the first couple of days and then slowly start to soften, which honestly makes the slices extra creamy and luscious.
Freezer: You can absolutely freeze this pie, and I actually recommend freezing it before you add the berry compote on top. Assemble the crust and cream cheese filling, then cover the dish tightly with a layer of plastic wrap and a layer of aluminum foil. Freeze for up to 2 months. When you're ready to serve, thaw it overnight in the refrigerator, then spoon the chilled compote over the top. The filling stays smooth and creamy this way, and you avoid a soggy crust or icy berries.

FAQs
Can I use Cool Whip instead of homemade whipped cream?
Yes, though the filling will turn out sweeter and a bit softer. Freshly whipped cream gives the best texture and flavor, but a thawed tub of whipped topping will still let the pie set.
What if I don't have sour cream?
Plain full-fat yogurt works well in its place and adds the same tangy note. Low-fat or nonfat yogurt tends to make the filling looser, so I'd stick with full-fat.
Can I use frozen berries instead of fresh?
Yes, but frozen berries release more liquid as they thaw. Cook them fully into the compote rather than folding in extra fresh fruit, to avoid adding too much moisture.
Why didn't my pie set properly?
This usually comes down to chill time or a filling that wasn't fully stabilized. Make sure the whipped cream reaches stiff peaks, and give the pie the full 4 hours (or overnight) in the fridge.
Can I use a store-bought graham cracker crust?
Yes, this is a fine shortcut if you're short on time. Store-bought crusts tend to be shallower than a homemade one, so the filling will sit a little higher, but it still slices and serves well.
Do I have to cook the berries?
Skipping that step raises the odds of a watery topping. Cooking half the berries thickens the juices and keeps the layers stable.
More Berry Dessert Recipes You'll Love
- 4-Ingredient Blueberry Cream Cheese Pastries - Flaky, buttery pastries filled with sweet blueberry and cream cheese for a quick and easy dessert.
- Mixed Berry Icebox Cake - A layered no-bake dessert with fresh berries and cream that softens into a cake-like texture as it chills.
- Strawberry Crumb Bars with Vanilla Glaze - Soft, buttery bars layered with sweet strawberries and finished with a light vanilla glaze.
- Blueberry Crumble Cheesecake - A rich cheesecake topped with a buttery crumble and juicy blueberries for a balanced, textured dessert.
Jackie Hyde says
This is a really great recipe! I made a couple changes. I tasted the berry compote and there were a lot of seeds. So I decided to use a a small strainer to take out the seeds. It takes extra time. But I think it makes compote more smooth without the seeds. And taste better.
But when you strain the compote you also lose some that that sticks to seeds. So I added about 1 cup blueberries when I put pie together since it looked like I didn’t have enough fruit.
I think this made pie better. This is really awesome recipe but strain our seeds and add blueberries and it’s even better!
Olya Shepard says
Thank you so much for sharing your tweaks—I love hearing and noting all of them. Straining the seeds is a great idea for a smoother texture, and you’re absolutely right that it can reduce the volume a bit. Adding extra blueberries to balance it out sounds like a perfect solution. I’m glad it turned out even better for you, and I really appreciate you taking the time to leave such thoughtful feedback!