Learn how to grill steak so the center and crust finish together, not one before the other. This guide shows you when to use direct heat, when to switch to a two-zone fire, how steak thickness changes your strategy, and what to do when a ribeye starts flaring before it is actually done.

Here's the truth about grilling steak: most of the time, it comes off the grill overcooked on the outside and just barely right in the middle. And almost nobody talks about why. It's not your grill. It's not the cut. It's not even your seasoning. It's the temperature gap between the surface and the center when the steak hits those grates - and what you do (or don't do) before and after it cooks.
Good news: a perfect grilled steak isn't about talent or instinct. It's about understanding a handful of things that actually matter. How cold meat behaves over fire. What carryover cooking does to your doneness level. And why a two-zone grill setup changes everything for thicker cuts.
The short version? Rest your steak before grilling. Set up a two-zone fire (hot side, cool side). Cook to temperature, not time. And let carryover finish the job while the steak rests. Everything else is detail - and I'm walking you through all of it below.
Here's my simple rule for choosing the method before the steak even touches the grill: use direct heat for 1-inch steaks, two-zone for 1.5-inch steaks, reverse sear for 2-inch ribeyes, and ignore the clock once fat starts dripping. That framework alone will save you from most grilling disasters.
If you want a full overview of every steak cooking method before diving in, start with my Complete Guide to Steak.

Why This Grilled Steak Works
This method works because it solves the core problem: getting the outside and the inside to finish at the same time. Here's what we're doing:
- Preheating the grill to 500°F creates the high heat you need for a proper sear and browning (the Maillard reaction that makes steak taste like steak).
- Two-zone setup (hot side + cool side) gives you control: sear fast over direct heat, then finish gently on the cool side so the center catches up without burning the crust.
- Cooking to 130-135°F internal temperature accounts for carryover cooking - the steak will rise another 5-10°F while it rests, landing you perfectly at medium-rare.
- Resting for 5-10 minutes lets the juices redistribute so they don't all run out when you slice.
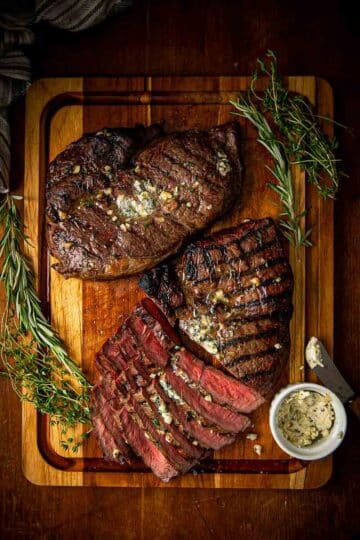
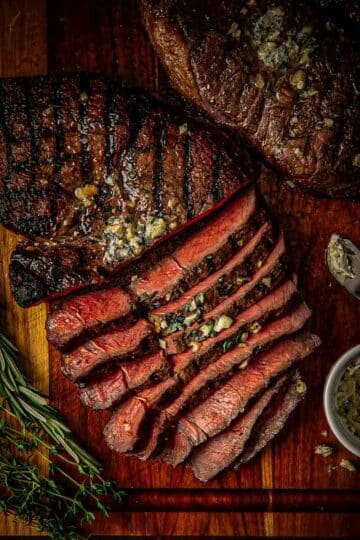
The result: edge-to-edge rosy steak with a dark, flavorful crust. No guessing, no gray bands, no hoping for the best.
Quick Summary
- Grill temp: 500°F, two-zone setup (hot + cool)
- Seasoning: Salt and pepper, generously
- Method: Sear over direct heat, move to cool side to finish
- Target temp: 130-135°F internal (for medium-rare)
- Rest: 5-10 minutes before slicing
- Pro tip: Use direct heat for 1-inch steaks, two-zone for 1.5-inch, reverse sear for 2-inch ribeyes

Perfect Grilled Steak
Ingredients
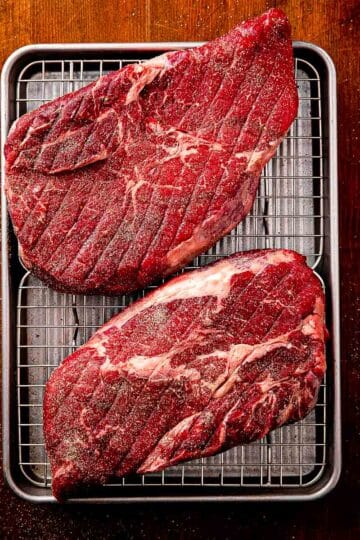
- 2-4 Ribeye, strip, or sirloin steaks (1 to 2 inches thick, about 12-16 oz each)
- 2 teaspoons Kosher salt (about 1 teaspoon per steak)
- 1 teaspoons Freshly ground black pepper (about ½ teaspoon per steak)
- Neutral oil vegetable or canola, for brushing the grates
Optional Finishing
- 2 tablespoons unsalted butter
- 2 cloves garlic smashed
- Fresh thyme or rosemary sprigs
Instructions
Rest the Steak (40 minutes before grilling)
- Remove steaks from the refrigerator and let them sit at room temperature for 30-40 minutes. Pat completely dry with paper towels. Season both sides generously with salt and pepper.Tip: A dry surface = better crust. Don't skip the patting step!
Set Up a Two-Zone Fire (15 minutes before cooking)
- Preheat your grill to high heat (500°F). Create a two-zone setup:Hot zone: All the coals or burners on one side (this is your searing zone)Cool zone: No coals or burners off on the other side (this is your finishing zone)Clean and oil the grates with a paper towel dipped in oil using tongs.
Sear the Steak (4-6 minutes)
- Place steaks directly over the hot zone. Sear for 2-3 minutes per side without moving them. You want a deep brown crust.For Grill Marks (optional): After 2 minutes, rotate the steak 45 degrees, then flip after another 2 minutes and repeat.
Move to Cool Zone (4-8 minutes)
- Once both sides are seared, move steaks to the cool zone. Close the lid and cook gently until the internal temperature reaches:130–135°F for medium-rare135–140°F for medium140–145°F for medium-wellPro Tip: Use an instant-read thermometer! Thickness matters more than time. A 1-inch steak finishes faster than a 2-inch ribeye.
Rest and Serve (5-10 minutes)
- Remove steaks from the grill and transfer to a cutting board. Tent loosely with foil and rest for 5-10 minutes. The internal temperature will rise another 5-10°F during this time (this is carryover cooking).Optional: Top with butter, garlic, and fresh herbs while resting.Slice against the grain and serve immediately
Notes
- 1-inch steaks: Direct heat only works fine
- 1.5-inch steaks: Two-zone is safer
- 2-inch steaks: Use reverse sear (cool zone first, then sear at the end)
- Ribeye: Expect flare-ups from the fat. Keep the cool zone ready.
- Strip steak: Even thickness, easy to grill with clean marks.
- Sirloin: Less forgiving if overcooked. Watch temp closely.
- Filet mignon: Lean and tender. Don't over-char.
- Dark outside, raw center? Move to cool zone immediately.
- Flames licking the steak? Shift away from the fire, don't flip repeatedly.
- Steak sticking? Wait 30-60 seconds. It'll release when the crust forms.
Pro Tips
- Don't skip the rest before grilling. Cold steak = gray band under the crust.
- Cook to temp, not time. Every grill and steak is different.
- Pull early. Carryover cooking is real. Your 130°F steak will hit 135-140°F while resting.
- Ignore the clock once fat starts dripping. That's your signal to manage flare-ups, not flip on a timer.
Make-Ahead & Storage
Make-Ahead: Season steaks up to 24 hours in advance and refrigerate uncovered (this dry-brines them). Bring to room temp before grilling.
Storage: Store leftover cooked steak in an airtight container in the refrigerator for up to 3 days. Reheat gently in a low oven (250°F) or slice thin for steak salads.
FAQ
Do I really need to rest the steak before grilling?
Yes! A cold steak creates a huge temperature gap between the surface and center, giving you that gray overcooked band under the crust.
Can I grill steaks without a two-zone setup?
For thin steaks (1 inch or less), yes. For anything thicker, you'll struggle to get the center cooked without burning the outside.
What if I don't have a thermometer?
Get one. Seriously. It's the difference between guessing and knowing. An instant-read thermometer costs $15 and saves every steak.

How to Prepare Your Grill
Start by scrubbing the grates with a sturdy grill brush or a wad of crumpled aluminum foil held with tongs - either works well and removes built-up residue that would otherwise transfer bitter, burnt flavors to the meat. If your grill hasn't been cleaned in a while, my guide on how to clean grill crates walks through a full deep clean before you cook; a neglected grill is harder to bring up to the right temperature and can create flare-ups once fat starts hitting dirty grates.
How to Preheat the Grill
We want a clean, hot grill
Clean, hot grill grates are the foundation of a great steak - if the grates aren't hot enough, the steak will steam instead of sear and you'll get pale, uneven contact marks instead of deep, dark grill lines. Preheat your grill for at least 10-15 minutes; on gas, this usually means all burners on high until the grill is very hot and just starting to smoke.
- For gas grills, open the propane valve, ignite the burners, and close the lid - it should reach 450-500°F within 10 to 15 minutes. Keep a backup propane tank on hand for longer cooks; for a few steaks, a tank that's about a third full is usually enough to get the job done.
- For charcoal, let the coals burn until they're fully lit and covered in a layer of gray ash before spreading them - this typically takes 20 to 25 minutes and means the fire is at a stable, even temperature rather than still climbing.
For a detailed breakdown of exactly what temperature to grill steak at for each doneness level, see my guide on steak grill temperature.
Why You Need a Two-Zone Fire for Steak
A single-zone grill - everything running on high - gives you no escape route. If the exterior is browning faster than the center is cooking, you have nowhere to move the steak and no way to slow things down without taking it off the grill entirely. A two-zone setup solves this by giving you a hot side for searing and a cooler side for finishing, so you stay in control of both the crust and the center at the same time.
It matters most with thicker cuts. A 1-inch strip over direct high heat moves fast enough that one zone is usually fine. A 1.5- to 2-inch ribeye is a different story - by the time the center reaches medium-rare, the exterior has had so much direct heat exposure that it can push past a good sear into something tougher and drier. Moving it to the cooler side lets the center catch up without burning the outside.
The cooler side is also your insurance policy when things move faster than expected. If the steak is charring before it hits your pull temperature, you move it over, close the lid, and let indirect heat do the rest - instead of pulling it early and hoping for the best.
How to Set Up Two-Zone Fire
Whenever possible, set up a two-zone fire: one hot side for searing and one cooler side for finishing.
- On a gas grill, keep one or two burners on high and one burner on low or off.
- On charcoal, pile all the coals on one half of the grill and leave the other half coal-free.
This lets you sear hard on the hot side, then move the steak to the cooler side to gently cruise up to your target internal temperature.

How to Get Your Steak Ready for the Grill
Cold steak straight from the fridge cooks unevenly because the exterior races ahead of the still-chilled center once it hits the hot grill.
When you put a cold steak on a hot grill, the exterior starts searing immediately while the center is still at 38-40°F - roughly the temperature of your refrigerator. Heat moves from the outside in, which means the outer layers cook faster than the interior; by the time the center reaches 125°F for medium-rare, the outer layers have been exposed to high heat long enough to push past medium into medium-well or even well-done territory, leaving a gray band of overcooked meat around a properly cooked center.
Room-temperature steak starts closer to 65-70°F, which narrows the temperature gap between the surface and the center so the center warms at a rate closer to the exterior's cooking speed, giving you less gray band and a more consistent color throughout the cross-section.
How Long to Let Steak Sit
I let steak sit at room temperature for one full hour before grilling. This is enough time for a 1- to 1.5-inch thick New York strip to warm from fridge temperature (38-40°F) to around 65-70°F, which is the sweet spot for even cooking.
- Anything less than 45 minutes doesn't move the internal temperature enough to make a meaningful difference - the steak might rise only 5-10 degrees, which doesn't change how the center cooks relative to the exterior.
- Longer than an hour is fine from a cooking standpoint, but it's not necessary unless you're working with a very thick cut like a 2-inch ribeye, which can take closer to 90 minutes to come to room temperature all the way through.
Food Safety Notes
Do not leave steak out longer than two hours for food safety reasons, especially in a warm kitchen. If your kitchen runs hot, one hour is plenty.
Try to keep steaks similar in thickness so they cook at roughly the same rate; wildly mixed thicknesses make timing much harder.
How to Season a Steak Before It Goes on the Grill
At minimum, season generously with kosher salt (see why kosher salt in Kosher Salt vs. Table Salt) and freshly ground black pepper on all sides. If you can plan ahead, add a good amount of salt the night before, set the steak on a wire rack, and refrigerate it uncovered for 24 hours; this dry brine seasons more deeply and helps the surface dry out for better searing.
Seasoning Checklist before the steak goes on the grill:
- Pat it completely dry with paper towels to remove surface moisture, which helps browning.
- Season just before grilling, you can add pepper, garlic powder, or a simple blend of salt, pepper, garlic to the surface. Avoid sugary rubs over very high direct heat, as sugar burns quickly.
- Lightly oil the steak itself or the grates using a high smoke-point oil like canola, vegetable, avocado, or grapeseed oil - not extra-virgin olive oil, which smokes at lower temperatures.
A dry, seasoned surface plus high heat is what gives you that deep, flavorful crust instead of a gray exterior.

How to Get Crosshatch Grill Mark
Once your grill is hot and the steak is seasoned, the rotation technique for crosshatch marks is simple - and if you want the full breakdown with photos, I cover it in detail in my guide on how to get grill marks.
- Place the steak on the grill at roughly a 45-degree angle to the grates - think of a clock and position the steak so the ends sit at 10 and 4 - and grill undisturbed for 2 to 3 minutes.
- Rotate the steak 90 degrees (ends moving to 2 and 8) without flipping, and grill another 2 to 3 minutes; the first position burns one set of lines into the surface and the rotation burns a second set across the first, creating the crosshatch pattern.
Two things ruin grill marks: moving the steak too early and pressing it down with a spatula. If the steak sticks when you try to rotate or flip it, it's not ready - let it go another 30 to 60 seconds and it will release cleanly once a good sear has formed. Pressing down squeezes out juice and flattens the surface, which disrupts the sear and dries out the meat.

Direct Heat vs. Two-Zone and Reverse Sear
You can grill steak directly over high heat the whole time or use a two-zone/reverse sear approach, depending on thickness and your comfort level.
- Direct high heat: Great for thinner steaks (around 1 inch). Get the grill screaming hot, sear over the flame, flip frequently or use the 2-3 minute crosshatch pattern, and pull once you reach your target temp minus carryover.
- Two-zone / reverse sear: Ideal for thicker steaks like a 1.25-2 inch ribeye. Start the steak on the cooler side at 250-300°F until it's about 10-20°F shy of your target internal temperature, then move it to the blazing hot side and sear 1-2 minutes per side, adding quarter turns for crosshatch if you like.
With both methods, the rule stays the same: cook to temperature, not time, and use the cooler zone as a safety net if the outside is browning too quickly before the center catches up. If you prefer cooking steak on the stovetop instead, my guide to pan-searing steak perfectly every time walks through the same principles using a cast iron skillet.
Understanding Carryover Cooking
Steak does not stop cooking the moment it comes off the grill. Residual heat on the surface continues moving toward the cooler center during the rest, raising the internal temperature another 5-10 degrees - this is called carryover cooking.
For medium-rare, I pull the steak at 120-125°F even though the target is 130-135°F. For medium, I pull it at 130-135°F instead of waiting for 140-145°F; if you wait until the steak hits your target temperature on the grill, it will overshoot as it rests and you'll end up one level more done than you wanted.
Steak Temperature Guide
Use an instant-read thermometer every time - not just when you're learning, but always. Thickness varies, grill temperatures vary, and the only way to know where the steak is without cutting into it is to check the internal temperature by inserting the thermometer into the thickest part of the steak, avoiding any bone.
Approximate pull and final temperatures:
- Rare: Pull at 115-120°F, final 120-125°F - cool red center, very soft.
- Medium-rare: Pull at 120-125°F, final 130-135°F - warm red center, very juicy; the sweet spot for most steak lovers.
- Medium: Pull at 130-135°F, final 140-145°F - pink center, slightly firmer.
- Medium-well: Pull at 140-145°F, final 150-155°F - mostly gray with a small pink center.
- Well-done: Pull at 150-155°F, final 160°F+ - no pink, firm, and significantly drier.
For steak salad specifically, I pull at 120-125°F for medium-rare; steak at this doneness slices cleanly, stays juicy when chilled, and holds its texture better than well-done steak, which dries out quickly once it's cut and refrigerated.
For best results, use an Instant Read Thermometer instead of guessing-medium‑rare sirloin is usually around 130-135°F when you pull it from the pan. You can always peek at my Steak Doneness Temperatures Cheat Sheet if you're not sure when to take the steak off the heat.
Resting and Finishing Touches
After grilling, transfer the steak to a cutting board and let it rest for 5-10 minutes - roughly as long as it took to cook. There's a lot of conflicting advice about resting steak, so if you want the full breakdown of what actually happens during this step, I cover it in detail in Resting Steak Myths vs Reality. Tent it loosely with foil if your kitchen is cold, but don't wrap it tightly or the crust will steam and soften. This rest allows the juices to redistribute and the temperature to even out from edge to edge, which is a huge quality jump compared to cutting into it immediately off the grill.
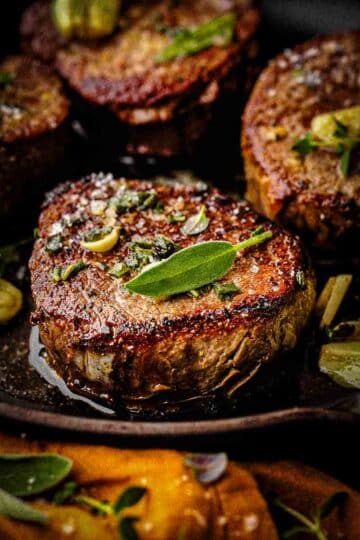
If you like, top the hot steak with a pat of compound butter - softened butter mixed with herbs, garlic, a splash of Worcestershire, or a little white miso and lemon - so it melts over the surface as the steak rests and adds an extra layer of richness.
When you're ready to slice, always cut against the grain; this shortens the muscle fibers and makes every bite noticeably more tender, regardless of the cut. Once sliced, this steak is also perfect over a salad - my grilled steak salad is one of the best ways to use it.
Step-by-Step Grilling Summary
- Let the steak sit at room temperature for about 1 hour (up to 90 minutes for very thick cuts), keeping overall time under 2 hours for food safety.
- Optionally dry brine by salting the steak the day before and refrigerating it uncovered on a wire rack.
- Preheat the grill for at least 10-15 minutes; set up a two-zone fire with one hot side and one cooler side. Clean and oil the grates.
- Pat the steak dry, lightly oil it, and season with salt, pepper, and any preferred spices.
- Sear on the hot side: lay the steak at a 45-degree angle, cook 2-3 minutes, rotate 90 degrees, cook 2-3 minutes, then flip and repeat until close to your target temp. Move to the cooler side if the exterior is browning too quickly or if you're using a reverse sear.
- Use an instant-read thermometer and pull the steak 5-10°F before your desired final doneness to account for carryover cooking.
- Rest for 5-10 minutes, optionally with a pat of compound butter on top, then slice against the grain and serve.
Looking for what to make with your grilled steak? Browse my collection of steak dinner recipes for fast, saucy ideas with minimal cleanup.
Comments
No Comments