Thin, floured chicken breasts cook in just 10 minutes for juicy, crispy pan-seared chicken every time. This skillet method uses a light dredge and high heat to lock in moisture. Perfect for easy weeknights without dry, rubbery chicken. Say hello to crunchy crust and rich flavor!
For thicker chicken breasts, try Juicy Chicken Breast.

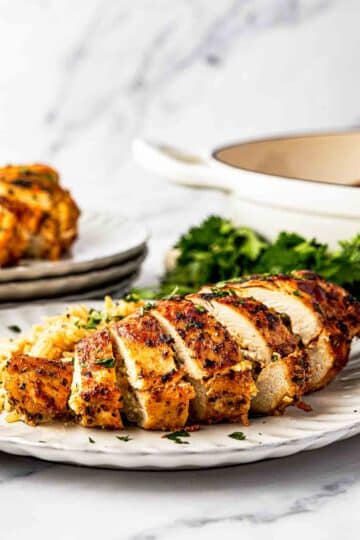
Pan‑seared chicken breast is my default dinner when I'm standing in the kitchen thinking, "I don't know what to cook, but it needs to be good and it needs to be fast." Instead of throwing plain chicken in a pan and hoping for the best, I use thin, evenly cut pieces, dust them in a light seasoned flour coating, and cook them hot and fast so they come out deeply golden on the outside and juicy in the middle. I first shared this recipe back in 2017 and have quietly tweaked it ever since-timing, dredge, heat level-so what you're seeing now is the version I make on repeat in my own kitchen.
Plus is the only method that never punishes me with dry, sad chicken.
If you love this kind of "simple but properly done" chicken, you might also like my parmesan crusted chicken, baked chicken tenders with sriracha mayo, or my go‑to method for baked chicken thighs.
Why I Always Pan‑Sear My Chicken This Way
I don't have time for complicated on busy nights, so this recipe is deliberately fast-each batch is done in about 8 to 10 minutes, start to finish, and I can cook enough for dinner and lunches in one go. I slice the breasts thin (or butterfly and flatten them) so they cook evenly and brown properly instead of burning on the outside while staying raw inside. That thin cut is the quiet underdog of this recipe: you get restaurant-style sear in weeknight time.
The light flour dredge is as my secret "great chicken" step. Plain chicken in a hot pan will brown, but the seasoned flour creates a delicate crust that grabs onto the pan just long enough to build flavor, then turns beautifully golden and crisp. It also protects the meat so it stays moist, and the crust soaks up just enough of the pan juices and oil to taste like you actually cooked something, not just reheated a protein.
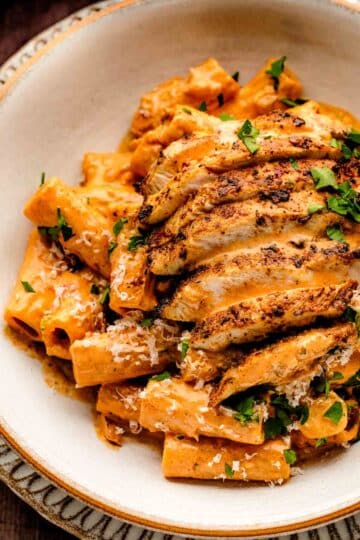
Once you learn the base method, you can take it in any direction. I'll keep it classic Italian one night, go Cajun or taco-seasoned the next, or add lemon pepper when I want something bright and punchy-all without changing the cooking technique. I love that one pan of chicken can become salads, sandwiches, pasta, grain bowls, or just sliced over vegetables for a whole week's worth of meals.
And because I'm a big believer that "everyday recipes" should still be realistic, everything here is pantry‑friendly and budget‑friendly: chicken breasts, flour, salt, pepper, garlic and onion powders, Italian seasoning, and a bit of oil. If I'm feeling fancy, I'll slide in a small pat of butter at the end and spoon it over the chicken for that extra restaurant gloss, but the core method is intentionally simple enough for true beginners and workaholic cooks (like myself) and reliable enough (ready lazy enough) for seasoned home cooks who want a no‑fail staple.
Equipment Needed
- Hard anodized non-stick fry pan: These pans retain and distribute heat evenly for a superior crust. Nothing sticks to these pans & they are a breeze to clean.
- Instant Read Thermometer: Digital Meat Thermometer, but if you are really want to be a bit more scientific with your cooking, then use this professional meat thermometer.
- Silicone Solid Turner: Non Stick Slotted Kitchen Spatulas, high heat resistant and BPA Free.
- Stainless Steel Kitchen Tongs: With silicon tips to prevent scratching pans and they are high heat resistant. Perfect for handling chicken during dredging and cooking.

How I Pan Sear Chicken to Perfection
I start by giving the chicken the best possible chance to brown properly. I pat the breasts bone‑dry with paper towels-like, really dry-because any surface moisture means they'll steam instead of sear, and I want deep golden crust, not pale boiled chicken. If the pieces are thick, I butterfly or lightly pound them so they're all roughly the same thickness; this one extra minute makes the difference between evenly juicy and overcooked edges with a raw center.
Each piece gets a delicate, seasoned flour layer that turns into a crisp crust in the pan. In a big bowl, I whisk together flour, salt, pepper, garlic powder, onion powder, and Italian seasoning until it looks like a speckled, savory dust. Using tongs, I dredge each piece in the mixture so every nook is covered, or I toss the chicken and flour together in a bag or lidded container and give it a good shake-my lazy night move. I always tap off the excess; you want a light, even coating, not clumps.
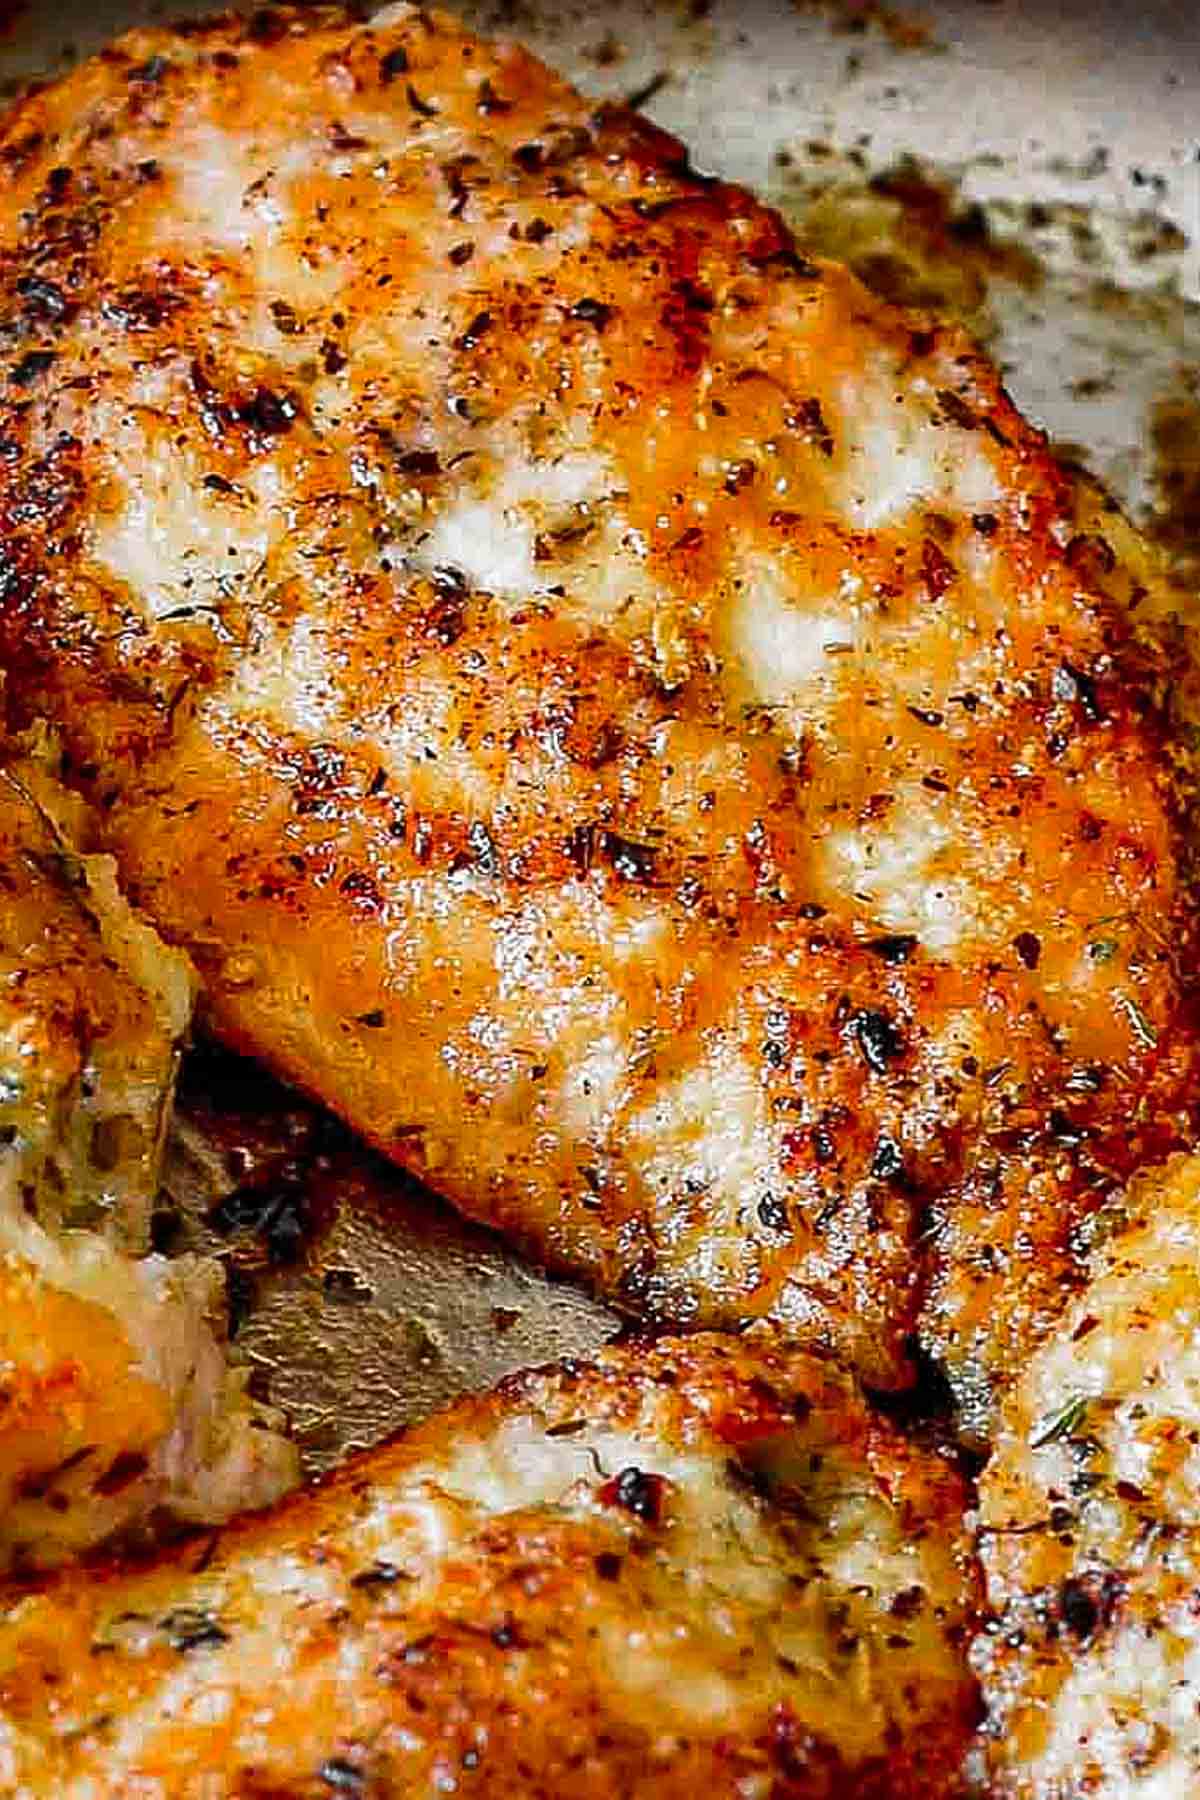
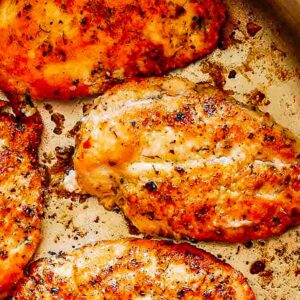
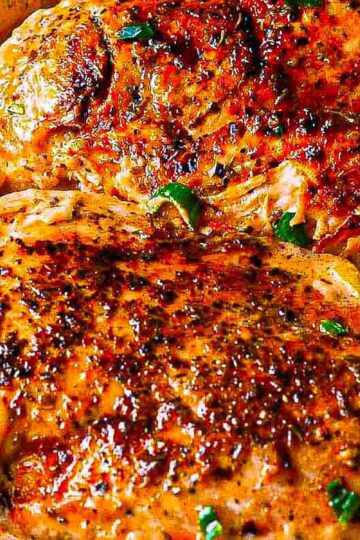
Now for the fun part: the sear. I heat a generous slick of olive oil in a skillet over medium‑high heat until it's hot but not smoking-if a tiny pinch of flour sizzles on contact, it's ready. The coated chicken goes in and I resist every urge to fuss with it; no nudging, no flipping, just 4 to 5 undisturbed minutes so the crust can actually form. When it releases easily and is deeply golden, I flip once and cook another 4 to 5 minutes until the internal temperature hits 165°F. As soon as the chicken comes out of the pan, I let it rest on a plate for a few minutes. That little pause lets the juices settle back into the meat instead of running all over the board when you slice-so every bite is as juicy as it should be.
Pan-Seared Chicken Breast (Thin-Cut, Juicy + Crispy Method)
CLICK on STARS to REVIEW the RECIPE, then CLICK OK
Ingredients
- 4 chicken breasts (thin, boneless and skinless)
- ½ cup flour
- 1 teaspoon sea salt
- ¼ teaspoon black pepper
- 1 teaspoon garlic powder
- 1 teaspoon onion powder
- 2 teaspoons Italian seasoning
- 2 tablespoons olive oil
Instructions
- Paper towel dry your thin chicken breasts (if you bought thick ones, make sure to butterfly each one). In a large bowl, combine flour, salt, black pepper, garlic powder, onion powder and Italian Seasoning. Stir well to blend.
- Using a fork or tongs, coat the chicken breasts in the flour mixture and set aside.
- Heat 2 tablespoons of olive oil in a large skillet over medium-high heat. Once the skillet is hot, place flour coated chicken breasts in the skillet and cook for 4 to 5 minutes on each side, until golden brown on both sides and cooked through, turning once between cooking, about 8-10 minutes.
- Remove chicken from pan and serve warm with pasta or vegetables.
Notes
- Thin-cut matters: If your chicken breasts are thick, butterfly or pound them to an even thickness so they cook through in 8-10 minutes without burning on the outside. This is the single biggest difference between juicy and dry chicken.
- Dry before dredging: Pat the chicken very dry with paper towels before coating in flour. Any moisture on the surface will stop the crust from getting crisp and can make the coating gummy.
- Light flour coating only: Aim for a thin, even flour layer-tap off excess. A heavy coating can burn before the chicken is cooked through and tastes pasty instead of crisp.
- Don't move the chicken: Once the chicken goes into the hot pan, let it cook undisturbed for 4-5 minutes. It will naturally release from the pan when a golden crust has formed; if it's sticking badly, it's not ready to flip yet.
- Temperature, not guesswork: Use an instant-read thermometer and pull the chicken from the pan as soon as it reaches 165°F in the thickest part. Going much higher is where dry, stringy chicken happens.
- Butter finish (optional but lovely): For extra flavor, add a small pat of butter to the pan during the last minute of cooking and spoon the foaming butter over the chicken. It adds richness without needing a separate sauce.
- Seasoning swaps: The base seasoning mix is Italian-style, but you can swap in Cajun, taco seasoning, lemon pepper, or your favorite store-bought blend without changing the method. Just keep the flour ratio the same.
- Meal prep tip: Cook a double batch, cool completely, then slice and refrigerate in an airtight container for 3-4 days. It reheats well gently in a skillet or can be served cold on salads and bowls.
My Rules for Perfect Pan-Seared Chicken
The single most important thing I can tell you about pan-searing chicken is to leave it alone once it hits the pan. Four to five minutes of undisturbed contact with hot oil is what builds that golden crust-every time you nudge, press, or peek underneath, you're breaking that process. Flip it once, and once only.
I always cook on medium-high heat, not a screaming hot pan, not a gentle sizzle. Too low and the chicken steams and turns pale and sad. Too high and the flour coating burns before the inside is cooked. Medium-high is the sweet spot for this flour-dredged method specifically-it's hot enough to crisp the coating but controlled enough to cook the meat through.
Last thing: don't crowd the pan. If the pieces are touching, steam builds up between them and the crust goes soft. I'd rather cook in two batches and get proper chicken than crowd the pan and get mediocre results on everything.
Why Is My Chicken Breast Dry or Overcooked?
Dry chicken is almost always a timing issue, and I've made this mistake myself more times than I'll admit. Thin breasts are done in 4-5 minutes per side on medium heat; thicker ones need about 8 minutes per side on medium-low. The problem is that stovetop heat varies by pan, stove, and thickness, which is exactly why I don't rely on timing alone. I use an instant-read thermometer every single time and pull the chicken the moment it hits 165°F in the thickest part. One or two degrees past that and you're already losing moisture.
If you consistently get dry spots, the other culprit is uneven thickness. Slice or pound thick breasts before cooking so the whole piece finishes at the same time-one thick end and one thin end in the same skillet will always give you one overcooked piece.
Pro Tip: After cooking, add a pat of butter and flip the chicken for an extra-luscious finish.
What If the Chicken Is Still Pink in the Middle?
Don't panic-just put it back. If you cut into a breast and the center is still pink or the thermometer reads under 165°F, return it to the pan on low heat and cover it loosely. Low and slow from here; you don't want the outside to burn while the inside catches up. Another two to three minutes is usually enough for a slightly underdone breast.
One thing I always remind people: resting the chicken for a few minutes after cooking lets the internal temperature continue to rise slightly and the juices to redistribute. So even if it reads 163°F when it comes off the pan, the rest will often finish the job.
And please-never eat pink chicken. It's not worth it. An instant-read thermometer is a five-second check that removes all the guesswork.
The Outside Is Burnt But the Inside Is Raw
This one is almost always a heat problem, and it happens to everyone at least once. If your pan is too hot for the thickness of chicken you're cooking, the flour coating browns and burns before the meat has time to cook through. The fix is straightforward: lower the heat to medium or medium-low for thicker pieces, and give them more time rather than more heat.
The other common cause is crowding. When too many pieces are in the pan, the heat concentrates unevenly and some spots get too hot. Cook in batches if needed and pound or slice the chicken thinner so the whole piece is in contact with the pan at a consistent temperature.
My Chicken Is Rubbery-What Went Wrong?
Rubbery chicken is almost always either undercooked or overcooked-both textures present similarly, which is confusing. The fix is the same in both cases: get the pan hot enough to actually sear before the chicken goes in, then cook at a temperature that lets the inside reach 165°F without rushing it. A properly preheated pan with a light oil coating gives you the sear you need; then reduce heat slightly and let it finish. Patience here pays off more than any seasoning trick.
FAQ
Can I use bone-in chicken breasts?
You can, but I'd change the method slightly. Sear the chicken in the pan first to get that golden crust, then transfer it to a 375°F oven to finish cooking through safely. Bone-in cuts need more time than stovetop alone can give them without burning the outside.
What oil is best?
For this high-heat sear, I use olive oil, but any neutral high-heat oil works well-avocado oil, canola, or vegetable oil are all great choices. I'd avoid butter alone at this stage because it burns quickly at medium-high heat (save it for the finishing step instead).
How do I keep chicken from sticking to the pan?
Make sure both the pan and the oil are fully heated before the chicken goes in. If you place cold chicken into a cold or lukewarm pan, it will bond to the surface and tear when you try to flip it. A properly seared piece will actually release itself from the pan naturally when the crust has formed-if it's sticking, just wait another minute.
Can I make this ahead for meal prep?
Absolutely-I do this regularly. Cook a full batch, let it cool, slice it, and store in an airtight container in the fridge for up to 3-4 days. Cold sliced chicken on salads, pasta, grain bowls, or wraps is one of my favorite easy lunches.
What if I don't have Italian seasoning?
Use whatever you have-Cajun, taco seasoning, lemon pepper, steak seasoning, or even just garlic powder and smoked paprika. The flour dredge method works with any dry seasoning blend, so treat the spice mix as completely flexible.
How do I prevent uneven cooking?
Pound or slice thick breasts to an even ½ to 1-inch thickness before dredging. This is honestly the most effective step you can take-it costs you two minutes and eliminates the most common cooking problem with chicken breasts.
Can I cook vegetables in the same pan?
I prefer to cook them separately or after the chicken comes out. When vegetables go in alongside chicken, they release moisture, which steams the chicken and softens the crust you worked to build. Cook the chicken first, rest it, then sauté your vegetables in the same pan to pick up all that flavor.
Gluten-Free and Alternative Flour Options
If gluten is a concern, swap the all-purpose flour for any of these:
- Rice flour - closest to the original in texture and color
- Almond flour - adds a subtle nutty flavor and a slightly darker crust
- Corn flour - gives a crispier, more cornmeal-like texture
- Potato starch - very light, almost invisible coating with good crispiness
- Gluten-free specialty blends - most work as a 1:1 swap with consistent results
Each one behaves slightly differently in the pan, but all will give you a crust. Rice flour is my go-to GF substitute because it's the most neutral and predictable.
Troubleshooting Common Issues
- Soggy crust after cooking: Don't cover warm chicken with a lid or foil-the trapped steam softens the crust fast. Rest it uncovered on a wire rack or plate.
- Chicken is dry: Almost always overcooked. Pull it at exactly 165°F and not a degree more. A thermometer is non-negotiable here.
- Coating falls off: The chicken wasn't dry enough before dredging, or the pan was crowded. Pat it very dry, dredge lightly, and give each piece room.
- Undercooked inside: Pound to even thickness and use a thermometer. Timing alone is not reliable enough for chicken.
How to Store Pan-Seared Chicken
I always let my cooked chicken cool for no more than 1-2 hours before refrigerating-leaving it out longer than that is where bacterial growth becomes a real concern. Once cooled, I store it in an airtight container or a sealed bag and it stays fresh in the fridge at or below 40°F for 3-5 days. When reheating, I go low and slow-a few minutes in a skillet over medium-low heat or short bursts in the microwave-because high heat on already-cooked chicken dries it out fast.
For longer storage, freeze it. Wrap each piece tightly in plastic wrap or foil first, then place in a freezer bag or airtight container to prevent freezer burn. Frozen pan-seared chicken keeps well for up to 3 months. Thaw it overnight in the fridge-never on the counter-and it reheats almost as well as the day you made it.
Serving Suggestions
- Toss with Garlic Butter Spaghetti, Spaghetti carbonara or Creamy garlic potatoes
- Serve alongside roasted or steamed vegetables, such as Honey Roasted Carrots or Skillet green beans.
- Slice over fresh Avocado Tomato Salad, grain bowls, or rice.
- Top with herb butter, Balsamic glaze or mustard-wine sauce for extra flavor.
More Chicken Recipes You'll Love
- Oven-Roasted Rosemary Chicken Thighs - Crispy-skinned, herb‑rubbed chicken thighs roasted in the oven with rosemary and garlic for an easy, aromatic weeknight dinner.
- Creamy Tuscan Chicken - Seared chicken in a rich, garlicky cream sauce with sun‑dried tomatoes and spinach that tastes restaurant‑level but comes from one pan.
- BBQ Chicken Kebabs - Juicy marinated chicken threaded onto skewers and basted with barbecue sauce for smoky, charred kebabs that are made for grilling season.
- Crispy Baked Chicken Nuggets - Oven‑baked chicken nuggets with a crisp coating and optional sriracha mayo that work just as well for game day as they do for family dinners.

Vincent says
Excellent recipe! Thank you!
Christie says
My husband loved it and said it's his new favorite way to make chicken! Yay!! I didn't have any onion powder on hand so I'm excited to try it with onion powder next time. Thank you!
Olya says
The onion powder will definitely up the taste!! So glad you tried the recipe!
Lynn says
The only chicken my kids eat
Andrea says
Can you keep these warm in a warming tray or do they get soggy?
Olya says
They will get soggy if covered.
Sharon says
Can you make the chicken breast’s the day before,(or earlier in the day), and warm them in the microwave?
They sound scrumptious!
Olya says
Yes, absolutely. Only 10- 15 minutes in microwave
Deb says
This recipe made for a really good, quick, and tasty weeknight meal. What made it even faster was by using a bag of already trimmed boneless all natural chicken breasts that I pounded flat to even out the meat surface for even browning and cooking times. This one is a keeper - my only change was shorter cooking times. Yum, thank you.
Olya says
Thank you Deb - yes the key is to use thinner slices or pound them flat like you did.
Virginia says
5 stars all the way! My husband and I really enjoyed it. Thank you so much for sharing.
John J. says
These were really good! So easy to make! I’m going to pair them with rice next time!
Olya says
Rice and chicken is a solid meal! good idea, John!
Hunter Biden says
Fantastic recipe for breasts. Came out perfectly. Take a crack at this recipe and you will not be dissapointed.
Olya says
I am glad you enjoyed it, Hunter
Bobette Frazier says
Made the pan-seared chicken breasts tonight, exactly like the recipe but I added a little smoked paprika. Turned out amazing! Will definitely be making this again.
Olya says
Sound like you nailed those chicken breasts last night, Bobette!
Bill says
Omg, best chicken I ever had, used flour, garlic and onion powder and salt for coating, cooked 5 minutes each side in olive oil, perfectly browned, wife and I loved it , thank you !!!
Olya says
Sounds like you nailed the chicken, Bill!