
Until recently I had no idea you could eat zucchini raw! I've become a big fan of stacked zucchini slices, zucchini carpaccio or just a salad out of zucchini itself, either with a zoodler or cut into chunks.
I must say that I always loved cooked zucchini - after all, I made desserts with it! Yes- Zucchini Brownies and Chocolate Zucchini Cake for the win. But raw zucchini, sliced into circles, covered in salt and red pepper flakes? Used as crackers or dip vehicles for salsa? SO GOOD. All the crunch and stability for stacking or dipping, but none of the strong flavor or excess moisture of carrot, cucumber, celery, peppers (I do love red bell peppers), etc. Raw zucchini has no flavor, so nothing takes over the flavor of my favorite dip, much more like a PERFECT neutral cracker. Plus only about 50 cal for a whole medium zucchini! Are you kidding me, zucchini, where have you been all my life?
How to eat zucchini raw the easy way
I just love slicing small, fresh zucchini into thin ribbons using a Vegetable Peeler or Mandoline to avoid a squeaky texture. I then toss everything with olive oil, lemon juice, and a pinch of salt. Let it sit for 10-15 minutes so the salt softens the squash and draws out excess moisture before eating.
- Raw zucchini stays crisp-tender and soaks up flavor from lemon, olive oil, and salt.
- It saves you from turning on the oven, stove, or air fryer.
- Thinly sliced and lightly salted zucchini tastes mild, slightly sweet, and way more interesting than you'd expect from a humble green squash.
- This carpaccio-style salad uses up a good amount of zucchini - perfect for garden overload and meal prep boxes.
If you want the classic Italian-inspired version, my Zucchini Carpaccio with Lemon Vinaigrette is still one of my most-made summer recipes.
Can You Eat Zucchini Raw?
Yes, zucchini is safe to eat raw as long as it's fresh and not bitter. Raw zucchini shows up in Italian-style carpaccio, shaved salads, and crudité platters. The trick is slicing it very thin, then seasoning it properly with salt, acid (lemon), and good olive oil so it tastes bright and silky instead of squeaky or watery.

Why Raw Zucchini Tastes Squeaky - And How to Avoid It
I want to be specific about why most raw zucchini tastes bad: it's almost always a thickness problem combined with a skipped salt step. When zucchini is cut too thick, the cell walls stay rigid and the flesh tastes starchy rather than tender - that's the squeaky, cucumber-at-a-bad-buffet texture. When you slice it paper-thin and give it 10 minutes with a light dusting of kosher salt, the salt draws out surface moisture and relaxes the cell structure just enough that the zucchini bends, curls, and absorbs dressing instead of resisting it. I know this because I got it wrong - repeatedly - before I understood what was actually happening at the cellular level.
Ingredients For Quick Raw Zucchini Carpaccio
Fresh herbs - Think basil, mint, or parsley. They make raw zucchini taste like summer.
Zucchini - I go for fresh, firm, smooth skin. Smaller ones work best; giant zucchini can be watery and have more seeds.
Olive oil - I always use a good-tasting extra virgin olive oil since zucchini carpaccio is uncooked and you can really taste the oil you use.
Lemon - Fresh lemon juice only. Bottled won't give you that bright, clean flavor.
Garlic - A small clove, very finely minced or grated, for a gentle garlicky kick. I use only one, but I don't see how you can't use more.
Salt & pepper - Salt brings out the flavor and softens the zucchini, pepper adds a little bite. I prefer to use sea salt.
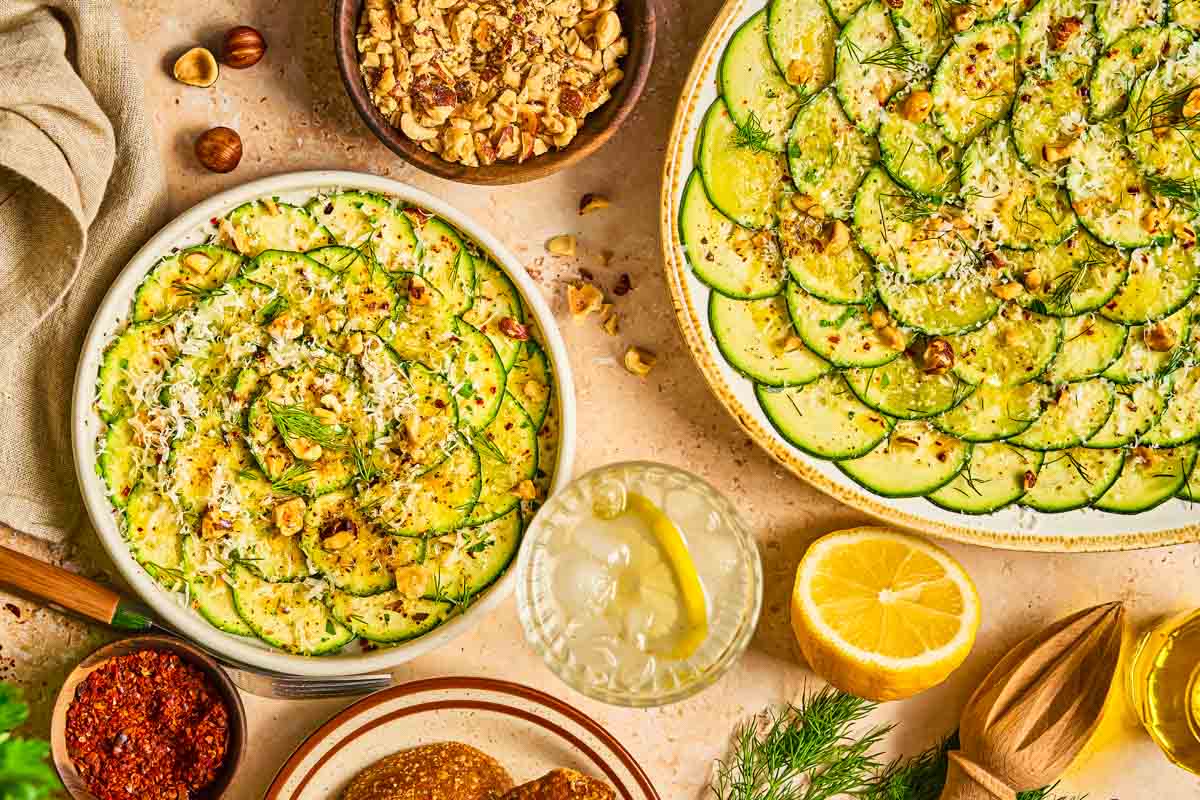
Cheese - Shaved Parmesan does it for me! It gives such a nice salty richness, although I sometimes substitute it with crumbled feta which creates a nice creamy contrast.
How to Cut Zucchini for Raw Carpaccio
The whole secret to raw zucchini that tastes amazing comes down to three things: how thin you slice it, how long you salt it, and how well you dry it before the dressing goes on.
Step 1: Trim and slice
Trim both ends off the zucchini, then slice it as thin as you possibly can - lengthwise, into long ribbons or flat slices. You're aiming for translucent. If you hold a slice up to the light and can vaguely see your hand through it, you're in the right zone.
The best tools for this, in order:
- A mandoline is the gold standard. Fastest, most consistent. Watch your fingers - use the hand guard, always.
- A Y-peeler (a vegetable peeler) works beautifully and is more forgiving. Run it down the length of the zucchini in long, confident strokes.
- A very sharp chef's knife can work if you have steady hands and patience, but it's hard to get the slices thin enough to be truly great.
- What went wrong in my testing: I tried using a dull knife first and got uneven slabs instead of ribbons. Half of them were too thick and tasted starchy and raw in the worst way - you know, that slightly squeaky texture that makes you feel like you're chewing through a cucumber that hasn't decided what it wants to be yet. Slice thin or don't bother.
Step 2: Salt and soften
Lay the slices out in a single layer on a cutting board, clean kitchen towel, or tray. Sprinkle them lightly with a pinch of kosher salt - lightly, not aggressively - and then walk away for 10 to 15 minutes.
What's happening here is the salt is drawing out some of the excess water from the zucchini and, more importantly, gently relaxing the cell structure. The result is a slice that bends, curls, and drapes instead of snapping stiffly in half when you try to fold it onto a fork. It goes from "raw vegetable" to something that actually behaves like carpaccio.
What went wrong in my testing: I over-salted on one round - thinking more salt = more flavor - and ended up with limp, sad, almost translucent slices that pooled water on my cutting board and tasted aggressively salty. The dressing was then completely overpowering. Less is genuinely more here. You want a light dusting, not a full coat. Think about how you'd season pasta water's shy, less intense cousin.
Step 3: Pat dry (don't skip this)
After resting, the zucchini slices will have released a small amount of moisture on the surface. Gently - gently - press them between two layers of paper towels or blot them with a clean kitchen towel.
This step is the reason your dressing will cling to the zucchini instead of sliding right off and pooling at the bottom of the plate. A dry surface lets the olive oil and lemon emulsify against the zucchini rather than sit on top of a thin film of vegetable water. It's the difference between a glossy, dressed carpaccio and a watery, underdressed one.
What went wrong in my testing: I skipped the drying step once because I was impatient. The lemon vinaigrette pooled immediately at the bottom of the plate, the zucchini looked washed out and pale, and the whole thing tasted like slightly lemony water with slices of vegetable floating in it. Pat dry. It takes thirty seconds.
Step 4: Arrange like carpaccio
Now for the part that makes it look like you spent way more effort than you did.
Fan the slices out on a large, flat plate or a wide shallow bowl in overlapping layers. Alternate the direction - some going left, some going right, some loosely curled where they naturally want to bend. It doesn't have to be precise or symmetrical. In fact, perfectly symmetrical looks a little stiff for this kind of dish. You want it to look like you casually draped them there and it happened to look beautiful.
Once your lemon vinaigrette goes on, the slices will glisten and the whole plate will look pulled-together and intentional. The glossy dressing does most of the visual work for you.
Pro tip: If some slices are curling or rolling on you, just lean into it - stand them up slightly or let them coil. It adds height and texture to the plate and photographs really well.
The whole process - trim, slice, salt, dry, arrange - takes about 20 minutes from start to plate, and most of that time is just the salting rest where you don't have to do anything. That's the kind of recipe math I can always get behind.
Optional add-ins:
I am impartial towards toasted nuts ( such as pine nuts, sliced almonds, pistachios) for crunch and flavor. A pinch of red pepper flakes or a drizzle of chili crisp works great if you love heat. Or, a tiny bit of honey in the vinaigrette if you want a sweet contrast to the lemon.
Frequently Asked Questions
Can I slice the zucchini ahead of time? You can slice and salt the zucchini up to a few hours ahead, then pat dry and refrigerate. Dress it just before serving for the best texture.
How do I know if zucchini is too bitter to eat raw? Taste a small slice. If it tastes unusually bitter, toss it and grab another; some over-mature or stressed zucchini can have off flavors.
Can I add protein? Yes. It's lovely with sliced pan seared chicken, grilled shrimp, or cajun salmon on the side - all still keep it in "no heavy cooking" territory if you're using leftovers.
What To Cook With Zucchini
For something completely different, Creamy Prosciutto Pasta with Zucchini and Easy Zucchini Soup are where zucchini season gets genuinely cooked and exciting. And if you're still staring at a pile of squash and don't know where to start, my Sweet and Savory Zucchini Recipes roundup covers everything.


Comments
No Comments