Smoked low and slow at 225°F over hickory wood, this Boston butt transforms into fall-apart pulled pork in 10-14 hours with minimal hands-on effort. One simple dry rub, a pellet or charcoal smoker, and a thermometer are all you need.
The only smoked pork butt guide that explains the stall, includes an overnight schedule with exact clock times, and gets beginner smokers to fall-apart pulled pork on the first try - no injection required.
If you've never smoked a Boston butt before, this is the right place to start. There's no injection, no hard-to-find ingredients, and no technique that requires experience - just a simple dry rub (with a small amount of finely ground coffee that builds a darker bark than most rubs can on their own), a yellow mustard binder, and low heat for a long time. I've included both a daytime and an overnight schedule with exact clock times, because the hardest part of smoking a big cut like this isn't the cooking - it's the timing.
If you want to zoom out and see how pork butt compares against other pork cuts specifically on the grill, my Pork on the Grill: Tenderloin vs. Chops vs. Ribs vs. Pork Butt has it all.
The one thing I want to prepare you for is the stall. Somewhere around 150-165°F, your thermometer is going to stop moving for what feels like a very long time - sometimes two hours, sometimes four. Nothing is wrong. The fix is simple: wrap the pork in foil at 160-165°F, which traps the moisture and lets the temperature climb again. Once you know that's coming and why, the rest of this cook is completely straightforward. If you want fall-apart pork without the smoker, the Instant Pot Country Style Ribs (Fall-Apart Tender BBQ Pork) deliver the same tender result in a fraction of the time.

Ingredients for Smoked Boston Butt
The Dry Rub - What Each Ingredient Does
- Brown sugar - this is what gives the outside of the pork that deep, almost caramelized crust called bark; it also balances out the heat from the spices.
- Smoked paprika - I bought the McCormick smoked paprika from the spice aisle; it adds a rich red color and a subtle smokiness that layers on top of the smoke from the grill.
- Garlic powder - this is just dried, ground garlic; it gives the rub a savory depth without any of the burning or bitterness that fresh garlic would cause at high heat.
- Onion powder - I grabbed a basic store-brand bottle; it works the same way as garlic powder, adding a quiet savory note that you'd notice if it were missing.
- Coarse black pepper - the larger grind means it holds up during a long cook without disappearing into the bark; it also adds a mild bite that keeps the rub from tasting too sweet.
- Chili powder - this is a mild spice blend, not pure heat; it adds warmth and earthy flavor and is part of what makes the finished bark taste like classic BBQ.
- Cayenne pepper - I used just a small amount; it brings a low, slow heat to the back of your bite rather than making the pork spicy upfront.
Why Coffee Goes in the Rub
- Finely ground plain coffee - I picked up a small bag of espresso grind at Aldi; a tiny amount deepens the bark color and adds a subtle savory richness that you won't identify as coffee once the pork is done - it works the same way a square of dark chocolate works in a pot of chili, enhancing everything around it without standing out on its own.
What the Mustard Binder Actually Does
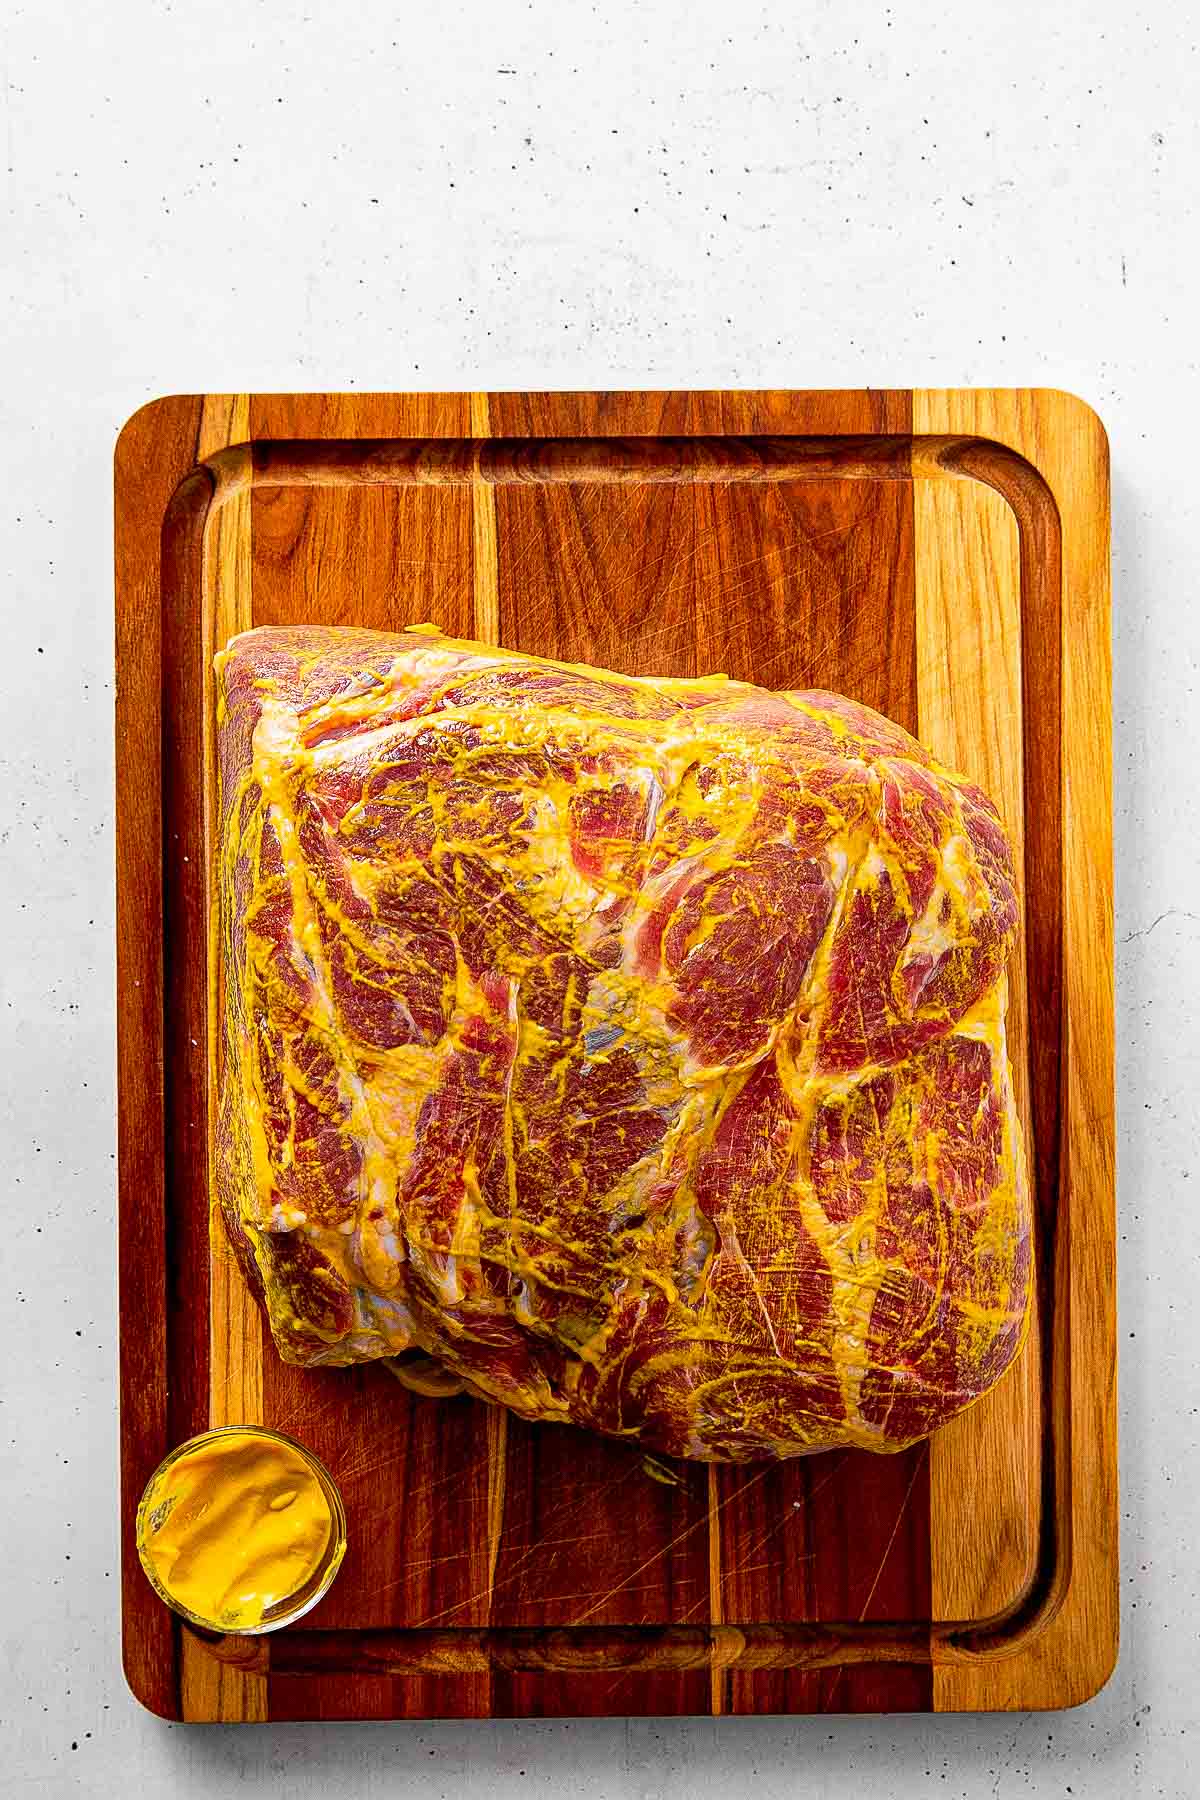
- Yellow mustard - I used plain French's yellow mustard, nothing fancy; you spread a thin layer over the entire pork butt before applying the rub, and it acts like glue so the rub sticks to the meat instead of falling off on the grates.
- It will not taste like mustard - once the pork cooks for 12+ hours, the mustard flavor completely disappears; its only job is to hold the rub in place, and it does that job better than anything else.
- Yellow mustard as a binder isn't unique to smoked pork - it also does a great job on the Baked Pork Tenderloin with Mustard Crust, where it forms the same kind of seasoned crust in the oven.
For Wrapping
- Unsalted butter - I grabbed the store brand; the butter melts into the meat during the final hours of the cook and adds richness and moisture to the finished pulled pork.
- Brown sugar - same one from the rub; in the wrap it creates a slightly sweet, sticky glaze on the bottom of the pork as it braises in its own juices.
- Apple juice - I bought a small bottle of regular Mott's apple juice; it adds just enough liquid to create steam inside the foil wrap, which keeps the pork from drying out as it finishes cooking.

How to Smoke a Boston Butt Step by Step
Day Before - Trimming and Dry Brining
The day before your cook is where the flavor actually starts. It takes about ten minutes of active work, and it makes a real difference in how the finished pork tastes.
Start by pulling the pork butt out of its packaging and patting it completely dry on all sides with paper towels. Dry surfaces are what allow a good bark to form - moisture sitting on the outside of the meat steams rather than crusts. Once it's dry, take a sharp knife and trim the fat cap down to about ¼ inch. Any thicker than that and a significant portion of your rub ends up sitting on a layer of fat that will either render off or get discarded, flavoring nothing. You want that rub on actual meat.

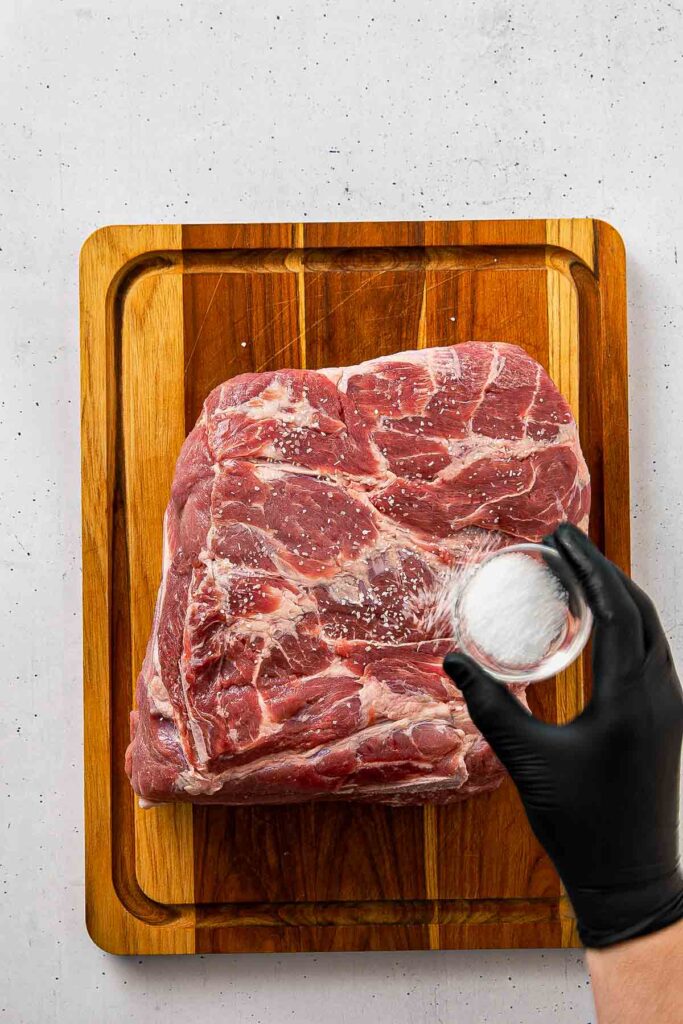
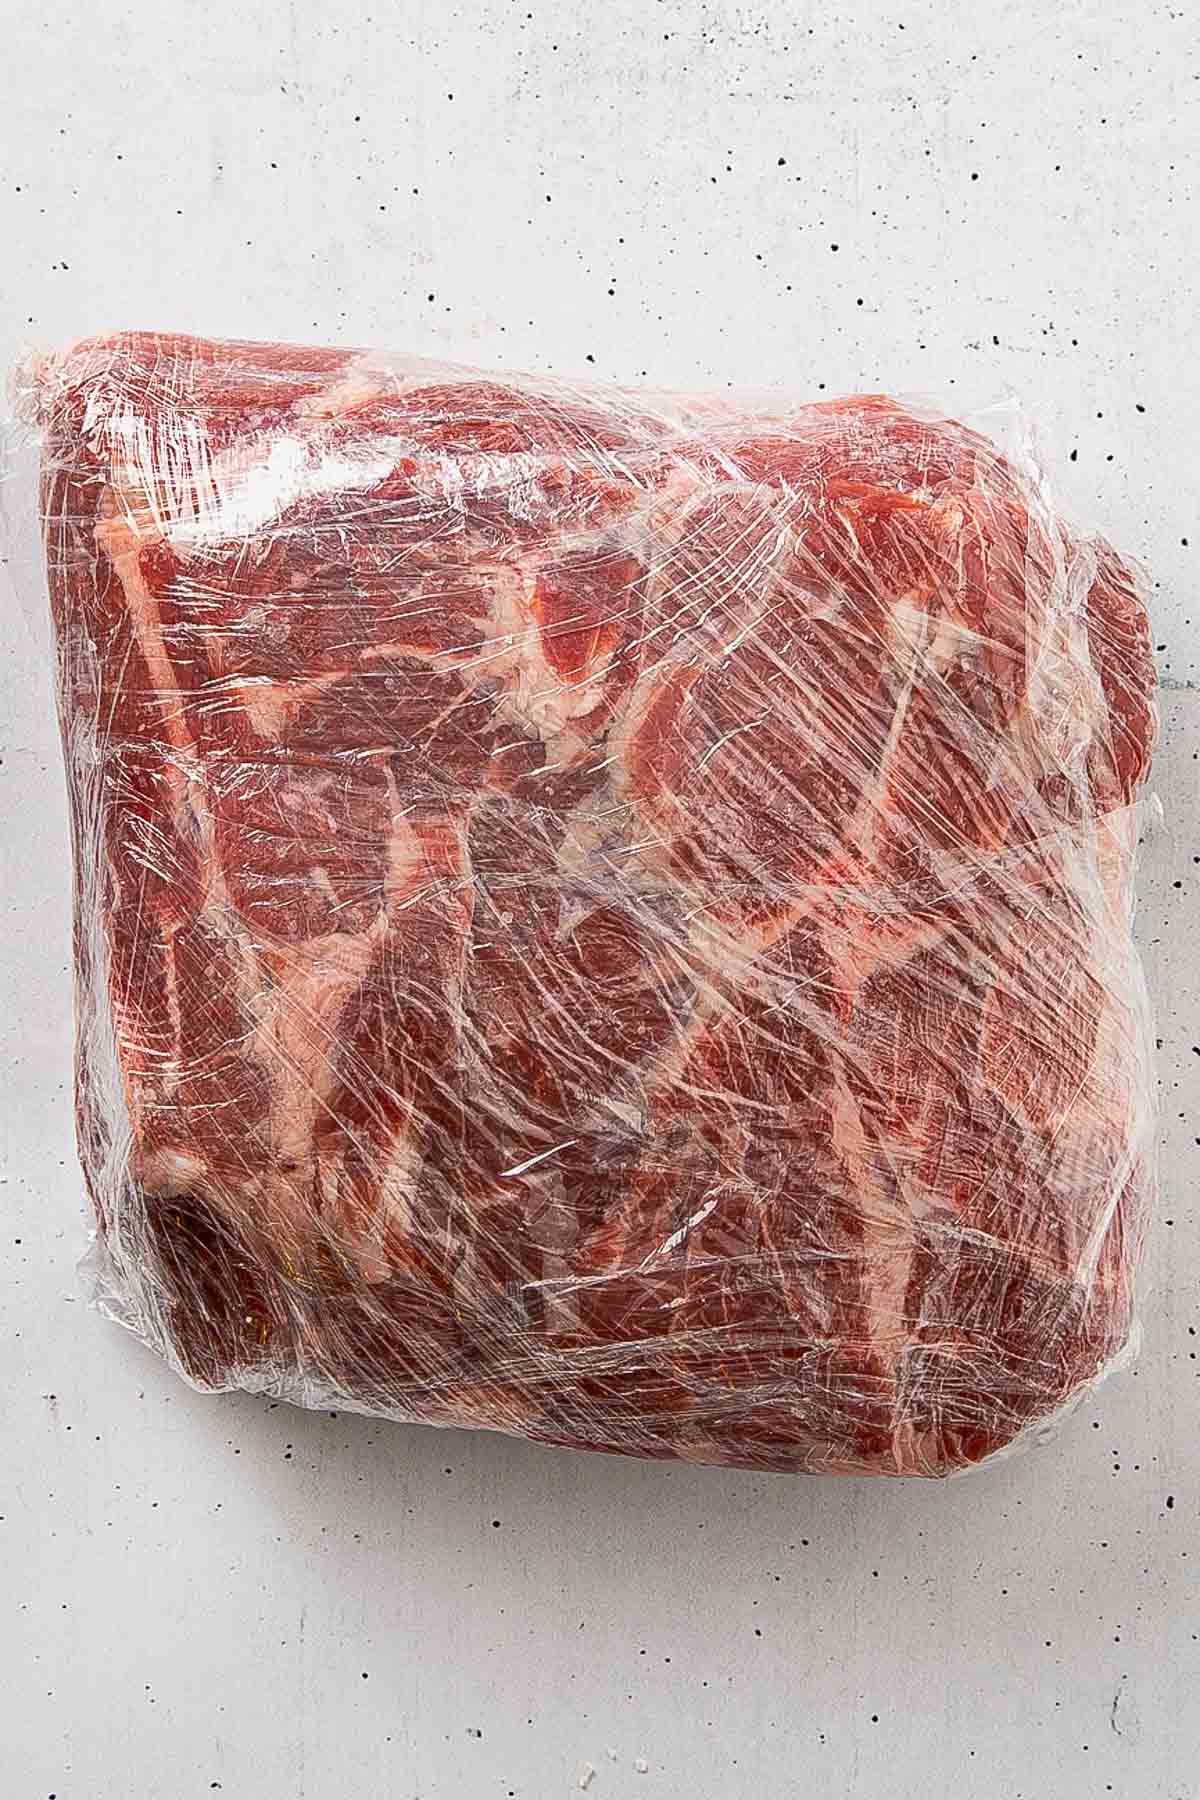
Now sprinkle kosher salt evenly over every surface - top, bottom, and all sides. The reason the salt goes on alone at this stage, rather than mixed into the rub, is that salt does a different job than the rest of the spices. It draws moisture out of the meat, dissolves into it, and gets pulled back in over the full overnight window, seasoning the meat from the inside out. Mixing salt into the rub and applying it all at once shortens that window and makes even coverage much harder to achieve on a large roast. Once the salt is on, wrap the pork tightly in plastic wrap and refrigerate it for at least 8 hours, overnight being ideal. If you want to understand how brining works across different pork cuts before your smoke day, How to Brine Pork Chops breaks down both wet and dry brining fully - the same principles apply here.
Day Of - Mustard, Rub, and Getting It on the Smoker
Pull the pork butt out of the refrigerator and unwrap it. The surface may look slightly wet or tacky - that's exactly right and means the brine did its job. Do not pat it dry. Set it on a foil-lined sheet pan and let it rest at room temperature for 45-60 minutes while you preheat your smoker. Putting cold meat straight onto a hot smoker causes the outside to cook faster than the inside can catch up.
I always use my hands to coat the entire surface of the pork in a thin, even layer of yellow mustard. You're not flavoring the meat here - the mustard taste completely disappears during a long cook. What the mustard does is give the dry rub something to grip so it stays on the meat through hours of heat and airflow rather than falling through the grates.
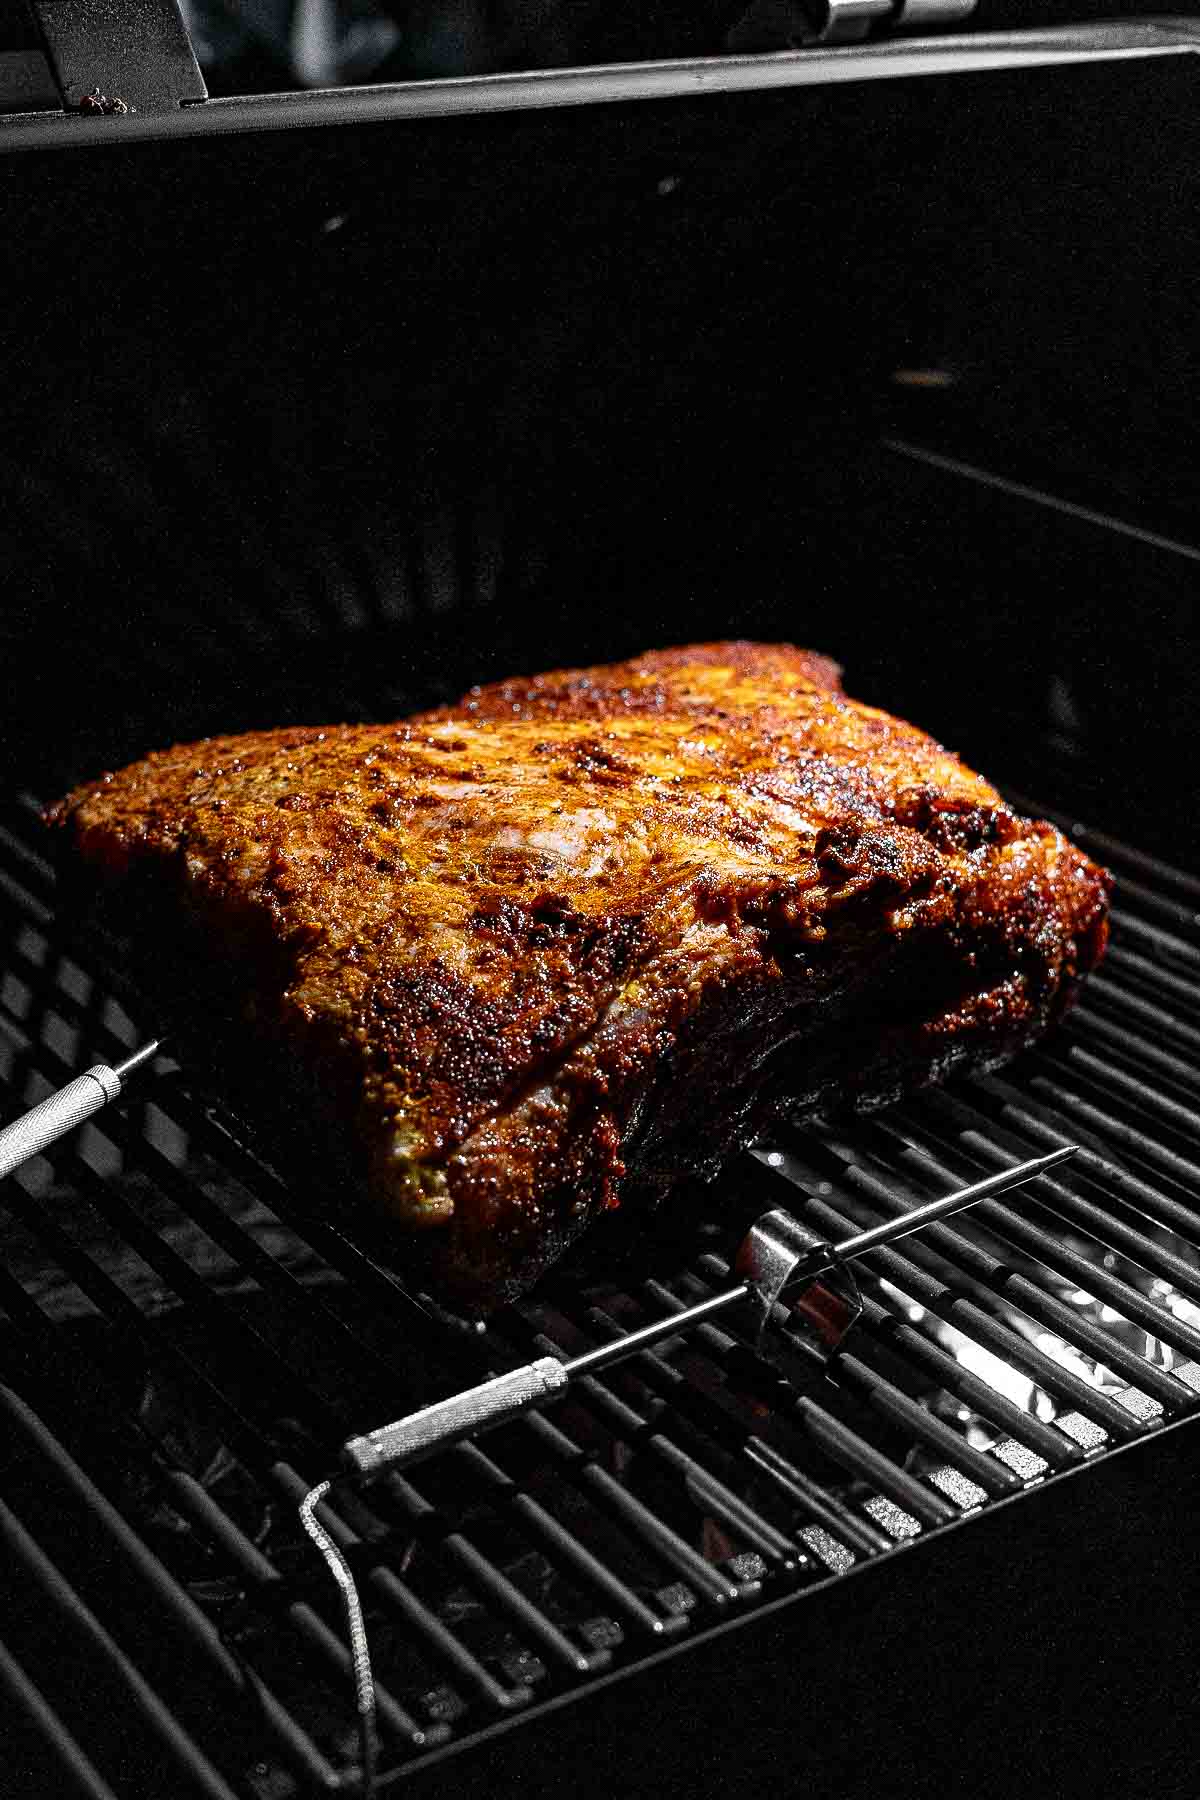
Once the mustard is on, I generously apply the dry rub on all sides, pressing it gently into the mustard with your hands as you go. Don't be conservative here. A large pork butt has a lot of surface area and needs solid, even coverage to build a proper bark. Then I place the pork fat-cap-side up directly on the smoker grates and insert a leave-in digital thermometer probe into the thickest part of the meat, keeping the tip away from the bone - bone contact gives a falsely high reading. Close the lid and resist opening it for at least the first 3 hours.


What Temperature to Smoke Boston Butt (and Why 250°F Works)
The standard smoking temperature for a Boston butt is 225-250°F, and the difference between those two numbers matters depending on how you're running your cook.
250°F is the right call for a daytime cook. It moves fast enough to finish an 8-10 lb pork butt in a reasonable window - roughly 12-14 hours total - while still being low enough for the fat and collagen inside the meat to break down slowly into the gelatin that makes pulled pork pull apart the way it's supposed to. Crank the temperature higher and you're rushing a process that genuinely can't be rushed; the outside finishes before the inside has had enough time to become tender.
225°F is better for an overnight cook. The lower temperature slows the cook by roughly 1.5-2 hours, which makes it far less likely that the pork hits the wrapping point before you're awake to deal with it. The finished result at 225°F versus 250°F is nearly identical - the lower temperature just gives you a more forgiving overnight window. Low-and-slow is the right call for large cuts like this one - but if you want great pork on a weeknight without the wait, Cast Iron Baked Pork Tenderloin gets you a juicy, perfectly cooked result in under 30 minutes.
The Stall - What It Is and What to Do
At some point during the cook, usually somewhere between 150-165°F, your thermometer is going to stop moving. It might sit there for two hours. It might sit there for four. This is called the stall, and it happens to every large cut of meat cooked low and slow.
Here's what's actually happening: the pork is sweating. Water evaporating from the surface of the meat is cooling it at almost exactly the same rate the smoker is heating it - the same physics that make sweating cool your body on a hot day. The smoker isn't losing temperature. The pork isn't stalled because something went wrong. It's just evaporative cooling doing exactly what evaporative cooling does.
The worst thing you can do during the stall is panic and turn up the smoker temperature. Higher heat dries out the exterior before the interior has finished breaking down. The right move is to let it ride until the thermometer reads 160-165°F, then wrap the pork in foil. Wrapping traps the moisture, eliminates the evaporation, and allows the internal temperature to climb again. The stall ends almost immediately after wrapping.
When and How to Wrap Your Pork Butt in Foil
Wrap the pork when the internal temperature hits 160-165°F. At that point the bark has fully set and the meat has taken on most of the smoke it's going to absorb. Continuing to smoke unwrapped past this point adds very little and risks drying out the surface.
Tear off two pieces of heavy-duty aluminum foil, each about 3 feet long, and lay them out in a plus sign shape on your work surface. My time tested method is to scatter the butter pieces, brown sugar, and apple juice in the center. These aren't decoration - the butter and sugar melt into the bottom of the pork as it finishes cooking and the apple juice creates steam inside the foil that keeps the interior from tightening up. I place the pork fat-cap-side up in the center, then fold the foil up and around it, crimping the edges firmly to seal it as well as I can. Poke your thermometer probe back through the foil so you can keep monitoring without unwrapping.


If the foil tears during wrapping or when you're moving the pork back to the smoker, don't try to repair it. Set the pork on a fresh sheet of foil immediately, pour any escaped liquid back in around the meat, and re-wrap. One tear is not a ruined cook - losing all the liquid is. Return the wrapped pork to the smoker and increase the temperature to 250°F if you were running at 225°F overnight.

What Internal Temperature Is Pork Butt Done
A pork butt is done when the internal temperature hits 200-203°F. At that temperature the collagen inside the meat has fully converted to gelatin, the muscle fibers have relaxed, and the fat has rendered. That's the physical condition that makes pulled pork pull apart instead of slice.
But temperature alone isn't the complete answer. When your thermometer reads 200°F, insert the probe tip into 2-3 different spots in the thickest section of the meat. In a properly finished pork butt the probe will slide in and out with almost no resistance - the way a skewer goes into warm butter. If you feel any resistance at all, give it another 20-30 minutes and check again. A pork butt that probes clean at 200°F is done. A pork butt that reads 203°F but still pushes back against the probe needs more time. The probe test is the real finish line. The temperature is just a signal to start checking.

Smoked Pork Butt (Boston Butt) Recipe
CLICK on STARS to REVIEW the RECIPE, then CLICK OK
Ingredients
Pork
- 8 lbs bone-in pork butt (Boston butt)
- 1 tablespoon kosher salt (for overnight dry brine)
- 2 tablespoon yellow mustard (binder, applied day of)
Dry Rub
- 3 tablespoon brown sugar packed
- 1 tablespoon smoked paprika
- 2 teaspoon garlic powder
- 2 teaspoon onion powder
- 1 teaspoon coarse black pepper
- 1 teaspoon chili powder
- ½ teaspoon cayenne pepper
- 1 teaspoon finely ground coffee (plain, unflavored)
Spritz
- 1 cup apple juice (or ½ cup apple juice + ½ cup apple cider vinegar)
Wrapping
- 2 tablespoon unsalted butter cut into small pieces
- 2 tablespoon brown sugar
- 2 tablespoon apple juice
Instructions
Trim the Fat Cap
- The morning before your overnight smoke, or at least 8 hours before you plan to put the pork on the smoker, remove the pork butt from its packaging and pat it completely dry on all sides with paper towels. Trim the fat cap down to about ¼ inch thickness. A thinner fat cap means your rub and bark develop on actual meat rather than on a layer of fat that will render off or get discarded.
Season the Pork Butt
- Sprinkle the kosher salt evenly over every surface of the pork butt, covering all sides as thoroughly as possible. Applying the salt on its own at this stage ensures it distributes evenly and has the full overnight window to penetrate the meat. Wrap the salted pork butt tightly in plastic wrap and refrigerate for 8 hours or overnight.
- When you are ready to smoke, remove the pork butt from the refrigerator and unwrap it. The surface may look slightly wet or tacky. That's normal and exactly what you want. Do not pat it dry. That moisture is the result of the overnight brine doing its job and the mustard will adhere to it just fine.
Get Pork Butt to Room Temperature
- Set the pork butt on a foil-lined sheet pan and let it rest at room temperature for 45-60 minutes. While it rests, set up your smoker and preheat it to 250°F (121°C). For an overnight cook, preheat to 225°F (107°C) instead. (see Notes.)
- For wood, use apple or cherry for a mild, sweet smoke, hickory for a classic BBQ character, or a blend of apple and hickory for the best of both. If you are using a charcoal grill with a smoker box or a gas grill with a smoker attachment, follow your equipment's instructions for maintaining steady indirect heat and a consistent stream of wood smoke.
Coat in Mustard and Rub
- Coat the entire pork butt with yellow mustard, using your hands to spread it in a thin, even layer. The mustard acts as a binder and will not give the pork a mustard flavor once it cooks. Sprinkle the dry rub generously over all sides, pressing it gently into the mustard with your hands so it adheres. Do not be shy with the rub. You want solid coverage on every surface.
Smoke the Pork Butt
- Place the pork butt fat-cap-side up directly on the smoker grates. If your smoker tends to run hotter on one side, position the thicker end toward the heat source. Insert a leave-in digital meat thermometer probe into the thickest part of the pork butt, making sure the tip is not touching the bone. Contact with bone gives a falsely high reading. Close the smoker and resist opening it for at least the first 3 hours. Every time you open the lid, you lose heat and smoke.
- If you are doing a daytime cook: beginning at the 3-hour mark, open the smoker and spritz the pork lightly on all exposed surfaces using a spray bottle set to a fine mist. You want to dampen the surface, not wash the rub off. Spritz once every 60-90 minutes after that. If you are doing an overnight cook, skip the spritz entirely. (see Notes.)
- When the internal temperature reaches 160-165°F (71-74°C), it is time to wrap. At this point the bark has set and the meat has taken on most of the smoke it will absorb. Use a wide, flat tool to slide the pork butt off the grates and onto the pan, being careful not to wipe away seasoning.
- Tear off two pieces of heavy-duty aluminum foil, each about 3 feet long, and lay them out in a plus sign (+) shape. Scatter the butter pieces, brown sugar, and apple juice in the center. Place the pork butt fat-cap-side up in the center of the foil. Fold the foil up and around the pork, crimping the edges firmly to seal it as well as you can. You want the moisture trapped inside. The shiny or dull side of the foil facing in or out makes no difference.
- Poke the thermometer probe through the foil back into the thickest part of the meat, away from the bone, so you can keep monitoring the temperature without unwrapping. If a tear happens during wrapping or transfer, set the pork on a fresh sheet of foil immediately, pour any escaped juice back in around the meat, and re-wrap tightly.
- Return the wrapped pork to the smoker and continue cooking until the internal temperature reaches 200-203°F (93-95°C). This usually takes another 2-4 hours after wrapping. But temperature is your guide, not the clock. When the thermometer reads 200°F, insert the probe tip into 2-3 different spots in the thickest section. In a properly finished pork butt the probe will slide in and out with almost no resistance, the way a skewer goes through warm butter. If you feel any resistance at all, give it another 20-30 minutes and check again.
- Before you open the smoker, stage a foil-lined sheet pan right next to it so you have somewhere to set the pork immediately if the foil tears. Using oven mitts, move the wrapped pork butt off the grates and onto your foil-lined sheet pan. Do not lift it by the foil edges. If a tear happens and juice begins leaking out, immediately wrap the foil from the sheet pan up, containing any juices within the wrap.
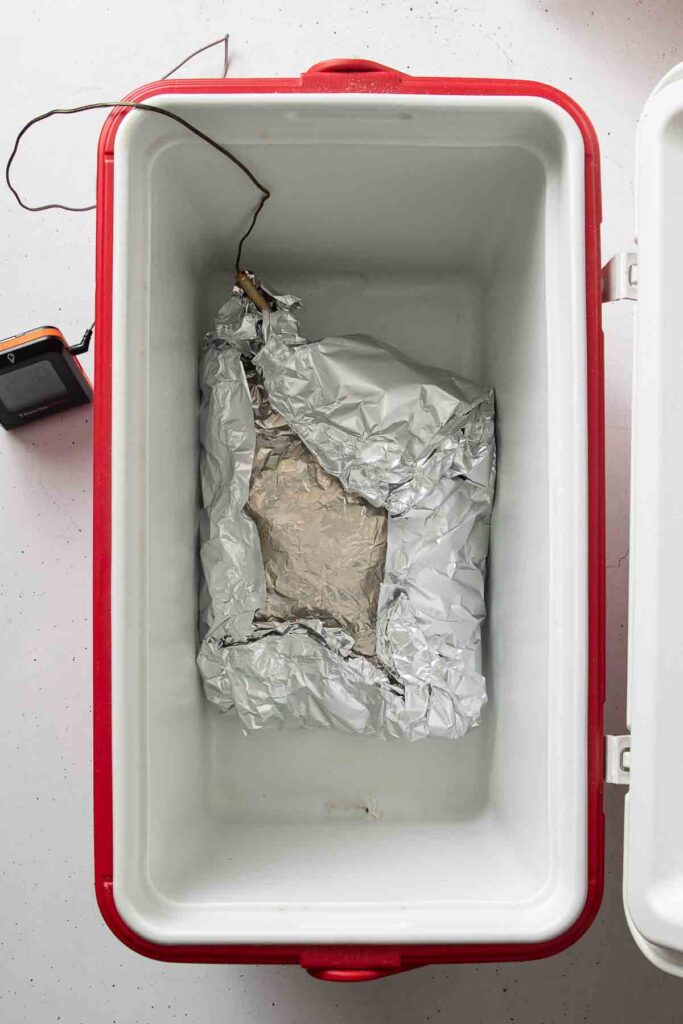
- Carry the sheet pan to your cooler, place the wrapped pork inside, lay a clean kitchen towel or two on top, and close the lid. This is called a faux cambro and it will keep your pork butt safely above 140°F for up to 4 hours. Let it rest for a minimum of 1 to 2 hours, but 4 hours is better. Resting allows the muscle fibers to relax and reabsorb the juices that pooled during the cook.
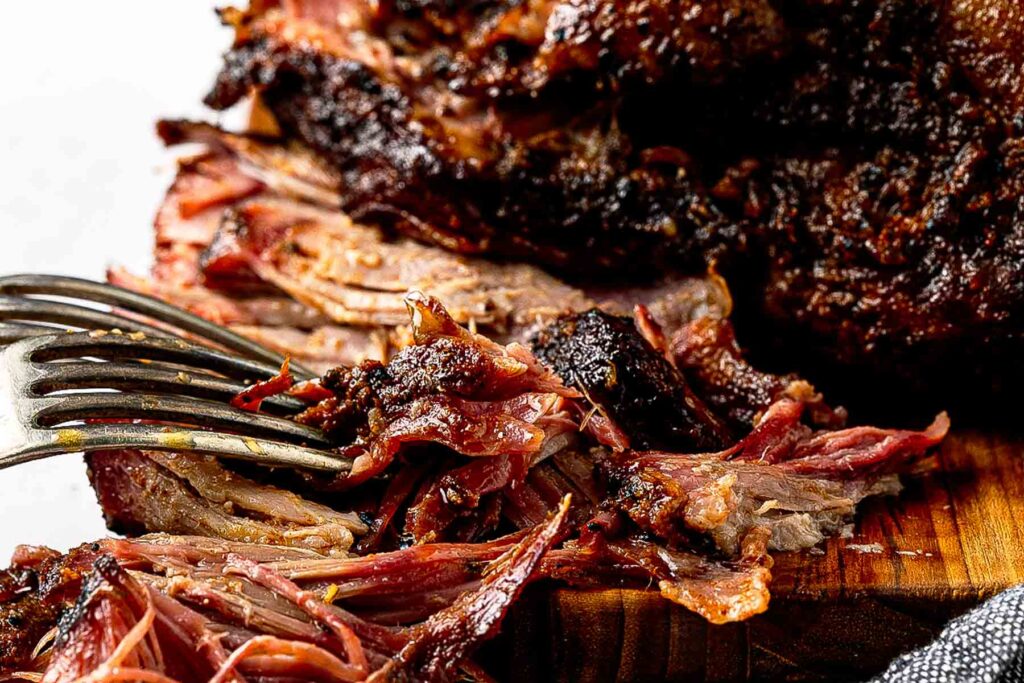
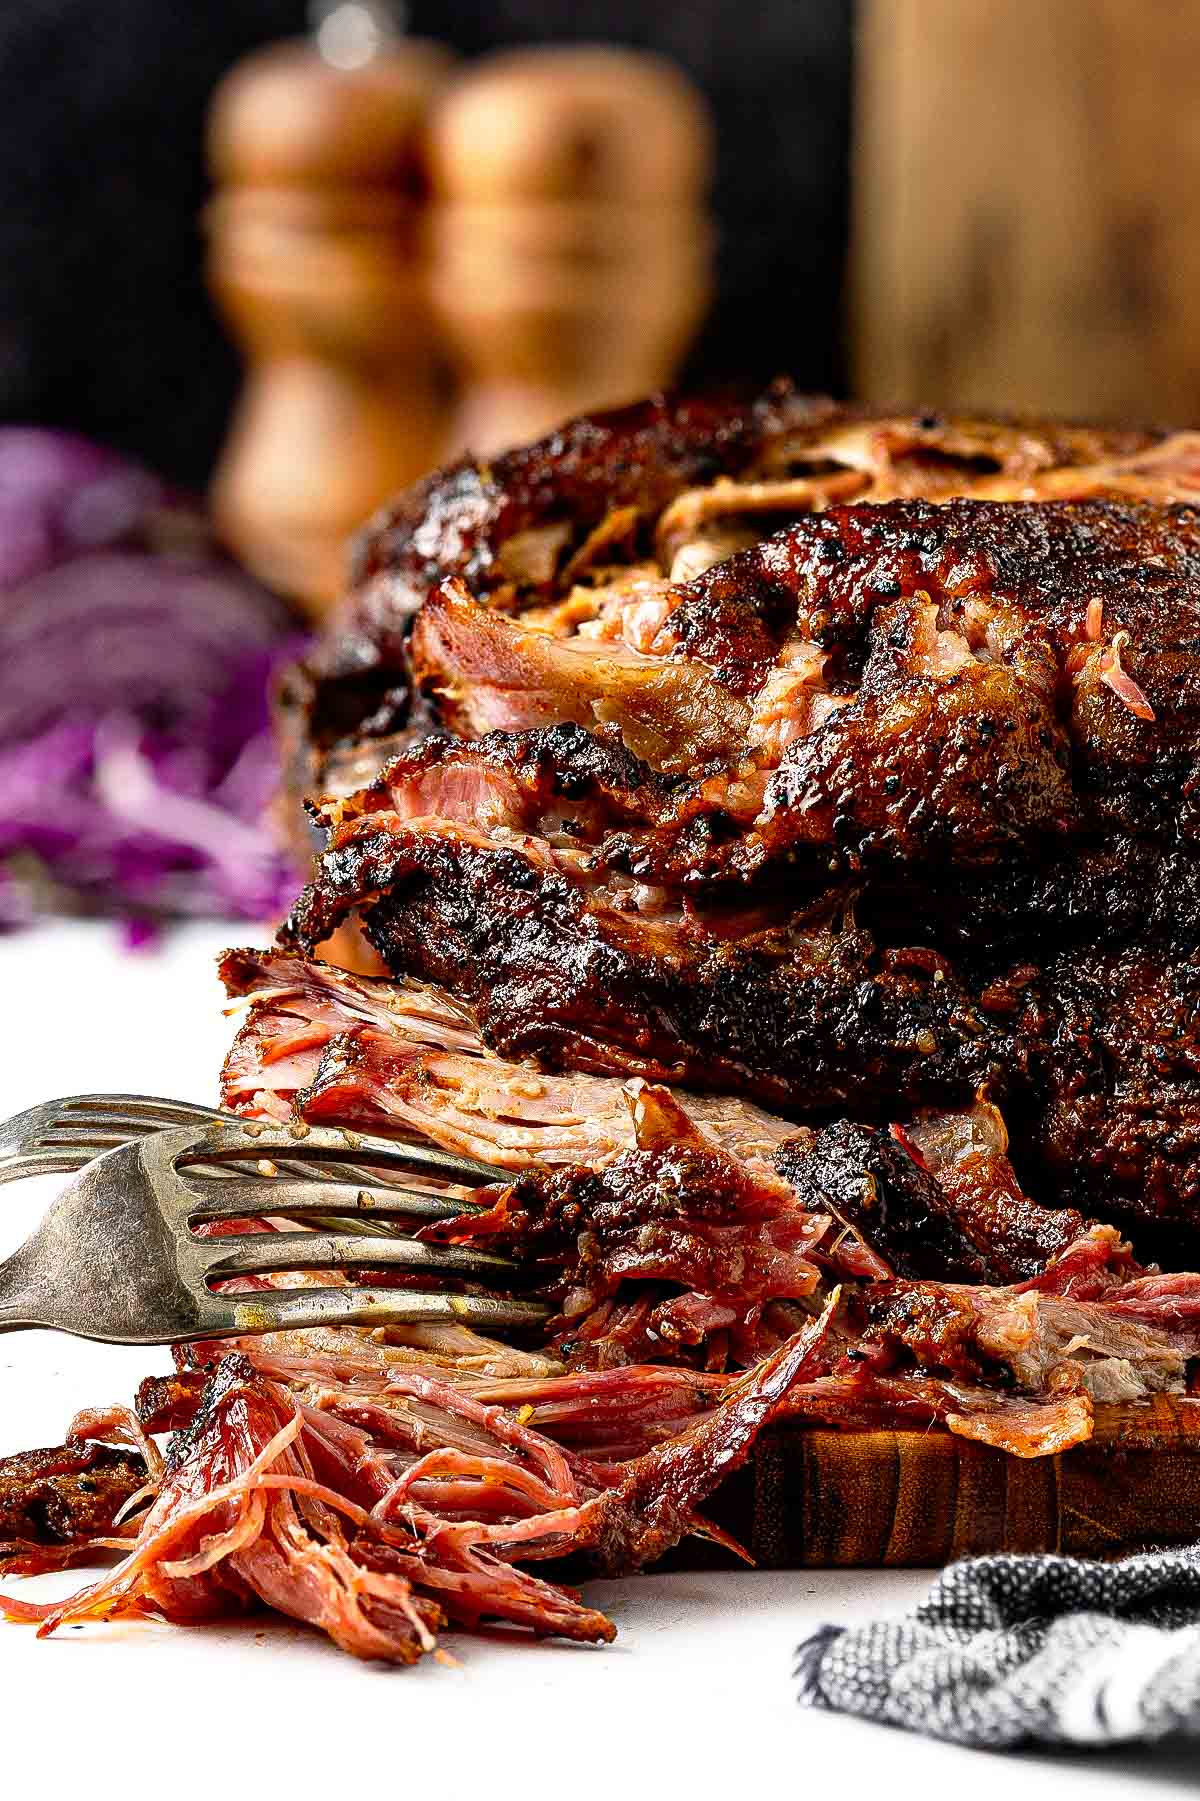
- After resting, open the foil carefully over your sheet pan. There will be hot liquid inside. Pour that liquid into a bowl or fat separator and set it aside. Wearing heat-resistant gloves or using two forks, pull the pork apart. The bone should slide out cleanly with little effort.
- Discard any large clumps of fat that did not render down during the cook. Drizzle some of the reserved cooking juices back over the pulled pork and toss gently to moisten.
- Serve with your favorite barbecue sauce on the side, or mix a small amount directly into the pork before serving.
What Smoker Should I Use
In my opinion, a pellet smoker is hands-down the easiest way to nail this cook. The digital temperature controller holds your 225°F window for the full 12-hour cook without you ever touching the fire - no babysitting, no wood splits, no 3 a.m. wake-up calls. If you're weighing your options before committing to a smoker, read our full breakdown of why a pellet smoker gives you the most hands-off BBQ experience - pork butt is exactly the kind of long, low-and-slow cook where that difference matters most.
How to Rest and Shred a Smoked Pork Butt
The cook is finished, but you're not done yet. How you handle the pork in the next two hours determines whether all that fat and collagen you spent 12+ hours breaking down actually stays in the meat or runs out onto your cutting board.

The Faux Cambro Method Explained
A cambro is an insulated holding container used in professional kitchens to keep cooked meat at safe serving temperature for hours. A faux cambro is the home version, and it works almost as well - all you need is a clean cooler and a couple of kitchen towels.
Before you open the smoker, stage a foil-lined sheet pan directly next to it so you have somewhere to set the pork immediately. Using oven mitts, slide the wrapped pork butt off the grates and onto the pan. Do not lift it by the foil edges - a heavy, juice-filled foil packet will tear under its own weight. Carry the sheet pan to your cooler, set the wrapped pork inside, lay one or two clean kitchen towels on top to fill the air space, and close the lid.
The towels matter. Air is a poor insulator; filling the dead space in the cooler with towels slows heat loss significantly. A properly set up faux cambro will hold your pork safely above 140°F for up to 4 hours - well above the food safety threshold and plenty of time to let the meat relax completely before you shred it.

Rest for a minimum of 1 hour. Two hours is better. Four hours is ideal. The resting period isn't just about temperature - it's about giving the muscle fibers time to relax and reabsorb the juices that pooled during the cook. Cut into the pork too soon and those juices run straight out onto your board instead of staying in the meat where they belong.
How to Shred Pulled Pork and What to Do with the Juices
When you're ready to shred, open the foil carefully over your sheet pan - there will be a significant amount of hot liquid inside, and it will splash if you're not paying attention. Pour that liquid into a bowl or fat separator and set it aside. Do not throw it away. That liquid is concentrated pork drippings, rendered fat, melted butter, brown sugar, and apple juice that cooked with the meat for hours. It is the single best thing you can add back to the finished pulled pork.
As you can see I am wearing heat-resistant gloves and let me tell you - it is the most efficient way to shred a large pork butt - you can work quickly, feel exactly what you're pulling, and break up any remaining chunks easily with your fingers. Two forks work fine if that's what you have, but gloves are worth buying if you plan to make this more than once. Your quick fingers is all you need!

The bone should slide out cleanly with almost no effort - give it a twist and pull. If it's resisting, the pork needed more time; this almost never happens if you waited for the probe test to pass. Once the bone is out, begin pulling the meat apart, working with the grain where you can. As you go, discard any large clumps of fat that didn't render down during the cook - you'll feel them easily, they're soft and slick rather than fibrous.
Once everything is pulled, drizzle some of the reserved cooking juices back over the meat and toss gently to distribute. How much to add is a judgment call - you want the pork moist and glossy, not soupy. Start with a few tablespoons, toss, and assess. If you used a fat separator, the defatted drippings at the bottom of the separator are pure flavor with less grease; use those first. The remaining juices can be stored separately in the refrigerator and stirred back in during reheating to restore any moisture lost overnight.
Serve immediately with barbecue sauce on the side, or rest the pulled pork covered at room temperature for up to an hour before serving - it holds beautifully.
Make-Ahead Smoked Pulled Pork for a Party
After the pork has finished its rest in the cooler, I shred it with a fork (no knife needed!), drizzle the reserved cooking juices over the top, and toss to combine. Let it cool to room temperature uncovered for about 30 minutes, then transfer to a covered container and refrigerate overnight. The next day, spread the pulled pork in a single layer in a roasting pan or covered baking dish, add a splash of apple juice or chicken broth to keep it from drying out, cover tightly with foil, and reheat in a 300°F oven for 20-25 minutes or until it hits 165°F internal temperature.
For a large party, a slow cooker on Low is an easy way to hold the reheated pork at serving temperature for the duration of the event without drying it out. Add a splash of liquid to the bottom before you turn it on, and give the pork a gentle toss every hour or so.
My timeline for a Saturday party:
- Thursday morning - salt brine, refrigerate
- Thursday night - mustard, rub, onto smoker at 225°F around 10 PM
- Friday morning - wrap at 160-165°F, finish cook, rest in cooler, shred, refrigerate
- Saturday - reheat at 300°F, serve
Want a grilled pork option to go with your smoked Boston butt? Try my Grilled BBQ Ribs (Foolproof 2-Step Foil Method) for tender, saucy ribs on a gas grill.
Storage, Reheating, and Freezing
- Refrigerating - Pulled pork keeps well in the refrigerator for up to 4 days in an airtight container. Store the reserved cooking juices separately and stir them back in during reheating - the meat absorbs them as it warms and comes back nearly as good as the day it was made.
- Reheating - The best method is a covered pan in a 300°F oven for 20-25 minutes, with a splash of apple juice, chicken broth, or reserved cooking liquid added before covering. The covered environment traps steam and keeps the pork from drying out as it heats through. Pull it when the internal temperature hits 165°F.
- Freezing - Pulled pork freezes exceptionally well. My time tested method of freezing pulled pork is to divide it into meal-sized portions, and then press into zipper freezer bags with as much air removed as possible, and freeze for up to 3 months. I always include a small amount of the reserved cooking juices in each bag - the liquid protects the meat from freezer burn and doubles as built-in moisture when you reheat. Thaw overnight in the refrigerator and reheat as directed above. Pulled pork frozen within 24 hours of cooking is nearly indistinguishable from fresh.
Avoid microwaving large portions. The outer edges dry out and tighten before the center is even warm. If the microwave is your only option, reheat in short 60-second intervals on medium power, covered with a damp paper towel, stirring between each interval.
Smoked Pulled Pork Serving Ideas and Variations
Pulled Pork Sandwiches and Sliders
The most classic application, and for good reason. Pile the pulled pork onto a soft brioche bun and top with a simple vinegar-based coleslaw - the crunch and acidity of the slaw cuts straight through the richness of the pork in a way that barbecue sauce alone doesn't. For sliders, I use Hawaiian rolls, which are soft enough to compress slightly under the weight of the pork without falling apart, and their mild sweetness works well against a smoky, peppery bark. Keep the sauce on the side so guests can control how much they use - not everyone wants the same amount, and letting the pork speak for itself is never the wrong call.
Pulled Pork Tacos
Use small corn tortillas, double them up so they don't tear under the weight of the filling, and warm them directly over a gas burner or in a dry skillet until they have a few char spots. Press about ¼ cup of slaw into the fold of the tortilla first, then pile the pork on top. The slaw acts as a structural base and keeps the taco from getting soggy. Finish with pickled red onion, sliced avocado, and a squeeze of fresh lime. The acid from the lime and the onion does the same job as vinegar-based sauce - it lifts the richness of the pork and makes the whole thing taste brighter. Skip the heavy barbecue sauce here; it overwhelms everything else. If you love pork tacos, the Pork Belly Tacos - oven-roasted with a crispy fat cap - are worth making the very next weekend. Completely different preparation, same level of impossible-to-stop-eating.
Variations
- Carolina Vinegar Pulled Pork - Skip the brown sugar in the dry rub entirely. Once the pork is shredded, finish it with apple cider vinegar, red pepper flakes, a pinch of salt, and a small amount of sugar mixed directly into the meat rather than served on the side. Eastern Carolina style is deliberately simple - the vinegar does most of the work, cutting the fat and seasoning the pork in the same step. The result is tangier, lighter, and noticeably less sweet than a standard BBQ-style pulled pork. It's also exceptional on a plain white bun with nothing else on it.
- Chipotle-Citrus Pork Butt - Replace the cayenne in the dry rub with 1 teaspoon of chipotle chili powder, which brings a smoky, earthy heat rather than straight fire. In the foil wrap, swap the brown sugar for the zest of one orange and add a tablespoon of the juice along with the apple juice. The citrus brightens the finished pork and plays well against the chipotle. This variation leans naturally toward tacos and grain bowls rather than classic BBQ sandwiches.
- Honey Garlic Glazed Pork Butt - After the pork comes off the smoker and you've unwrapped it - but before you shred - brush the bark generously with a mixture of 3 tablespoons of honey and 1 teaspoon of soy sauce. Return it to the smoker or place it in a 275°F oven, uncovered, for 15 minutes to set the glaze. The honey caramelizes against the bark and the soy sauce adds a savory depth that keeps it from tasting like candy. Shred immediately after. The glaze sets into the bark rather than pooling at the bottom, and every piece of pulled pork picks up a bit of it.
Frequently Asked Questions
Why Did My Pork Butt Stall for So Long?
Because that's exactly what pork butts do. The stall happens when moisture evaporating from the surface of the meat cools it at almost the same rate the smoker is heating it. A large bone-in pork butt can sit at 150-165°F for anywhere from 2 to 5 hours and come out perfectly fine on the other side. My fix is simple: wrap the pork in foil at 160-165°F, which eliminates the evaporation and lets the temperature climb again almost immediately.
Can I Smoke a Boston Butt Without Wrapping It?
Yes, and some pitmasters prefer it. Skipping the wrap produces a thicker, harder bark because the surface never gets steamed. The tradeoffs are a longer stall, a slightly drier finished product, and 2 to 4 additional hours of cook time. For a first cook, wrapping is the more forgiving path. Once you've done it a couple of times and understand how the cook behaves, going unwrapped is a reasonable experiment.
Can I Use a Gas Grill to Smoke a Boston Butt?
Yes, with one caveat: maintaining consistent wood smoke takes more active management on a gas grill than on a pellet smoker. Use a smoker box with soaked wood chips placed over one lit burner, with the pork on the opposite side on indirect heat. Plan to replenish the chips every 45-60 minutes for the first few hours. Once the pork is wrapped, the smoke source matters much less - at that point it's essentially braising inside the foil.
Do I Need to Inject a Boston Butt?
No, and this recipe was specifically developed without it. A bone-in pork butt already has enough intramuscular fat to keep the interior moist through a long cook. The overnight dry brine seasons the meat from the outside in, and the foil wrap with butter and apple juice handles moisture during the final hours. Injection is a competition technique - for a home cook, the process as written is enough.
Can I Make Smoked Pulled Pork the Day Before?
Not only can you - you probably should. The flavor is noticeably deeper the day after it's cooked, and reheating is completely hands-off. Shred the pork, drizzle the reserved juices over it, refrigerate overnight in an airtight container, then reheat covered in a 300°F oven for 20-25 minutes with a splash of apple juice or broth. Most people genuinely cannot tell it wasn't made that day - and your party day becomes completely stress-free.
More Smoker Recipes You'll Love
Take a look at my full collection of big project meats here: The Best Smoker Recipes: Pork Butt, Brisket, Chuck Roast & More.
- How to Smoke a Brisket Flat That Eats Like a Whole Packer
- The Only Smoked Beer Can Chicken Method That Gets the Skin Right
- Smoked Chuck Roast (Poor Man's Brisket Done Right)
- Santa Maria-Style Tri-Tip, Smoked or Roasted, with Reverse-Sear Instructions
- Poor Man's Burnt Ends (Better Than Brisket - And I'll Prove It)
More Pork Recipes You'll Love
- Roasted Pork Tenderloin - juicy, fast, and weeknight-friendly; everything a pork tenderloin should be.
- Easy Pan-Seared Pork Chops - pan-seared until golden with a simple garlic butter pan sauce that comes together in minutes.
- Pulled Pork Mac and Cheese - the no-smoker version of pulled pork for when you want the same fall-apart result without the 12-hour commitment.
- Pork Belly Tacos (Oven-Roasted, Crispy Fat Cap) - crispy, melt-in-your-mouth pork belly tucked into warm corn tortillas with bright toppings that cut right through the richness.


Heidi says
This was amazing! It worked just as you described. My family loved it.
Henry Hendrickson says
Very informative. Like step by step and what spices to use. Read about mustard before but forgot about it. If you dont want to cook for 12-14 hrs do a heavy smoke for 2-3 hrs at the 250 degree and put in slow cooker overnight, same results, meat fall parts and still has great smoke flavor. Purist wont like this approach but it works
Olya Shepard says
Your shortcut is brilliant for busy folks: getting that deep smoke flavor in 2-3 hours at 250°F and then letting the slow cooker do the low-and-slow work overnight definitely works!!! The purists may raise an eyebrows all they want
Don says
A few things that this article gets wrong. 1st score the fat cap horizontally and vertically. This will get more seasoning into the meat. Second fat cap down not up the fat cap helps protect the meat from drying out. 3rd do not wrap in foil. That bark you spent the first half of your cook building will be softened a d turned to mush.You don't have to wrap, but if you do wrap in butcher paper. This still helps hold in some of the heat to get past the stall and keep the meat from drying out, but keeps your bark intact.