Make tender, juicy grilled BBQ ribs using this easy 2-step foil method that locks in moisture before finishing over smoky heat. Ready in about 3 hours using simple pantry spices and your grill, this foolproof approach delivers consistent, fall-apart ribs without needing a smoker.
If you've ever pulled a rack of tough, dry ribs off the gas grill and just stood there wondering what went wrong, I've been there too - and this recipe is exactly how I fixed it. The 2-step foil method I use here guarantees tender, juicy meat every time, and once you try it, you'll never go back to guessing. I cook the ribs low and slow in foil to steam and soften the meat, then finish them unwrapped over indirect heat so the sauce caramelizes and the bark develops without burning. Whether you're working with baby back or St. Louis-style ribs, this approach works beautifully on a basic gas grill and hits that sweet spot of smoky flavor, clean bone pull, and just enough chew - with a glossy, sticky sauce that clings instead of sliding off.
Making ribs is a science, as described in The Ultimate Guide to Cooking Ribs at Home.
The 2-Step Method for Guaranteed Tender Ribs
This is the exact method I rely on every single time I make ribs: first, the ribs are wrapped and gently cooked to tenderize; then they're finished directly on the grill to build flavor and bark. The foil stage traps moisture and essentially steams the ribs in their own juices, breaking down connective tissue without drying them out. The second stage-unwrapped over indirect heat-lets the exterior tighten up, absorb smoke, and develop that sticky, caramelized finish.
My two‑step foil‑plus‑grill method in this recipe relies on a stable two‑zone fire to produce predictable tenderness first, then layer in texture and flavor. For an exact walk through of how to that up on both gas and charcoal specifically for ribs, take a look at 2‑Zone Grilling for Ribs: Charcoal vs Gas Explained.
Foil vs. No-Foil Ribs
Cooking ribs without foil can produce a firmer, chewier texture with a more pronounced bark, but it's also less forgiving-especially on a gas grill where maintaining steady humidity is difficult.
Foil-wrapped ribs, on the other hand, are more consistent. The meat turns noticeably more tender, with a softer interior and less risk of drying out. The trade-off is a slightly lighter bark-but that's corrected in the final grilling stage.
If your goal is juicy, tender ribs every time, foil wins. If you're chasing competition-style bark and have precise fire control, skipping foil can work-but it's less reliable.
If you want to keep the low-and-slow momentum going, my Smoked Boston Butt Recipe (Fall-Apart Pulled Pork for Beginners) is the recipe I'd make alongside these ribs for a full cookout spread.
Why This Method Works So Well on a Gas Grill
Gas grills don't retain moisture like smokers, which is why ribs often dry out or cook unevenly. The foil stage compensates for that by creating a sealed, humid environment.
Once unwrapped, you still get the benefits of grilling-caramelization, light charring, and smoky flavor (especially if you add wood chips). This method is especially reliable if you're making BBQ ribs on a gas grill and struggle with dry meat or uneven cooking.
275°F vs. 300°F: What Changes
Temperature affects both timing and texture:
- At 275°F: ribs cook more, giving fat and collagen more time to render. The result is slightly juicier meat with a softer bite. Total time: about 3 hours.
- At 300°F: ribs cook faster, closer to 2½ hours, with a slightly firmer texture and more aggressive bark development.
Both work, but 275°F gives you a wider margin for error, especially on a gas grill.
Baby Back vs. St. Louis Ribs
If you are choosing between baby back, spare, and St. Louis ribs, start with Baby Back vs Spare vs St. Louis Ribs: Cuts, Price, Tenderness so you know exactly what you are working with before you turn on the grill.
Here are the differences between the two:
- Baby back ribs: smaller, leaner, and cook faster (about 2 to 2½ hours wrapped, plus finishing time). They tend to be more tender but can dry out quicker if overcooked.
- St. Louis-style ribs: larger, fattier, and more forgiving. Expect closer to 3 hours total cook time. They deliver a richer, meatier bite.
Exact Timeline (275°F Game Plan)
This is the schedule I actually follow on game day - print it out or keep it on your phone so you're not doing the math mid-cook.
If you're wondering how long to cook ribs at 275°F on a gas grill, plan on about 3 hours plus a rest:
- 0:00-0:20 - Prep ribs, remove membrane, apply rub
- 0:20-1:20 - Rest (optional but recommended for flavor)
- 1:20-3:20 - Cook wrapped over indirect heat (turn once halfway)
- 3:20-4:00 - Unwrap, sauce, and finish on grill (baste every 10-15 minutes)
- 4:00-4:10 - Rest before slicing
Ingredients You'll Need
Pork ribs (baby back or St. Louis-style): I've tested both baby back and St. Louis-style, and either works great here - just know that the timing shifts a little depending on which cut you go with.
Yellow mustard: Trust me on this one - you won't taste it at all, but it holds the rub in place and helps keep things moist while the ribs cook.
Brown sugar: I love what brown sugar does to the exterior - that caramelized crust is half the reason these look as good as they taste.
Smoked paprika: If you like a bolder smoke taste, this is a good choice because it layers nicely with BBQ sauce.
Kosher salt: I used that to season the meat all the way through; if you only have table salt, you can use it instead, but start with less because it tastes saltier. Kosher Salt vs. Table Salt explains everything.
Black pepper: If you like a stronger pepper flavor, you can grind it a bit coarser.
Garlic powder: It's an easy way to add garlic flavor that spreads evenly over the ribs; if you like to use fresh garlic, keep it to the surface so it doesn't burn.
Onion powder: This is is a good choice because it blends in smoothly and doesn't leave chunks.
Ground cumin: This is one of my favorite additions to a rib rub - it adds a warm, earthy depth that plays really well against the sweet BBQ sauce. Skip it if you want, but I never do.
Cayenne pepper: I keep it at a pinch for mild heat, but if you like things spicy, this is the easiest place to dial it up.
Apple juice: A small pour inside the foil packet does more than you'd think - it creates that steamy, moist environment that makes all the difference.
BBQ sauce: I usually grab a bottle of my favorite store-bought sauce to keep things simple, but if you have a homemade version you love, use it - you'll really taste the difference.
Worcestershire sauce: I add just a small splash alongside the apple juice inside the foil - it's subtle, but it adds a savory, umami backbone that makes the whole thing taste more complex.

How to Make Grilled BBQ Ribs (Step-by-Step)
Step 1: Prep the ribs so the seasoning can actually get in
Pat the ribs dry with paper towels so the surface isn't slippery. Slide a butter knife under the thin membrane on the back of the rack, loosen a corner, then grab it with a paper towel and pull; it should peel off in one or two strips. If a few patches remain, don't panic-just remove what you can so the rub can reach the meat instead of sitting on a rubbery layer.

Step 2: Add the mustard and rub for flavor and bark
Spread a thin, even layer of yellow mustard all over the ribs; you're not trying to taste mustard, you're just giving the rub something to stick to. Sprinkle the dry rub generously on all sides, pressing it in with your hands rather than rubbing it off. You want a solid, even coating with no bare spots; this is what will form the bark later.


Step 3: Let the ribs sit so the rub can work
Lay the seasoned ribs on a tray or cutting board, meat side up, and let them rest in the fridge for at least an hour, uncovered or lightly tented. During this time, the salt starts to pull in and season the meat from within, and the surface will look slightly damp as the rub dissolves a bit-that's what you want. If you have the time, leave them overnight for deeper flavor.

Step 4: Wrap tightly in foil with a splash of liquid
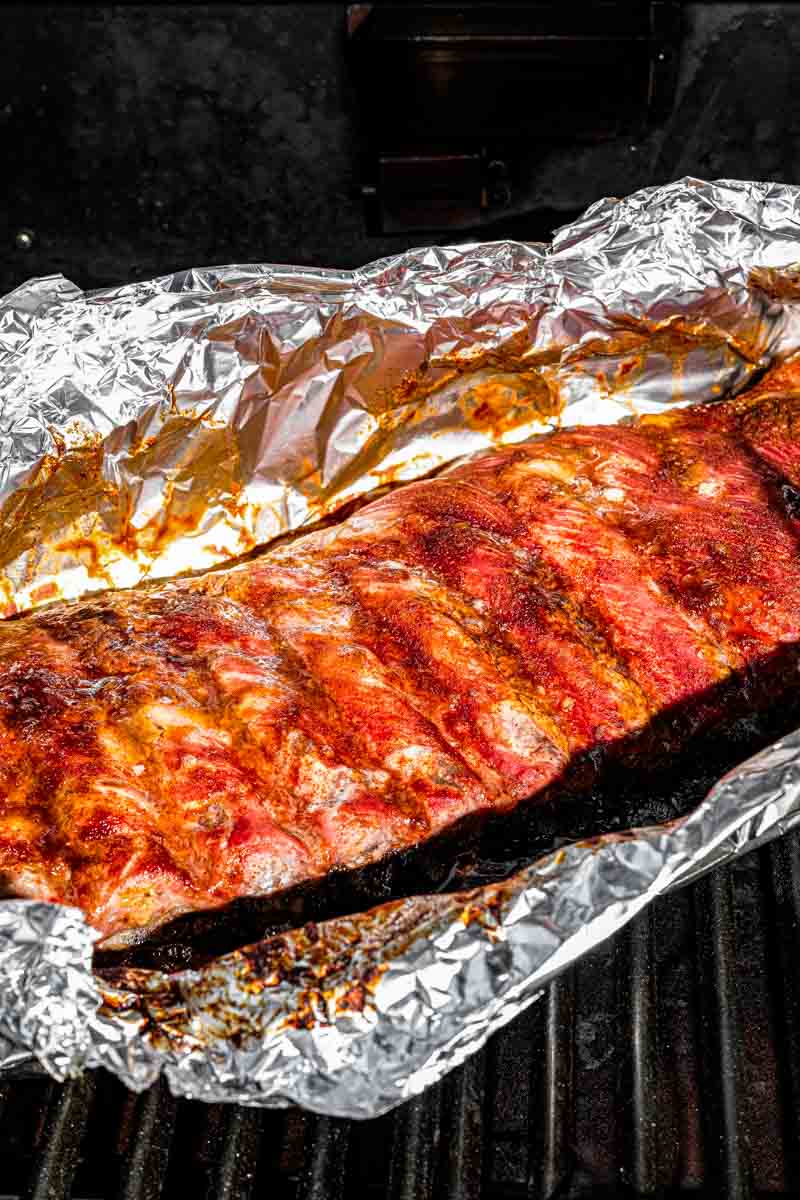
Tear off a large sheet of heavy-duty foil and place the ribs meat side up in the center. If using apple juice and Worcestershire sauce (or another liquid), pour a small splash around the ribs-not on top of the rub-so it can create steam inside the packet. Fold the foil tightly around the rack, sealing the edges well so no steam can easily escape; a snug packet is what makes the "steam" part of the method work.


Step 5: Set up the grill for steady, indirect heat
Preheat your grill to about 275°F using indirect heat: on a gas grill, turn on one or two burners and leave the others off, then place the ribs over the unlit side. Close the lid and give the grill at least 10-15 minutes to stabilize so you're not guessing on temperature. You're aiming for a calm, oven-like environment, not roaring flames.
Step 6: Slow-cook the ribs in foil
Place the foil-wrapped ribs over the indirect zone, close the lid, and cook for about 2 hours, flipping the packet once halfway through so both sides get even heat exposure. You don't need to peek; every time the lid opens, you lose heat and slow down the cook. At this stage, the ribs are steaming and gently breaking down-not browning yet-so patience here pays off later.
Step 7: Unwrap and check tenderness progress
After about 2 hours, carefully move the foil packet to a tray and open it away from your face-hot steam will rush out. The ribs should be noticeably more flexible, and the meat will have pulled back slightly from the bone ends, but they may not be fully tender yet. This is your chance to gently lift one end with tongs; if it bends easily but doesn't tear apart, you're ready for the grill finish.

Step 8: Move ribs to the grill and start saucing
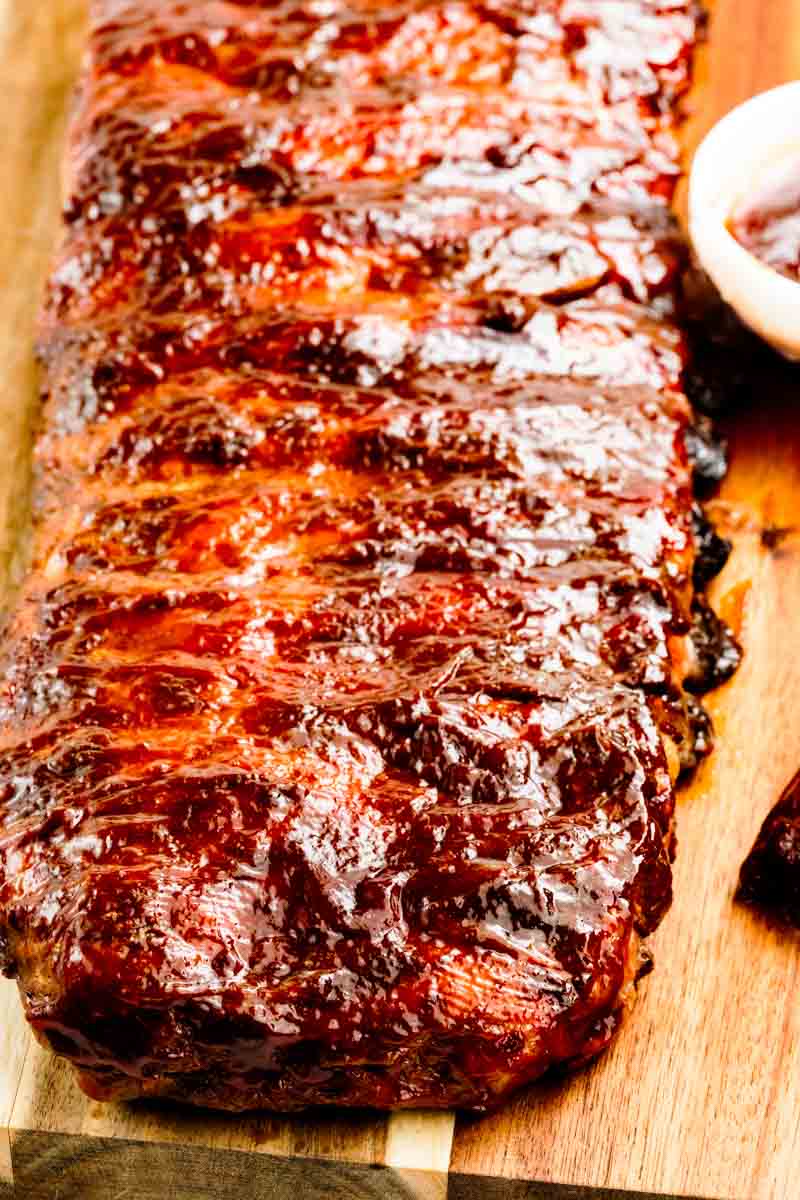
Turn the heat back to maintain around 275-300°F and lightly oil the grates if needed. Place the unwrapped ribs meat side up over indirect heat and brush on a thin layer of BBQ sauce. Keep the layer light at first; it's easier to build up a glossy finish with a few thin coats than to fix a thick, burnt one.
Step 9: Build bark and sauce in layers
Close the lid and cook for 30-45 minutes, brushing on more sauce every 10-15 minutes as it sets and thickens. Each time you open the lid, work quickly and close it again so the heat doesn't drop too much. You're looking for the sauce to darken slightly, lose its wet, shiny look, and cling tightly to the meat.
Step 10: Finish with a little bit of direct heat (optional)
If you want a little char, move the ribs briefly over direct heat for a minute or two per side, watching closely. This step is just to pick up some light caramelization and a few darker spots, not to blacken the whole rack. If you see sugar-heavy sauce starting to bubble aggressively or turn too dark, pull the ribs back to the indirect side or off the grill.

Step 11: Check doneness with bend test and temp
Lift the rack from the center with tongs; it should bend easily and show small cracks in the surface between the bones. If you use a thermometer, check between the bones in the thickest part-190-203°F is your target range. If the ribs feel stiff or read much below that, give them another 10-15 minutes over indirect heat and test again.
Step 12: Rest, slice, and serve
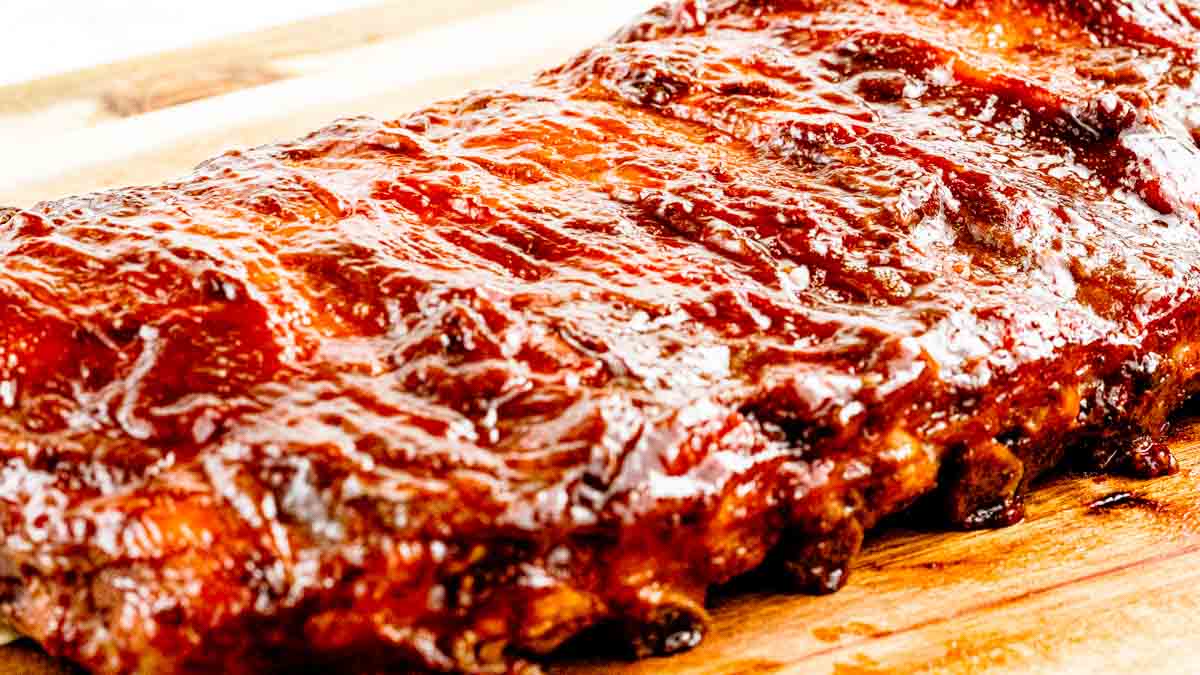
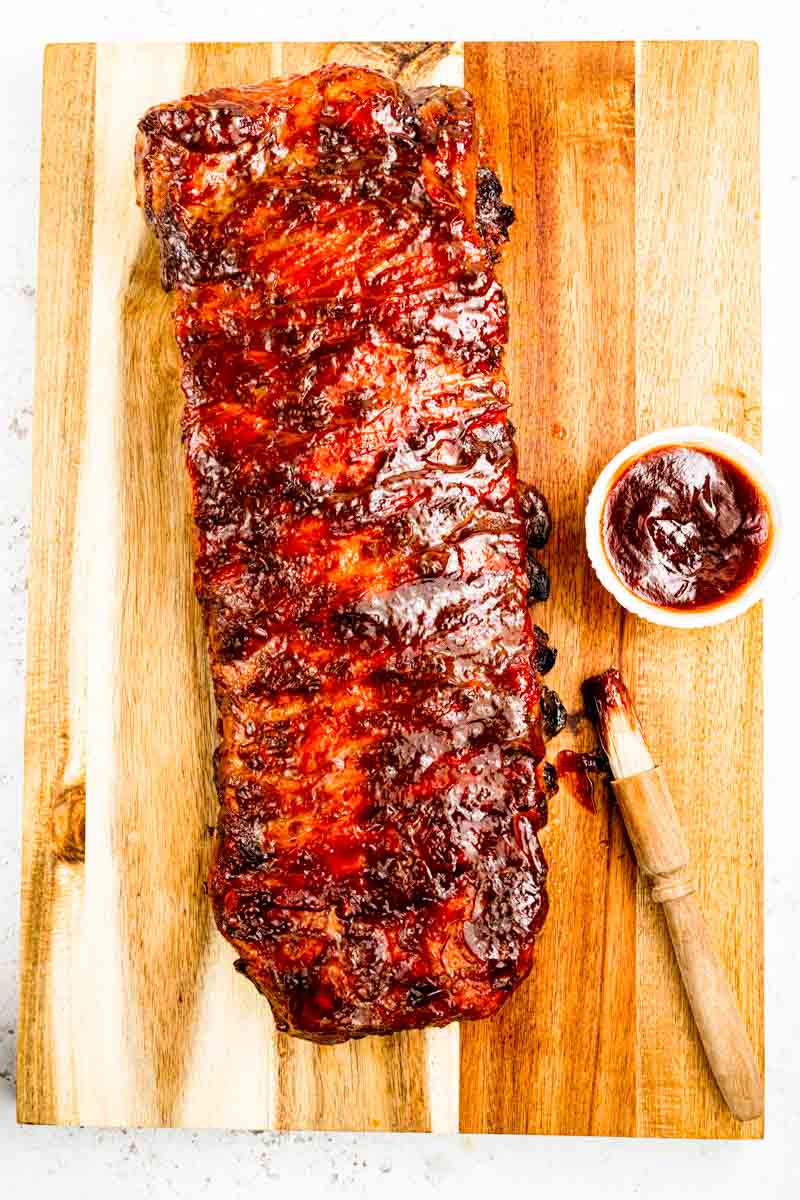
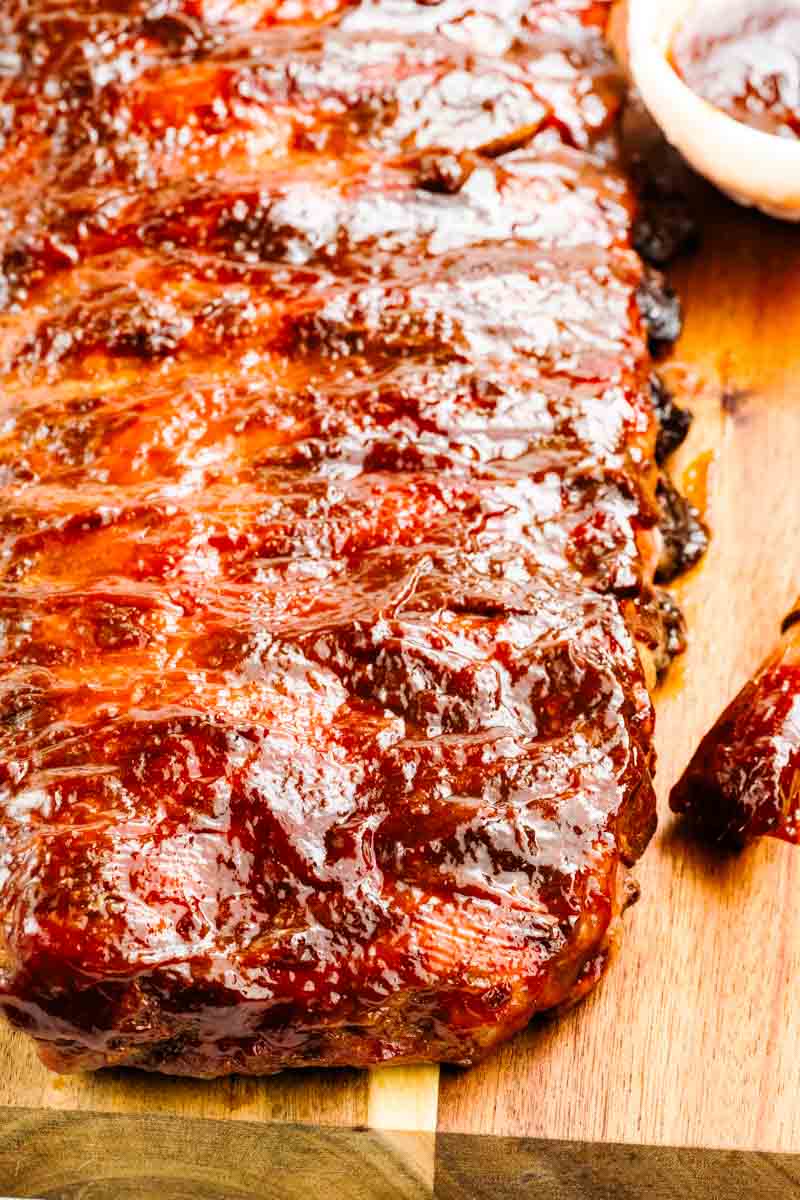
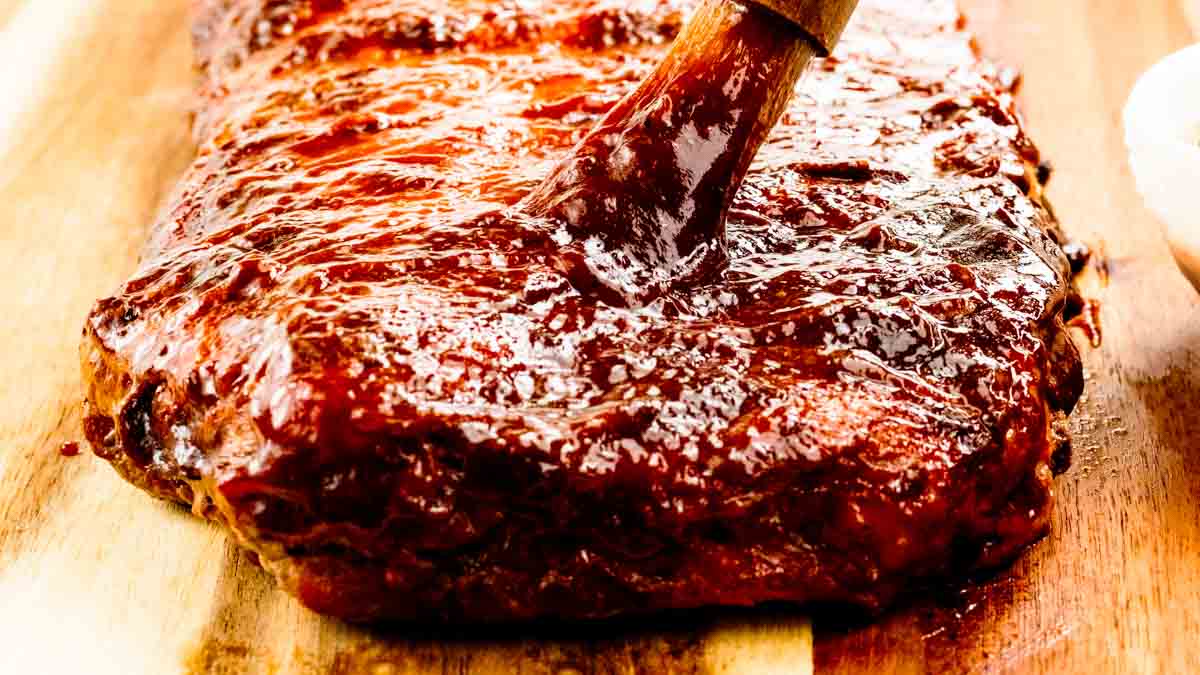
Transfer the ribs to a cutting board and let them rest for about 10 minutes so the juices settle back into the meat instead of running out on the board. Flip the rack meat side down so you can see the bones clearly, then slice between each bone with a sharp knife. Turn the slices meat side up, brush with a final light coat of sauce if you like, and serve with extra sauce on the side.

Grilled BBQ Ribs (Foolproof 2-Step Foil Method)
CLICK on STARS to REVIEW the RECIPE, then CLICK OK
Equipment
- Grill (gas or charcoal)
- Heavy Duty Aluminum Foil
- Instant-read thermometer (optional but helpful)
- Basting brush
- Tongs
Ingredients
- 3 lb. Pork baby back ribs or St. Louis-style ribs 1 rack (2-3 pounds)
- 3 tablespoons yellow mustard
- ¼ cup apple juice (optional, for wrapping)
- 2 tablespoons Worcestershire sauce (to sprinkle around the ribs)
For the Dry Rub
- ¼ cup brown sugar
- 1 tablespoon smoked paprika
- 1 tablespoon kosher salt
- 2 teaspoons black pepper
- 2 teaspoons garlic powder
- 1 teaspoon onion powder
- ½ teaspoon ground cumin
- ¼ teaspoon cayenne pepper (optional, for heat)
For Finishing
- 1½ cups BBQ sauce (store-bought or homemade)
Instructions
- Pat the ribs dry with paper towels, flip bone side up, and remove as much of the thin membrane as you can by loosening a corner with a butter knife and pulling it off with a paper towel.
- Spread a thin layer of yellow mustard over both sides of the ribs. Sprinkle the dry rub evenly all over, pressing it into the meat so it sticks and forms a solid coating.
- Place the seasoned ribs on a tray and refrigerate for at least 1 hour so the rub can start to penetrate the meat, or up to overnight for more flavor.
- Lay a large sheet of heavy-duty foil on the counter and place the ribs meat side up in the center. Add a small splash of apple juice and Worcestershire sauce around the ribs (if using), then wrap tightly, sealing the foil well to trap steam.
- Preheat your grill to about 275°F using indirect heat. On a gas grill, turn on one or two burners and place the ribs over the unlit side; close the lid and let the temperature stabilize.
- Set the foil-wrapped ribs over the indirect zone, close the lid, and cook for about 2 hours, turning the packet once halfway through to cook evenly.
- Carefully transfer the foil packet to a tray and open it away from your face. The ribs should be more flexible and the meat slightly pulled back from the bone ends; if they still feel very stiff, rewrap and cook 15-30 minutes longer.
- Adjust the grill to maintain 275-300°F. Place the unwrapped ribs meat side up over indirect heat and brush on a thin layer of BBQ sauce.
- Cook for 30-45 minutes over indirect heat, brushing with more sauce every 10-15 minutes until the sauce has thickened, darkened slightly, and clings to the meat.
- For a little char, move the ribs briefly over direct heat for 1-2 minutes per side, watching closely so the sauce does not burn.
- Check for doneness: lift the rack from the center with tongs; it should bend easily and show small cracks between the bones, or register about 190-203°F in the thickest meat between the bones.
- Transfer the ribs to a cutting board, rest for about 10 minutes, then slice between the bones into individual ribs and serve with extra BBQ sauce.
Notes
- For gas grills, always cook the ribs over indirect heat so they tenderize without drying out; the foil stage helps compensate for how quickly gas grills lose moisture.
- The bend test is your best doneness check: lift the rack from the center with tongs-if it bends easily and the surface cracks slightly between bones, the ribs are ready.
- Internal temperature is a helpful backup: aim for about 190-203°F in the thickest meat between the bones for tender ribs.
- Apply BBQ sauce only in the last 30-45 minutes; adding it too early, especially over direct heat, can cause the sugars to burn.
- Baby back ribs are smaller and cook a bit faster, while St. Louis-style ribs are meatier and more forgiving; adjust total cook time slightly based on the cut.
How to Tell When Ribs Are Done
The Bend Test
I've tested a lot of doneness methods over the years, and the bend test is the one I always come back to. It's the easiest way to tell if ribs are done, it's more reliable than a timer and works even if you don't have a thermometer handy. Pick up the rack with tongs from about the middle and let one end hang down; if the surface cracks slightly and the rack bends easily, you're in the right zone. If it stays stiff and doesn't flex much, it needs more time. If it starts to break apart and tear, it's gone a bit past ideal but will still be tender.
Internal Temperature (190-203°F)
If you like numbers, use a thermometer as a backup to the bend test. For tender ribs, you're aiming for about 190-203°F in the thickest meat between the bones. Below that, the collagen hasn't fully broken down and the ribs will be chewy; much above that and they can start to dry out. Slide the probe in from the side so you're measuring meat, not bone.
What Perfect Bark Looks Like
Good bark is more than just color. You're looking for a deep reddish-brown surface that looks set and slightly sticky, not wet or pasty. The sauce should cling in a thin, glossy layer that doesn't smear right off when you touch it with a finger. A bit of darkening or light char around the edges is fine, but if large areas are turning black, the heat is too high or the ribs have spent too long over direct flame.
Once you're comfortable with what perfect bark should look like, the next decision is which cut of pork you want to treat with this method. I break it all down pork tenderloin vs. chops vs. ribs vs. pork butt with timing, techniques, temps, and recipe ideas so you can match the cut to your schedule, your grill, and your crowd.

Common Mistakes and How to Fix Them
Why Ribs Turn Out Tough
Oh man, this was my biggest mistake when I first started making ribs. Tough ribs are almost always undercooked ribs. The meat may look done on the outside, but the collagen inside hasn't had enough time at a gentle heat to break down. Let the ribs stay at low temperature longer until they pass the bend test and hit that 190-203°F range. Rushing the cook or cranking the heat to "speed things up" usually gives you chewy meat instead of tender.
Why Ribs Dry Out on the Grill
Oops, I did it again! Yes, I've made this mistake more than once, usually when I'm rushing or trying to multi-task at the grill. Dry ribs usually come from too much direct heat and not enough protection. Cooking directly over the flames for a long time, skipping the foil stage, or letting the grill run too hot will drive moisture out of the meat. Keeping the ribs over indirect heat, using foil for the first part of the cook, and resisting the urge to constantly open the lid all help the ribs stay juicy. If you know your grill runs hot, dial the burners down a bit and give the ribs more time.
Why BBQ Sauce Burns
BBQ sauce burns because of the sugar. If you brush it on too early or leave sauced ribs over direct heat, the sugars darken quickly and can go from nicely caramelized to bitter and burnt. To avoid this, start saucing only in the last 30-45 minutes of cooking and keep the ribs over indirect heat while you build up layers. If you want a quick char at the end, move them briefly over direct heat and watch closely, pulling them off as soon as the sauce bubbles and picks up a little color.
Love the flavor of BBQ ribs but not always able to grill? My oven baked ribs (easy foil method) delivers fall-off-the-bone results indoors, and my Instant Pot country style ribs are the weeknight shortcut when you need tender, saucy BBQ pork in under an hour.
More Fall Apart Ribs Recipes You'll Love
Beer-Braised Smoked Baby Back Ribs
Instant Pot Country Style Ribs
Want to braise your ribs instead? Red Wine Braised Short Ribs are all about fall apart tender oven braised ribs and How to Braise Short Ribs in the Oven walks you through the entire process.


Mary Jo Mankowski says
Fairly simple recipe. Great directions. My family are rib lovers and loved the rub.
Olya Shepard says
Thank you so much, Mary Jo
Marina says
Made these yesterday. This is a never-fail recipe and it’s so easy. Rub and cook ribs right away or rub and refrigerate for a few hours.