Want steakhouse results without the smoke show or stress? The cold sear method starts with a cold pan and a cold steak, and still delivers a gorgeous crust and perfectly pink interior. Here's exactly how to do it, step by step.

If you've spent any time learning how to cook steak, you've probably been told the same thing over and over: start with a ripping-hot pan.
And usually, that's good advice.
But the cold sear method breaks that rule completely - and somehow still works beautifully. Instead of heating the pan first, you put a cold steak into a cold pan, turn on the heat, and flip the steak every couple of minutes as both the pan and the meat heat up together. It sounds wrong. It feels wrong. And then it gives you a steak with a gorgeous crust, surprisingly even doneness, and far less smoke than a traditional pan sear.
For home cooks who want steak without turning the kitchen into a smoke alarm audition, cold searing is a method worth knowing.
If you're brand new to stovetop steak in general, you may also want to bookmark How to Cook Steak Perfectly Every Time (Pan Sear Method) for the classic version. And if you're trying to decide whether cold sear, traditional sear, or reverse sear makes the most sense for your steak, pair this with your comparison post on cold sear vs. pan sear vs. reverse sear.
What Is the Cold Sear Steak Method?
Cold searing means starting with:
- A cold steak, straight from the refrigerator
- A cold pan, not preheated
- Frequent flipping, usually every 1-2 minutes
- Moderate rendered fat instead of a big slick of smoking oil
The idea is simple: instead of blasting one side of the steak with intense heat from the start, you let the steak and pan heat gradually together. That slower ramp-up gives the inside of the steak time to warm more evenly before the crust gets too far ahead. The result is often less of that thick grey overcooked band you get with aggressive traditional searing - especially on moderately thick steaks.
Think of it as the calm, controlled cousin of a hard pan sear. Not as textbook. Not as dramatic. But very effective.
Why Cold Sear Works
The genius of cold sear is that it solves one of the biggest problems in steak cooking: the outside and inside often don't want to cooperate.
With a traditional pan sear, the pan is blazing hot from the start. That builds crust fast, which is great - but the outer layers of the steak also overcook quickly while the center races to catch up. That's why thick steaks often develop a dark crust, a grey ring, and then a narrow pink center.
Cold sear softens that contrast.
Because the pan starts cold, the meat heats more gradually. Because you flip frequently, neither side gets hammered continuously. And because the steak renders fat as it cooks, it creates its own cooking medium in the pan. It's not magic. It's just gentler heat management.
If you love the science side of steak, this method sits somewhere between the logic of a classic sear and the more gradual temperature control of reverse searing - but without the oven.
Best Steaks for Cold Searing
Cold sear is not the method for every cut.
It works best with steaks that have enough fat to render and enough thickness to benefit from slower heat buildup. Good candidates include:
- Ribeye
- New York strip
- Boneless strip steak
- Well-marbled sirloin
- Wagyu-style steaks
It's less ideal for super-thin steaks or very lean cuts that don't bring much fat to the pan. For a bigger-picture look at which steaks do best in a skillet overall, see Best Cuts of Steak for Pan Searing.
If you're deciding what to test this on first, a ribeye or strip is your safest bet. A lean flank steak, on the other hand, is better saved for something fast and bold like Chimichurri Marinated Flank Steak.
What You'll Need
You do not need much here, which is part of the appeal.
- 1 steak, about 1 to 1½ inches thick
- Kosher salt
- Black pepper
- A cold skillet, preferably nonstick or a very well-seasoned pan
- Tongs
- Instant-read thermometer
- Butter, garlic, and herbs if you want to finish it that way
A thermometer matters. Cold sear is forgiving, but it is still steak. Guessing is how expensive beef becomes a lesson.
If you need a quick reference for exactly when to pull your steak, keep Steak Doneness Temperatures open in another tab.
Step 1: Start With a Cold Steak
This is one of the rare methods where pulling the steak out early is not the goal.
Take your steak directly from the fridge, pat it very dry with paper towels, and season it generously with kosher salt and black pepper. You can season it right before cooking, or dry brine it earlier in the day if you want even better flavor and surface drying.
A dry surface still matters here. Even though the pan starts cold, moisture is still the enemy of crust.
If you already use dry brining in your traditional steak recipes like Peppercorn Steak or Steak Diane, the same principle applies here: dry steak equals better browning.
Step 2: Put the Steak in a Cold Pan
No oil. No preheating. No waiting for the pan to shimmer.
Place the seasoned steak directly into a cold skillet and set the pan over high heat. Yes, high. The pan is starting from zero, so the heat needs to build. As the steak begins to sizzle and render fat, you'll start to see the method make sense.
If your steak is especially lean, you can add the thinnest film of neutral oil, but with ribeye or strip, you usually don't need it.
This is one reason cold sear can feel less chaotic than the classic method in How to Cook Steak Perfectly Every Time (Pan Sear Method) - you're not committing to a smoking-hot pan from second one.
Step 3: Flip Every 2 Minutes
This is the key to the whole method.
Instead of leaving the steak untouched for a long sear, flip it every 1-2 minutes. That frequent flipping helps each side brown without overcooking too deeply. It also keeps the heat distribution more even, which is what gives cold sear its reputation for a more evenly cooked center.
As the pan heats and the steak releases fat, you'll notice the browning becoming more aggressive. At that point, reduce the heat slightly to medium or medium-low, depending on your stove. You want steady browning, not scorched bitterness.
This is not a "walk away and answer emails" method. But it is a very manageable, low-stress one. You're actively guiding the steak rather than trying to recover from an overheated pan.
Step 4: Baste, If You Want Extra Flavor
Once the steak is close to done and has developed a solid crust, you can add a tablespoon or two of butter along with smashed garlic cloves and a sprig of thyme or rosemary.
Tilt the pan and spoon the butter over the steak for the final minute or two. This is optional, but highly encouraged if you want steakhouse energy.
And if you end up with browned bits and buttery drippings in the pan, that is your invitation to make a sauce. Pan Sauces 101 is the perfect next move here, especially if you want to turn a simple cold-seared steak into something a little more dramatic.
If saucy steak is your love language, this is also where recipes like Steak Diane and Peppercorn Steak become natural follow-ups once you've mastered the method.
Step 5: Pull by Temperature, Not by Time
Cold sear timing varies depending on steak thickness, fat content, pan type, and how aggressive your stove runs. That means internal temperature matters more than the clock.
A good rule of thumb:
- Rare: pull at 115-120°F
- Medium-rare: pull at 120-125°F
- Medium: pull at 130-135°F
- Medium-well: pull at 140°F
The steak will continue rising a few degrees as it rests, so don't wait until it reaches the final number in the pan.
For the full doneness guide, use Steak Doneness Temperatures so you can stop second-guessing yourself and start cooking steak with actual confidence.
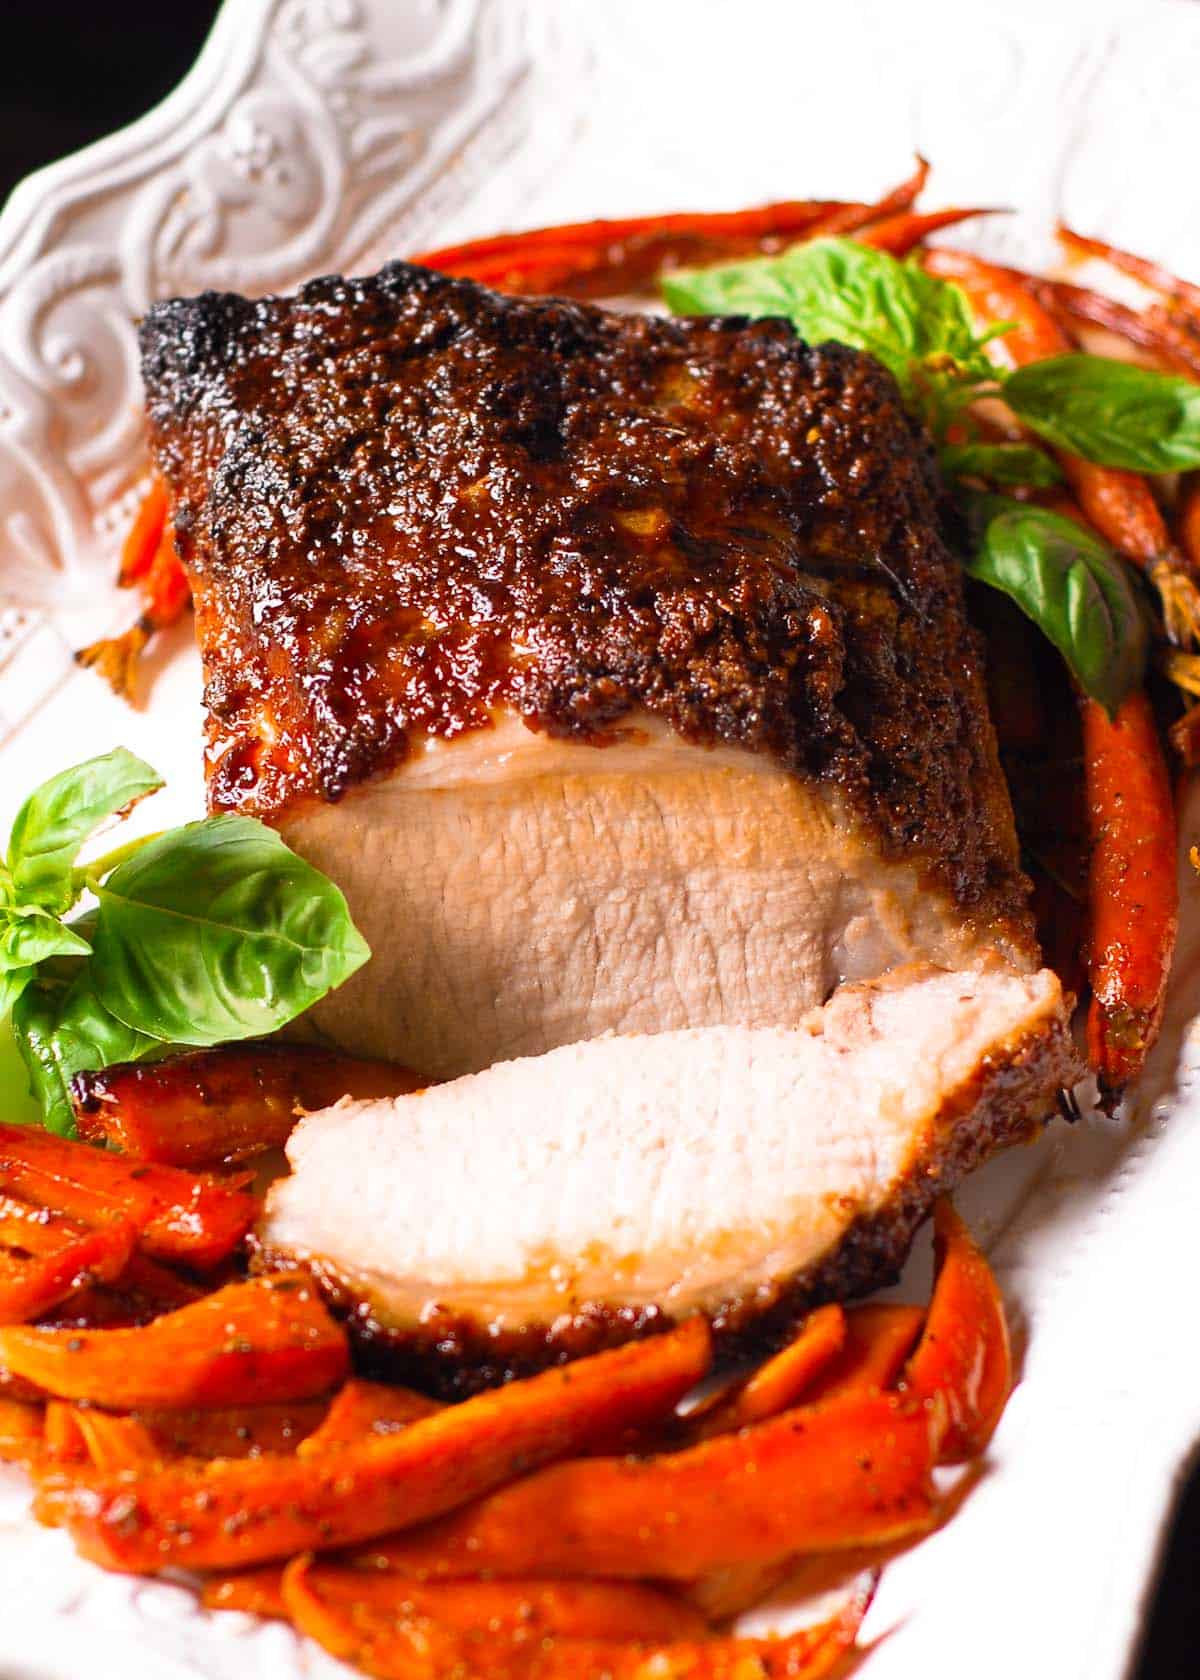
Step 6: Rest, Then Slice
Once the steak comes out of the pan, let it rest for 5-10 minutes before slicing.
Yes, even if you are hungry. Yes, even if it smells outrageous.
Resting lets the juices redistribute so they stay in the steak instead of running all over the cutting board. If you're serving the steak whole, rest and plate. If you're slicing it for salads, bowls, or steak dinners, slice against the grain.
Then build a meal around it. If you want ideas beyond "steak plus whatever is in the fridge," Steak Dinner Recipes is the obvious next stop.
Cold Sear vs. Pan Sear vs. Reverse Sear
Cold sear is excellent - but it isn't the universal winner.
Here's the simplest way to think about it:
- Traditional pan sear is best when you want a fast, classic crust on a steak around 1 inch thick. See How to Cook Steak Perfectly Every Time (Pan Sear Method).
- Reverse sear is best when your steak is very thick and you want edge-to-edge pink. See Why Reverse Searing Is Actually Brilliant - and When It's Not Worth It.
- Cold sear is best when you want a lower-smoke stovetop method with more gradual, forgiving heat and very good results on medium-thick steaks.
If you want the full side-by-side breakdown, this article pairs naturally with your subpillar comparing all three methods.
Common Cold Sear Mistakes
Using a steak that's too thin: A super-thin steak cooks too quickly for the gradual heat buildup to matter. You'll miss the whole benefit of the method.
Not drying the steak first: Cold pan does not mean wet steak. Moisture still prevents crust.
Forgetting to flip frequently: Frequent flipping is what makes this work. If you leave it sitting too long on one side, you're just doing a delayed traditional sear.
Keeping the heat too high for too long: Once browning gets going, reduce the heat. Cold sear should build momentum, not spiral into burning.
What to Make Once You've Learned It: Once you get comfortable with cold searing, it opens up a lot of possibilities across your steak content.
Steak Recipes for Cold Sear Method
- Sirloin Steak for a more budget-friendly cut
- Peppercorn Steak if they want a restaurant-style sauce
- Steak Diane for a classic pan-sauce finish
- Garlic Butter Steak Bites for a quicker, more casual variation
- Chimichurri Marinated Flank Steak when they want something bright, herby, and grill-adjacent
Frequently Asked Questions
Can you really start steak in a cold pan? Yes. That's the entire method. The steak and pan heat up together, which helps the interior cook more gradually while still allowing the outside to brown.
Is cold sear better than reverse sear? Not necessarily better - just different. Reverse sear is still the best move for very thick steaks when precision matters most. Cold sear is faster, easier, and fully stovetop.
Is cold sear better than traditional pan sear? For some cooks, yes. It creates less smoke, is easier to control, and can reduce the grey band. But if you want the fastest, hardest crust possible, classic pan sear still has a strong case.
What pan is best for cold sear steak? A nonstick skillet or very well-seasoned pan works best because you are starting cold and flipping often. If using cast iron, make sure it's well seasoned and be ready to manage heat carefully.
What steak is best for cold sear? Ribeye and New York strip are ideal because they have enough fat to render and enough thickness to benefit from slower heat buildup.
More steak resources you might like
If you want to go deeper on steak beyond this recipe, here are some of my favorite guides:
- How to Cook Steak: Complete Guide to Cuts, Doneness, and Methods - Best cuts, pan vs. grill, reverse sear basics, and a doneness temperature chart for every level.
- What Is Black Angus Beef? A Cook's Guide to Better Steak - What "Angus" actually means, and how to shop smarter for better flavor and texture.
- 5 Common Steak-Cooking Mistakes - The biggest pitfalls that ruin otherwise great steak-and how this recipe quietly avoids all of them.
- How to Cook Sirloin Steak (Pan-Seared, Juicy Every Time) - My go-to method for thick sirloin: hard sear, juicy center, pan sauce in the same skillet.
- Reverse Sear Steak Method: How to Cook Any Thick Cut Perfectly - The technique I use for extra-thick cuts that need gentle heat first, crust second.
- How to Cook Steak Perfectly Every Time on the Stove Top (Pan-Sear Method) - A full walkthrough of the stove-top pan-sear from start to finish.
- What to Use NY Strip Steak For: 7 Ways to Cook This Cut - Ideas for getting more mileage out of NY strip, from weeknight dinners to "company's coming" meals.


Comments
No Comments